Pillar Page: Waterproofing & Renovation Solutions
What Is Waterproofing Renovation? A Simple Guide for Property Owners
Waterproofing renovation means repairing old surfaces, priming, and adding a new waterproof or protective layer—without always demolishing what’s there. For property owners, this process brings peace of mind by preventing water leaks, mold, and costly repairs in the future. In this simple guide, we’ll cover what waterproofing renovation is, common problems for six typical areas, and how to decide if you need a complete overhaul or you can upgrade without messy demolition.
Understanding Waterproofing Renovation: Simple Definition
At its core, waterproofing renovation is a three-step process:
- Repair the base layer (fix cracks, fill gaps, prep surface)
- Apply a suitable primer (ensures strong adhesion and helps manage moisture)
- Add a waterproof layer or protective coating (the surface you see, which shields against water and chemicals)
In Chinese, you might hear: “修补基层 + 底涂 + 防水/保护面层.” This approach focuses on longevity and safety.
Where Does Waterproofing Renovation Apply? The Six Key Areas
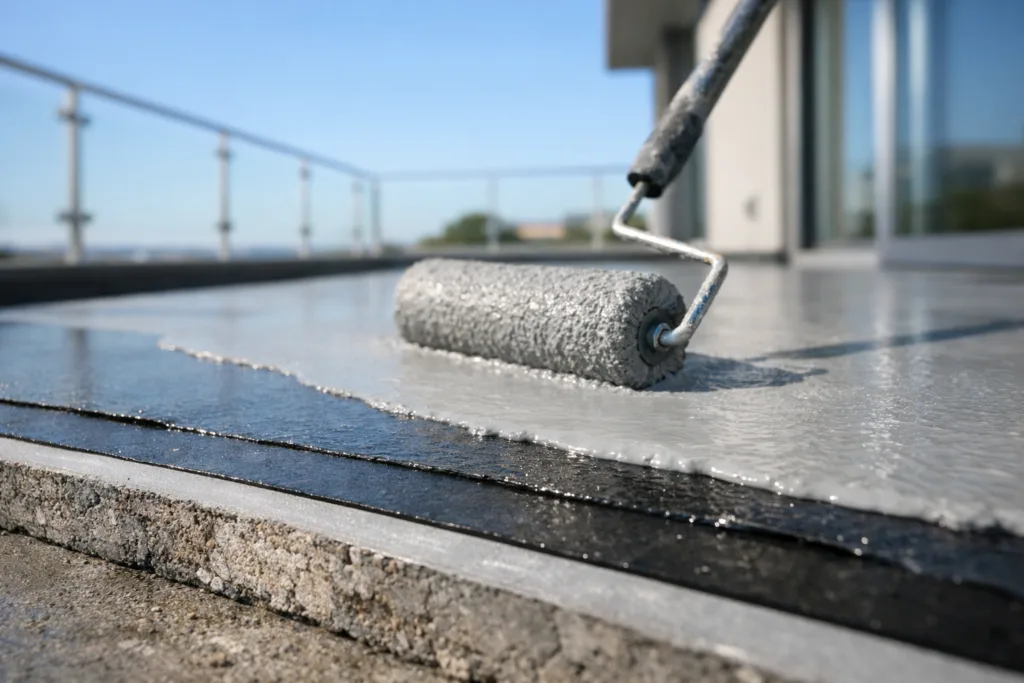
Balcony (Terrace) Renovation
Common Problem: Water stains, blistering paint, or tile popping up due to rain penetration.
Basic Solution: Repair cracks, use a compatible primer, and apply a strong outdoor waterproofing membrane or coating. For more about terraces and outdoor areas, explore our dedicate terrace balcony outdoor floor resource.
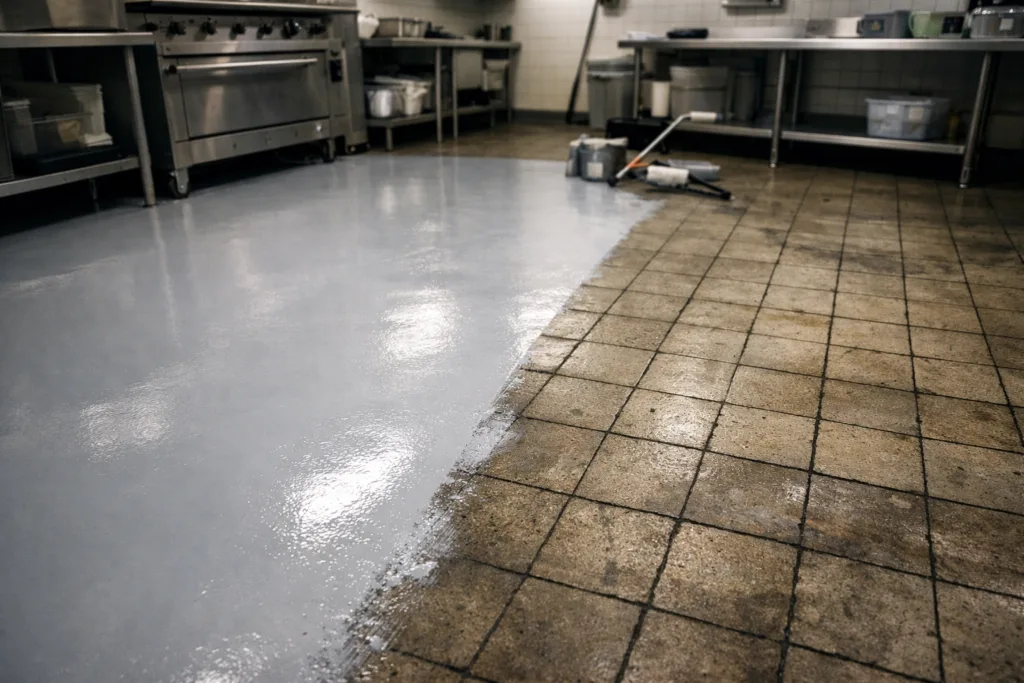
Kitchen & Bathroom Tile Waterproofing
Common Problem: Leaks beneath tiles, mold along grout lines, or unpleasant odors in wet areas.
Basic Solution: Clean and re-grout joints, repair hollow spots or cracks, apply primer (especially if re-tiling), and seal with a water-resistant coating. Our kitchen bathroom tile waterproofing guide covers this in detail.
Floor Waterproofing & Renovation
Common Problem: Dampness on basement or ground floors, chipped coatings, or persistent stains.
Basic Solution: Patch damaged substrate, apply a suitable primer matched to floor type, then finish with a dedicated waterproof topcoat. Discover more in our floor renovation solutions hub.
Swimming Pool Waterproofing
Common Problem: Water loss, recurring algae, cracks, or efflorescence (white powdery residue).
Basic Solution: Fill cracks with repair mortar, prime the surface, and add a pool-rated waterproof barrier. Our swimming pool waterproofing resources dive into the specifics.
Exterior Wall Renovation
Common Problem: Peeling paint, wet patches, or green mold running down outside walls after rainstorms.
Basic Solution: Remove loose layers, repair and smooth out defects, apply weather-resistant primer, and finish with a durable waterproof coating. Visit our exterior wall renovation page for more.
Court Yard Stone Flooring
Common Problem: Stone surface absorbs water, grows moss, or develops white stains on top.
Basic Solution: Deep-clean, fill any joints or cracks, prime, and use a stone-compatible waterproof sealant or resin. For more on this topic, see our guide to courtyard stone flooring.
Waterproof Renovation Meaning: Explained in Real-World Terms
People often ask, “Does waterproofing renovation mean you always need to tear everything up?” Not necessarily. The key is whether the underlying (base) layer is sound or broken.
“Waterproof renovation” really means picking the right upgrade approach. Sometimes, you can restore waterproofing by cleaning, repairing, priming, and recoating over the old layer—no messy demolition needed. But sometimes, you must strip away everything if the base is rotten or severely damaged. Let’s see how to decide.
When Can You Renovate Without Demolition?
- The base is solid (no hollow sound, no widespread soft spots)
- Cracks are hairline (<2 mm) and not structural
- No ongoing leak from inside walls or plumbing
- Surfaces aren’t oily or covered with sticky residue
- You only want to upgrade performance or refresh visuals
If most of these apply, you likely can avoid demolition. Clean and fix, then prime and coat. This is faster, cheaper, and less disruptive.
When Must You Demolish for a Full Waterproofing Overhaul?
- The substrate sounds hollow when tapped, or feels soft
- Large cracks (>3 mm), bulges, or movement in the floor/wall
- Severe mold, deep water stains, or “black” leakage lines
- Pervasive old waterproof layer failure (peeling everywhere)
- Hidden leaks in piping/supply lines that can’t be stopped from the surface
When these issues exist, remove everything, fix the base, and rebuild the system step-by-step.
Step-by-Step Guide: The Basic Waterproofing Renovation Workflow
- Diagnose the cause: don’t just treat symptoms—find leaks, check slopes, test for “hollow” areas
- Repair core base: fill cracks, patch divots, smooth joints, grind or scrape as needed
- Apply primer: usually epoxy, polyurethane, or acrylic, depending on surface and environment
- Lay waterproof/protection layer: trowel, roll, or spray—match the method to your zone
- Finish with sealant or wear-resistant top coat if exposure is heavy (sun, pool chemicals, vehicle wheels, etc.)
For more advanced waterproofing renovation solutions, visit our pillar resource: waterproofing renovation solutions.
Choosing the Right Coatings and Systems for Each Area
| Area | Typical Coating System | Notes |
|---|---|---|
| Balcony/Terrace | Flexible 2K Polyurea/Polyaspartic | Handles movement/temperature |
| Kitchen/Bathroom | Epoxy Primer + Waterproof Topcoat | Resists chemicals, easy to clean |
| Flooring | Epoxy or Polyaspartic Floor Coat | Choose slip-resistance, wear rating as needed |
| Swimming Pool | Tough Epoxy or Polyurethane System | Chlorine, UV and submersion resistant |
| Exterior Wall | High-Elasticity Acrylic or Polyaspartic | Breathable, fade-resistant |
| Courtyard Stone | Penetrating Stone Sealer or Resin | Maintains stone look, easy clean |
Common Causes of Waterproofing Failures
- Improper surface preparation (oil, dust, moisture not removed)
- Wrong primer or coating type for the surface
- Poor bonding (skipped primer, wrong mix ratio, no sanding/scuffing)
- Ignoring expansion joints or building movement
- Lack of ongoing maintenance or inspection
How to Check Base Layer Condition Before Renovating
Tap the surface—if you hear a “hollow” sound, it may need serious repair. Check for spreading cracks, surface softness, or large stains. For wall and pool areas, check if water seeps through from behind (inward leaks) as these require extra steps. Sometimes, moisture meters or dye-tests help spot hidden wet spots. Thorough inspection guides your decision: quick refresh or full rebuild?
Material Types Used in Waterproofing Renovation
- Epoxy-based: Great for strong bonds on concrete, tile, and stone; durable and chemical-resistant
- Polyaspartic/Polyurea: Flexible, fast-curing, ideal for temperature changes or vibration
- Acrylic: Affordable, easy to apply, best for walls needing “breathable” coats
- PU/PUR: High elasticity, bridges small cracks, good for outdoor areas
- Penetrating Sealers: Soak into stone/concrete, invisible protection and easy maintenance
Practical On-Site Advice from ZDSpoxy: Making Renovations Fail-Proof
ZDSpoxy specialists always stress batch consistency and strict mixing ratios—especially with epoxy and polyaspartic systems. Viscosity and gel time matter: if it’s too hot, setting happens fast; too cold, and you risk poor bonding. Proper use of moisture meters, grinding away stubborn residue, and spot priming are keys to success. On site, controlling air humidity and dust (using plastic sheeting) keeps defects away.
For large sites or high-stress areas, test bond strength on a small sample before full application. Log batch numbers and inspect viscosity each day for industrial-scale projects—a “small” material change can hugely affect results. Don’t rush! Proper cure time means a lasting result.
When to Upgrade: Signs You Need Waterproofing Renovation
- Water stains appear even after cleaning
- Pools lose water weekly
- Floors feel damp or slippery with no clear cause
- Mold keeps returning despite regular maintenance
- Tiles, paint, or grout keep falling apart
Waterproofing Renovation vs. Regular Surface Repairs—What’s the Difference?

Waterproofing renovation is far more than a quick “patch and paint.” Standard surface repairs only improve the look—true renovation blocks water entry and future mold by repairing the base and finishing with a tough barrier layer. The right renovation system can double or triple the lifespan of floors, pools, tiles, and walls.
Frequently Asked Questions
What is waterproofing renovation in simple terms?
Waterproofing renovation means repairing the base, priming, and protecting surfaces with a waterproof layer to block leaks and keep areas dry—often without full demolition.
Is waterproof renovation always necessary when I see stains or mold?
No, but persistent stains and mold often mean water is entering from behind the surface. A renovation is wise if basic cleaning and repairs do not solve the problem.
Can I waterproof over old tiles, or must I remove them?
If tiles are solid and the base is sound (no hollows, movement, or severe cracks), most waterproofing systems allow direct overlay after proper cleaning and priming.
What’s the difference between a primer and a waterproof coating?
A primer soaks into and stabilizes the surface for strong bonding, while a waterproof coating forms the outer barrier against water, chemicals, or UV exposure.
How long does waterproofing renovation last?
On average, 8–15 years depending on system type, exposure, preparation, and whether regular inspections and touch-ups are done. Heavy-wear areas may need more frequent renewal.
What is the most important step to avoid renovation failure?
Surface preparation and correct primer use are critical—most failures happen when oil, dust, or moisture are not fully removed, or primers are skipped.
Related Reading
- How to Refresh Interior Walls Without Demolition: Smart Renos
- Wood Floor Renovation: Proven Tips for Long-Lasting Surface Protection
- Unlock Stunning Courtyards with Modern Resin Bound Stone Systems
- Multi-Functional Polyurethane Paste: Seal Walls Easily in Wet and Dry Areas
- Stronger Floors Instantly: Upgrade Your Base with High Performance Epoxy Primer