Understanding Waterproofing Failure Causes and Coating Peeling Reasons
Waterproofing is the foundation for durable, resilient surfaces, from balconies and terraces to kitchens, bathrooms, and exterior walls. However, many owners and contractors encounter familiar failures that leave surfaces vulnerable. This article dives deep into the most frequent waterproofing failure causes and coating peeling reasons, such as peeling, blistering, whitening (efflorescence), cracking, chalking, and moisture rebound. We outline quick onsite diagnostics and the actionable repair pathways for every failure type. Most importantly, we’ll highlight how proper surface preparation and primer selection are at the root of lasting protection and why ignoring these steps leads to failure.
What Are the Signs of Waterproofing Failure?
Before we break down each phenomenon, let’s clarify the most telling warning signs. Typical waterproofing failures present as one (or more) of the following:
- Coating peeling or flaking off
- Blisters, bubbles, or voids under the membrane
- White haze, streaks, or salt blooms (whitening/efflorescence)
- Visible cracks, spiderwebbing
- Powdery surfaces (chalking, sugaring)
- Rebound moisture or visible damp spots
Each issue signals a breakdown in the waterproofing system, often hinting at what went wrong in the background. Pinpointing the root cause is essential for choosing the right fix and ensuring the problem doesn’t return after repair work.
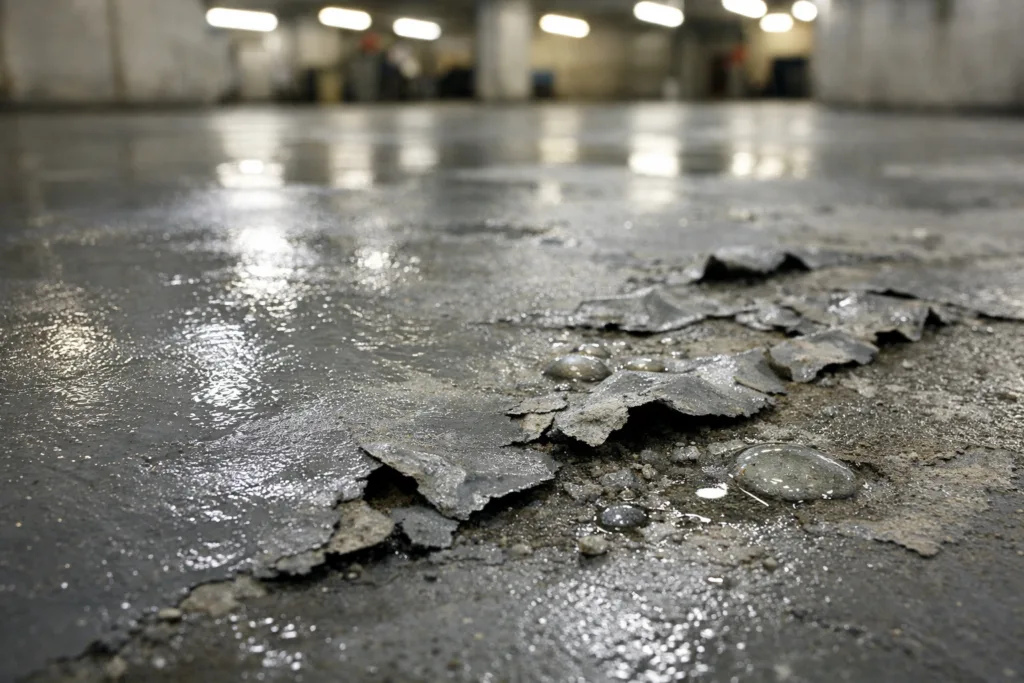
Coating Peeling: Most Common Causes
Top 3 Causes of Peeling
- Poor surface cleaning: Dust, oil, laitance, or previous coatings left unremoved block new coating adhesion.
- Incorrect or missing primer: Skipping the right primer or using a mismatched type means the waterproofing resin can’t properly bond to the substrate. For example, some primers are designed for concrete, others for tiles or wood.
- Moisture or outgassing: Trapped moisture below the surface or vapor pressure during curing causes the membrane to lose grip and peel away.
Quick Onsite Checklist
- Scrape test: Does the coating delaminate in sheets or chips easily?
- Check substrate: Look for oil stains, chalk, or residue under the peeled area.
- Moisture test: Use a plastic sheet or electronic meter to check for dampness.
Correct Repair Path (Light/Heavy)
- Light repair: Sand and remove all loose coating, clean, then reapply a compatible primer and topcoat.
- Heavy repair: Shot-blast or grind to bare substrate. Perform full substrate remediation, moisture test, apply correct primer, then install a new system. In terrace & balcony renovations, systems like those found in the terrace balcony outdoor floor guide are excellent references for heavy-duty repair sequencing.
Blistering and Bubbles: Characteristic Failure Patterns
Top 3 Causes of Blistering
- Substrate moisture outgassing: Rising vapor during initial cure forms bubbles under the membrane.
- Solvent entrapment: Rapid overcoating, thick films, or humidity cause solvents to become trapped, expanding as the membrane cures.
- Poor mixing or application method: Incomplete resin mixing, air entrapment, or too-quick application can introduce voids or bubbles.
Rapid Onsite Fault Finding
- Cut a section: Are the blisters water-filled, air-filled, or empty?
- Moisture probe: Is the substrate damp below a blister?
Correct Repair Path (Light/Heavy)
- Light repair: Drain and patch isolated blisters, sand feather edges, re-prime, and re-topcoat locally.
- Heavy repair: Remove all blistered material, assess moisture, improve substrate dry-out, and install a new build-up from a primer like waterproofing renovation solutions—matched to substrate moisture tolerance—then topcoat.
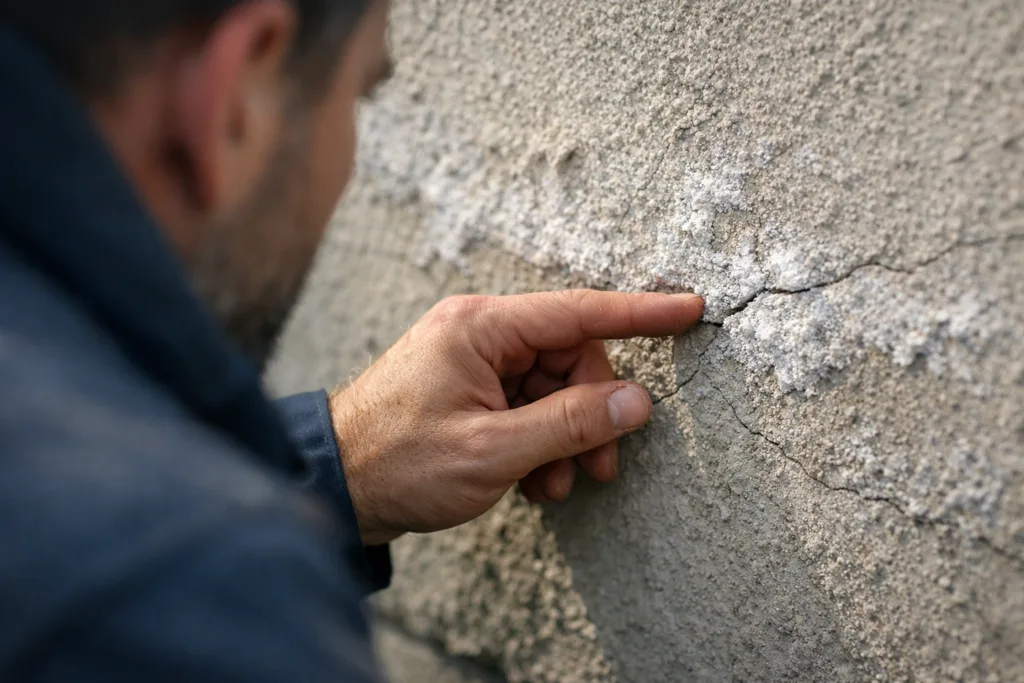
Whitening (Efflorescence): Troubleshooting the White Haze
Top 3 Causes of Whitening
- Water migration: Moisture carrying salts to the surface, often because the waterproofing membrane lets water pass through instead of blocking it.
- Overwatering during cleaning or rain exposure before cure: Too much water washes unreacted chemicals to the surface, leaving milky or chalky streaks.
- Incorrect resin ratios or poor mixing: Too much hardener or resin causes incomplete cure, making the system cloudy.
Quick Field Diagnostics
- Rub surface: Does the white mark wipe away or dissolve with diluted vinegar?
- Probe membrane: Is the film soft, tacky, or hard?
Repair Route (Light/Heavy)
- Light fix: Buff off surface staining, ensure moisture is controlled, then recoat if overall bond and cure are sound.
- Heavy fix: Remove membrane, fully investigate underlying leaks or vapor drive, fix the source, upgrade to a system with high salt and moisture resistance. For applications such as kitchen or bathroom tile waterproofing, always select materials proven for high-humidity areas.
Cracking: How and Why Membranes Fracture
Top 3 Causes of Cracking
- Substrate movement or settlement: Cracks form if the slab, wall, or base flexes but the membrane does not stretch, especially at joints or cold seams.
- Incorrect film thickness or lack of reinforcement: Applying resin too thin (or too thick) means stress is not distributed properly. Skipping mesh or fabric overlays at joints leads to direct membrane splitting.
- Thermal shock or rapid temperature swings: Exposed surfaces can expand/contract, stressing the waterproofing over time.
Field Checkup Steps
- Trace crack: Does it align with substrate joints? Run full-length or stop at stress points?
- Flex test: Is the membrane brittle, rubbery, or cohesive at the edge?
Critical Repair Actions (Light/Heavy)
- Light fix: Rout out cracks, clean, fill with a compatible flexible resin, overcoat with mesh-reinforced topcoat.
- Heavy fix: Cut out large areas, check for substrate movement, reinforce joints with banding or a specialized exterior wall renovation approach, then reinstall a flexible, movement-accommodating system.
Chalking and Powdering: The Sugary Disaster
Top 3 Causes of Chalking
- UV degradation of unprotected resins: Sunlight breaks down exposed waterproofing not designed for outdoors.
- Poor curing conditions: Too cold, damp, or humid environments slow or interrupt full resin development, leaving powdery residue.
- Incompatible chemical exposure: Harsh cleaning agents, salts, or alkalis attack the surface and turn it to powder.
Fast Site Diagnosis for Chalking
- Wipe test: Does residue come off easily onto your hand or rag?
- Observe color: Is the underlying color faded/bleached?
Repair Sequence (Light/Heavy)
- Light remedy: Abrade surface, remove debris, and apply a UV-resistant topcoat (for sunny outdoor or courtyard stone projects, see resin improvements similar to those in courtyard stone flooring technologies).
- Heavy remedy: Strip degraded layer, test base for chemistry/interactions, and overhaul with a UV-stable, chemical-resistant membrane system.
Moisture and Seepage Recurrence (Rebound Damp)
Top 3 Causes of Rebound Damp
- Poor primer sealing: Weak, patchy, or pinholed base coats allow moisture to rise and defeat the system.
- High substrate moisture content at install: Waterproofing over a wet substrate locks in water, which escapes later as the resin ages.
- Membrane voids, missed corners, or cold joints: Tiny breaks in detailing let water pass through and accumulate under the finish.
Site Investigation Checklist
- Check for high humidity or damp after rain or cleaning cycles.
- Test for continuity in membrane, especially at perimeter and wall intersections.
Repair Plan (Light/Heavy)
- Light fix: Dry substrate thoroughly, patch and reinforce weak spots, and apply a highly moisture-tolerant resin topcoat.
- Heavy fix: Remove failed system, allow substrate full dry-out, re-prime with a deep-penetrating, solvent-free primer, then upgrade to a closed-pore, thick-membrane waterproofing system.
Why Most Waterproofing Failure Causes Trace Back to Preparation and Primer Matching
Across every defect type discussed—peeling, blistering, whitening, cracking, chalking, and rebound moisture—the overwhelming common factor is either poor surface preparation or a mismatch between the substrate, primer, and membrane. Floors that haven’t been degreased, walls contaminated with efflorescence, or even old tiles skipped over without the correct primer are all at risk. Correct system design is especially important when transitioning between different substrate types, such as concrete, tile, or masonry block.
ZDSpoxy’s technical teams frequently encounter these exact preventable issues during renovation projects. Consistent field successes show that discipline in inspection, full-bond testing, and matching primers to the substrate’s unique chemistry and moisture profile vastly outperforms any shortcut. Failures usually only show up months—or even years—later, well after the initial install work is long forgotten.
Site-Proven Quick Inspection Steps by Failure Type
| Phenomenon | Main Rapid-Check Tools | What to Look For |
|---|---|---|
| Peeling | Scrape test, substrate check | Oil, dust, weak bond under delamination |
| Blistering | Cut-and-peel, moisture meter | Water/air under bubble, surface humidity |
| Whitening | Wipe/vinegar test | Soluble salt, soft or tacky surface |
| Cracking | Trace and flex test | Membrane embrittlement, joint alignment |
| Chalking | Wipe residue, color fade | Sun-exposed degradation, chemical exposure |
| Moisture rebound | Humidity sensing, membrane check | Damp readings, edge/corner leaks |
Choosing the Correct Fix: When to Patch, When to Overhaul
Before starting repairs, assess the scale of the failure:
- Localized/Isolated: If only small patches are affected, light preparation and patching may restore full integrity. This includes careful sanding, cleaning, appropriate primer reapplication, and local re-topcoating.
- Widespread/Systemic: If large zones or repeated errors are present, it’s best to go back to the substrate, re-diagnose all preparation, and rebuild the system from a proven base primer and compatible topcoats. For advanced troubleshooting, refer to the comprehensive waterproofing renovation solutions resource.
Field-Proven Materials and Repair Systems
Today’s high-performance primers (like epoxy, polyurethane, and polyaspartic systems) offer specialized solutions for demanding environments. The waterproofing renovation solutions from ZDSpoxy, for example, allow for tailored system design to meet varying demands—be it UV, poolside splashes, or crowded kitchens. Always verify the manufacturer’s primer, basecoat, and membrane recommendations for your site, and never skip technical datasheet review or compatibility testing.
How to Prevent Waterproofing Failures: Pro Tips
- Never skip cleaning: Power wash, degrease, acid-etch, or grind as required by the substrate and datasheet.
- Primer matters: Choose and apply primers that match both substrate type and site moisture level.
- Batch size control: Mix only enough material that can be laid out during the system’s working time window.
- Detail corners and joints: Use reinforcement mesh/strips at all angle intersections.
- Watch the weather: Avoid installs in rain, high humidity, or extreme temperature shifts.
- Test before you coat: Conduct adhesion and moisture checks before each layer.
PROMPT
Waterproofing failure causes, coating peeling reasons—these are not just common search terms, but critical knowledge for anyone seeking to extend the life of their substrate. Understanding the root causes, combining field-tested quick checks, and acting with proper material selection and preparation is the key to long-term protection.
Conclusion
Waterproofing failures—whether peeling, blistering, whitening, cracking, chalking, or rebound damp—nearly always trace back to poor substrate preparation or a mismatch between substrate, primer, and membrane system. Each failure type has distinct signs and quick field diagnostics, allowing teams to swiftly assign either a light patch or a full-system overhaul. Consistent site success relies on discipline in cleaning, primer selection, and adherence to manufacturers’ directions. Leveraging proven solutions, such as those in expert renovation guides, dramatically reduces callbacks and extends the service life of all waterproofing investments. With technical awareness and attentive inspections, even challenging repairs can achieve robust, lasting results.
Frequently Asked Questions
How can I prevent coating peeling in the first place?
Always perform disciplined cleaning and use a compatible primer based on the surface type and moisture level. This ensures proper bonding and reduces peeling risk dramatically.
Why does my waterproofing show bubbles or blisters after heavy rain?
This is usually caused by moisture trapped in or under the substrate outgassing as the membrane cures. Proper moisture testing and vapor-tolerant primers prevent this issue.
Is whitening or efflorescence dangerous to the membrane?
Whitening can indicate water or salt migration. While it may start as a cosmetic issue, it can signal deeper weaknesses that require full investigation and often a system upgrade.
When is a full-system reinstallation necessary instead of a patch?
If failures are widespread, repeating, or accompanied by substrate movement or deep moisture, strip back to base, check for base soundness, and rebuild the full waterproof system as per datasheets.
What’s the difference between chalking and peeling?
Chalking produces a powdery residue but the membrane stays attached. Peeling means the membrane loses adhesion and lifts away from the substrate in sheets or flakes.
Why do most waterproofing failures take months to appear?
Many issues (like poor prep or primer mismatch) do not show up until rain, freeze-thaw, or high humidity stress the system. Failures then emerge long after installation.
Related Reading
- 7 Steps to Master Epoxy Primer Selection and Avoid Delamination
- The Ultimate Waterproofing Renovation Checklist: 9 Steps for Flawless Results
- 5 Surprising Causes of Epoxy Osmotic Blistering and How to Prevent Them
- 10 Hidden Signs Your Building Needs Waterproofing Renovation—What to Check
- 9 Costly Waterproofing Mistakes and How to Avoid Them