Understanding Adhesion Test for Coating: Why It Matters
Before applying any protective or decorative coating, whether it’s epoxy, polyurethane, or another resin system, it’s vital to ensure the paint or coating will stick well. Assessing adherence with an adhesion test for coating prevents expensive failures like peeling, flaking, or delamination. For facility owners, DIY renovators, and professional applicators alike, running a quick coating adhesion test will potentially save hours of rework and product waste. In this article, we’ll cover three practical adhesion test methods anyone can use on-site, indicators of poor adhesion, and the vital corrections you should take before you coat. Whether you are prepping for a bathroom tile waterproofing upgrade or a major floor renovation, these simple checks can mean the difference between success and a costly repeat job.
What Is an Adhesion Test for Coating?
An adhesion test for coating evaluates how well a coating sticks (adheres) to its substrate—whether concrete, tile, metal, or wood. Testing helps predict if a coating will stand up to everyday wear, moisture, and cleaning, or if it’s at risk of failure. Typically, these tests are fast, low-cost, and require only basic tools.
When and Where Should You Run a Coating Adhesion Test?
Adhesion checks should always be performed after the surface is prepped and primed—but before full coating. Key locations for testing include floor corners, room entryways, or previously problematic spots (such as near drains or old coatings). For critical environments like kitchens, bathrooms, or commercial floors, this check is essential. Need more on prepping tiled areas? Our kitchen bathroom tile waterproofing guide covers substrate readiness in detail.
Three Simple Adhesion Test Methods Anyone Can Use
The following techniques make it easy to check primer or coating adhesion directly at the jobsite, with simple tools and no lab equipment:
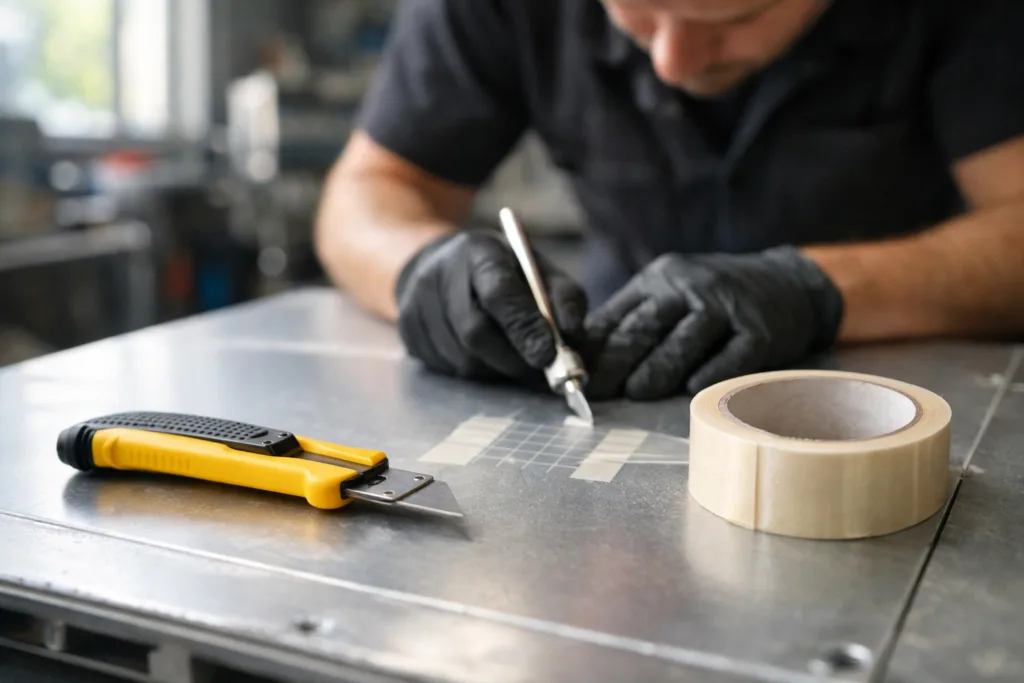
Tape Cross-Cut Test
- Score small squares (2×2 cm) into the dried primer or coating using a utility knife—cutting just through the coating, not deep into the substrate.
- Apply a piece of sticky tape (standard masking tape or packing tape works best) onto the cut area. Press down firmly.
- Pull the tape off quickly at a sharp angle.
Result: If more than 10–15% of the coating or primer lifts off, adhesion is not acceptable. If only pinhead-sized flakes come off, it’s acceptable.
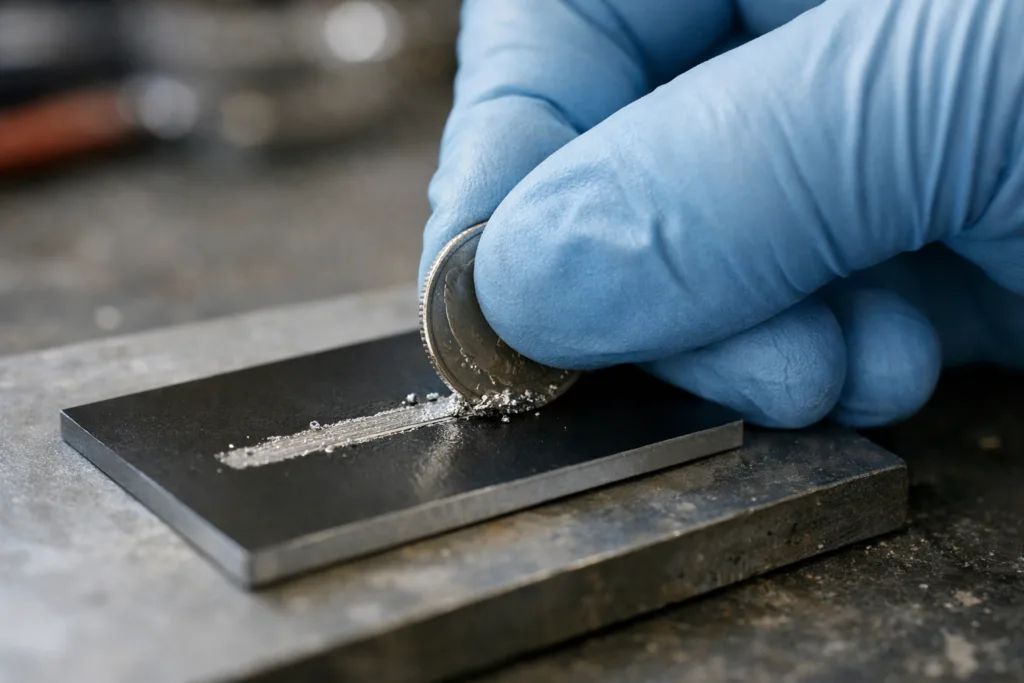
Coin Scratch or Scrape Test
- Using the edge of a coin (like a one-yuan or five-cent coin), scrape across the dried sample section with medium pressure.
- Observe if the coating/primer comes off easily, as a skin or chips, or stays put.
Result: Flaking, full peeling, or skin-like removal indicates poor adhesion. Only faint marks or minor powdering suggest suitable adhesion.
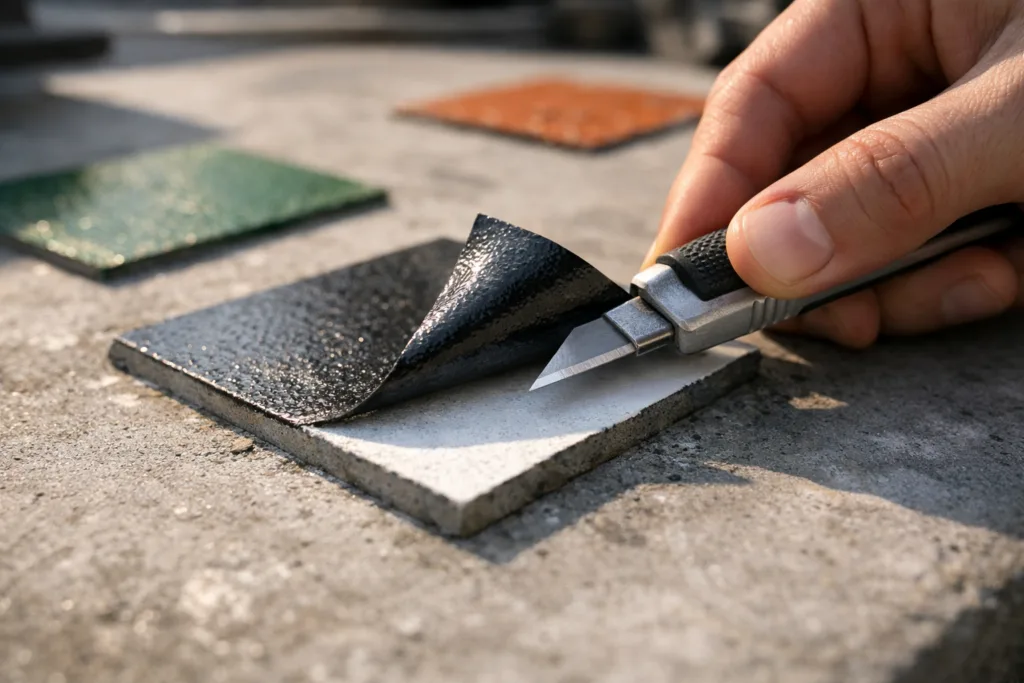
Edge Lift or Peel-Up Test
- At an inconspicuous edge (or a taped-off sample spot), try to pry up the dry coating with a utility knife or fingernail.
- Gently attempt to peel the corner up, observing resistance.
Result: If the coating peels easily and cleanly from the substrate, rework is necessary. If it resists, and fractures or shreds instead, adhesion is adequate.
What Counts as a Failed Coating Adhesion Test?
Failing a coating adhesion test means too much coating comes off with the tape or coin, exposing the bare substrate, or if the edge peels away easily in a single sheet. Even minor “fish-scaling” around the cut can indicate deeper bonding issues. Typical causes include:
- Poor surface cleaning (dust, oil, moisture, or residues)
- Incorrect or skipped priming
- Improper surface roughness (too smooth or too dirty)
- Over-application of release agents or old polishing wax
- Humidity or temperature problems
Immediate Actions When Coating Adhesion Test Fails
If your patch fails any adhesion test for coating, halt further application! Follow these correction steps, then retest before proceeding:
- Re-clean: Use a solvent wipe or detergent wash to fully remove contamination and let dry completely.
- Aggressively sand or grind: Mechanically roughen the area with sandpaper or hand grinder for increased surface profile; vacuum all dust.
- Prime smarter: Select a primer designed for tough substrates—like tiles or dense concrete. (Manufacturers such as ZDSpoxy can recommend a floor renovation primer appropriate for your surface’s real needs.)
- Reapply & retest: Recoat the test area and repeat the adhesion check until it passes.
Special Note: Manufacturer’s Primer Recommendations Matter
Every concrete, stone, or ceramic substrate is different. Manufacturers with technical expertise—like ZDSpoxy—often specify primer types based on on-site adhesion results. Differences in surface porosity, moisture, or old residues may push the selection towards high-penetration primers, specialist tile undercoats, or moisture-tolerant bonding agents. Always consult your material supplier after a test failure—don’t just recoat and hope for a better result.
Common Substrates and Coating Adhesion Behavior
Let’s break down some typical substrates and what influences coating adhesion:
| Substrate | Potential Problems | Typical Primer Solution |
|---|---|---|
| Ceramic Tile | Very smooth, may have glossy finish or contaminants | Rough sanding + specialist tile primer |
| Old Concrete | Dust, residual sealers, efflorescence | Deep cleaning + high-penetration primer |
| Metal | Grease, rust, or scale; very low porosity | Thorough degrease + abrasion + direct-to-metal primer |
| Wood | Variable porosity, old paint, oil or wax | Degrease + medium/fine sanding + wood primer |
Real-World Tips for Effective Adhesion Testing
- Always test in a few different spots, including high-traffic or previously repaired areas.
- Let primers cure fully—always follow the manufacturer’s recommended wait time before testing.
- Document your results, especially for larger projects or jobs where proofs are required.
- Don’t ignore minor failures—these often signal major problems later, especially on damp or greasy substrates.
How ZDSpoxy Engineers Validate Adhesion in Practice
Experienced resin manufacturers like ZDSpoxy routinely run spot-checks at different stages: after priming, between coats, and before final handover. Using a blend of the tape and coin methods, the technical teams confirm that primers wet out fully, and that mixing/application records match real site conditions. For example, in high-moisture substrates (common in old kitchens or pool decks), primers with superior tolerance to damp are recommended before any further coating—cutting down on callbacks due to peeling or bubbling. This engineering-centric approach assures quality far beyond simple visual checks.
Advanced Adhesion Tests: When to Go Beyond Basic Methods
In industrial, marine, or warranty-heavy projects, more rigorous tests like pull-off adhesion (using a specialized gauge), knife peel, or even salt-spray exposure may be required. However, for 80% of residential and commercial scenarios, the tape, coin, and peel methods yield rapid, reliable screening.
Enhancing Success: Factors Affecting Coating Adhesion
- Surface Temperature: Too cold or too hot affects wetting and bond formation.
- Substrate Moisture: Wet surfaces may cause blistering or poor primer curing.
- Ambient Humidity: High humidity can lead to condensation and adhesion loss.
- Cure Time: Testing too early gives unreliable results; always let coatings dry per the Technical Data Sheet.
Common Questions About Coating Adhesion Test Results
Certain gray areas still puzzle many DIYers and pros. Here are some quick answers.
- If only tiny flakes come off with the tape, it’s likely acceptable.
- If wide areas of primer lift or you see the substrate exposed, it’s a fail.
- The tape may leave adhesive residue on rough surfaces, which is not a failure.
Frequently Seen Failures and How to Fix Them
- Blistering or bubbling after curing: Likely residual moisture; re-dry and prime with moisture-tolerant systems.
- Entire “sheets” peeling: Nearly always from skipping primer, or oily substrate—repeat degreasing and resurfacing.
- Poor adhesion at edges and corners: Often due to missed cleaning or transition areas—always test here before finishing the whole floor.
Adhesion Test for Coating: The Step-by-Step Guide
Here’s a summary sequence for reliable results:
- Prep your surface as usual (clean, degrease, sand if needed).
- Prime as recommended for your surface.
- Allow the primer to cure completely as specified.
- Run the tape cross-cut, coin scrape, and optionally peel-up tests on different areas.
- Evaluate: large lift or see substrate? Rework. Only powder/fine scratches? Proceed with topcoat.
For major surfaces like outdoor terraces, always consult technical resources for further help. Read our in-depth waterproofing renovation solutions guide for comprehensive strategies.
Making the Most of Every Coating Project
Smart adhesion tests give you the best shot at a long-lasting, trouble-free result whether you are recoating a commercial kitchen, waterproofing a balcony, or protecting an industrial floor. Always respect the red flags these simple tests reveal. Don’t shortcut prep—or you may end up doubling your work. With the three easy methods described, you are now equipped to catch problems before they cost you real time and money.
Frequently Asked Questions
What is the best simple adhesion test for coatings?
The tape cross-cut test is quick and reliable. It shows if primer or topcoat grips well enough for normal use. It requires only a knife and some tape, so it’s accessible on any jobsite.
How long after priming should I run the adhesion test?
Wait until the primer has fully dried/cured per the manufacturer’s technical data, generally 4–24 hours depending on system and climate. Early testing may give false pass or fail results.
What does it mean if my coating peels up easily at the edge?
This typically means insufficient surface prep or a poor primer match. The bond to the base is weak, and the area should be re-prepped, re-primed, and retested before continuing.
When should I switch to a different primer?
If repeated adhesion failures occur after proper cleaning and sanding, it’s time to consult technical support or the manufacturer for a primer better suited to your exact substrate.
Can I skip the adhesion test if my surface looks clean?
No. Visual cleanliness doesn’t guarantee adhesion. Contamination or insufficient roughness may still prevent proper bonding. Always run at least one spot test before coating large areas.
What should I do if only a small spot fails the adhesion test?
Rework and retest only the failed spot. If it passes on the second attempt, continue coating. Widespread failures mean the whole surface needs new prep and primer.
Related Reading
- How to Diagnose and Fix Hairline vs. Large Cracks Before Coating
- Navigating 2026 Epoxy Flooring Costs: Budget Insights & Savings Tips
- 7 Proven Ways to Prevent Coating Peel-Off on Tile Surfaces
- Understanding Curing and Recoating Windows: A Contractor’s Action Plan
- Step-by-Step: Applying Resin Over Old Ceramic Tiles