Introduction: Mastering Fiberglass Boat Crack Repair with Marine Epoxy
Cracks in a fiberglass boat are more than an eyesore—they can let water in, compromise strength, and drive up repair costs if ignored. Thankfully, with careful surface prep, quality marine epoxy resin, and the right step-by-step repair process, most non-structural fiberglass cracks can be permanently repaired at home or in a professional shop. This guide covers a practical workflow for fiberglass boat crack repair, focusing on safe techniques using marine epoxy resin, fiberglass cloth, and careful fairing. Follow along for clear steps, a tool list, mistake prevention, and essential safety tips trusted by experienced boat builders and repair pros alike. For any cracks suggesting major structural damage or core issues, always consult a professional.
The Science Behind Fiberglass Boat Crack Repair
Understanding why cracks develop in fiberglass boats is key to choosing the right repair method. Most minor cracks happen due to stress, impact, flexing, or aging of the gelcoat and laminate. Proper fiberglass boat crack repair doesn’t just hide damage; it restores strength by bonding the damaged area with new glass fibers and marine epoxy resin. When these materials cure, they form a water-resistant structure that replicates the boat’s original strength and shape.
Essential Tools and Materials for Fiberglass Boat Crack Repair
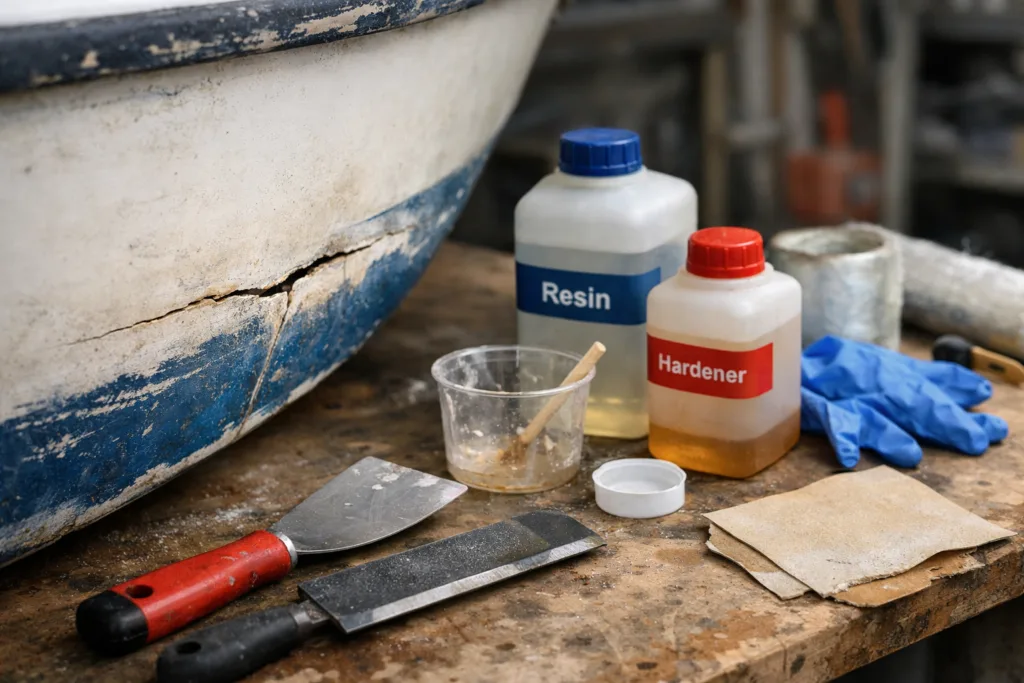
Achieving a lasting repair begins with the right gear. Here’s a checklist of essentials:
- Marine epoxy resin and hardener (low viscosity for wet-out, slow cure for controlled working time)
- Fiberglass cloth (varied weights for patching and fairing)
- Sanding tools (orbital sander/grinder, 60–120 grit discs, hand sanding blocks)
- Mixing cups, stirrers, and calibrated measuring sticks
- Fairing compound (epoxy-based, not auto body putty)
- Protective gloves, goggles, respirator or mask
- Acetone or marine cleaner for degreasing
- Masking tape, utility knife, scissors
- Plastic squeegees, spreaders, and disposable brushes
- Cloth towels for cleanup
For repairs above or below the waterline, select a marine epoxy resin formulated for boat repair. Epoxies like ZDS-2060AB offer excellent water resistance and bond strength, essential for marine conditions.
Inspecting Cracks: When Professional Help Is Needed
Not all cracks are created equal. Inspect the area carefully:
- Hairline or Crazing: Shallow cracks in the gelcoat, not structural—typically safe for DIY repair.
- Deeper or Wide Cracks: May indicate damaged fiberglass below. Use gentle tapping to check for soft spots or delamination.
- Structural Damage: If cracks continue through stringers, bulkheads, or involve flexing decks, consult a marine surveyor or professional. For in-depth resin system options, see our Marine Epoxy Resin Manufacturer pillar.
Preparing the Repair Site: Grinding and Tapering
Surface prep is critical so the new laminate bonds securely. Here’s how to do it:
- Clean the area with acetone, removing wax, oil, and dirt.
- Use a rotary tool or sander to grind away the gelcoat along the crack, exposing fresh fiberglass at least 1–2 inches on each side. Feather edges into a gentle taper, creating a “shallow bowl” shape—this maximizes bonding and prevents hard edges.
- Sand the inside of the repair bowl smooth, finishing with 80-grit paper.
- Wipe away dust and ensure surface is perfectly clean.
Measuring and Cutting Fiberglass Cloth for a Perfect Layup
Strong repairs depend on well-aligned glass cloth layers. Here’s a foolproof process:
- Cut multiple pieces of fiberglass cloth, each slightly smaller than the last, to match the bowl shape—largest first, smallest last.
- If the area is large, overlap patches to reconstruct layer thickness.
- Lay out all pieces nearby for a quick, organized application.
- Dry-fit each piece to ensure full coverage without overhangs.
Mixing Marine Epoxy Resin: Batch Size and Cure Timing
Marine epoxy resins offer various working (pot life) and cure schedules, so careful attention to mixing ratios and timing is essential.
- Always mix resin and hardener according to the manufacturer’s precise ratio. Typical error: eyeballing mixes, which can leave sticky or brittle spots.
- Mix only what you can use in 15–20 minutes, especially in hot weather. Larger batches cure faster and generate more heat (exotherm).
- Stir thoroughly, scraping cup sides and bottom, until fully blended.
ZDS-2060AB, formulated by ZDSpoxy, provides a forgiving pot life for extended layups but cures hard overnight, minimizing amine blush and stickiness. Keeping the repair temperature above 15°C (59°F) helps ensure a reliable cure.
Wetting Out the Fiberglass Cloth: Techniques for Full Bond
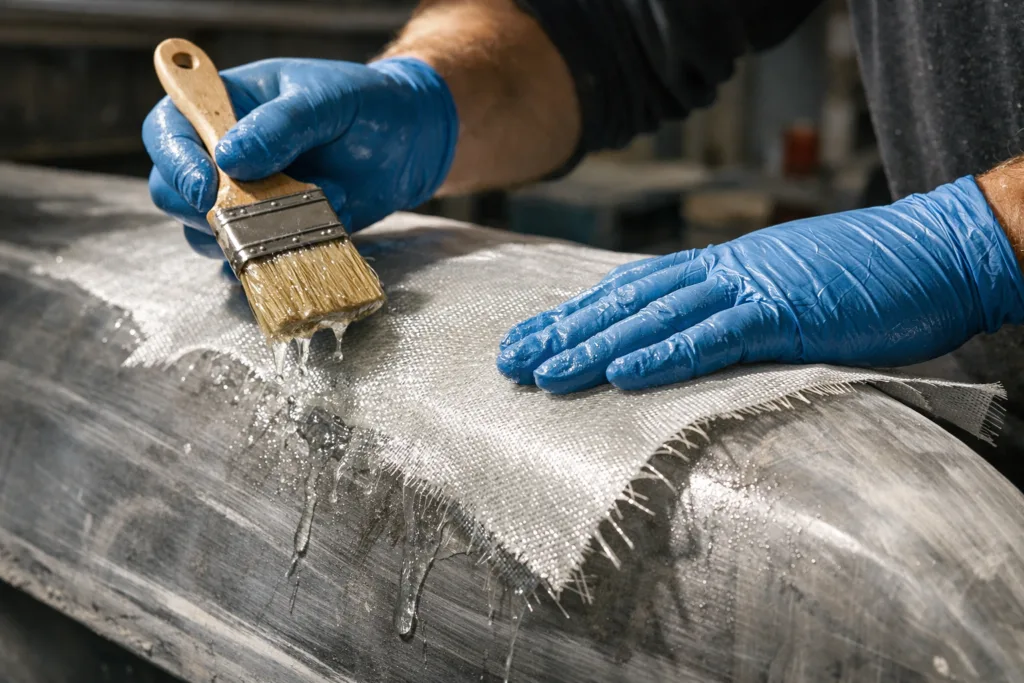
Proper wet-out is key to restoring boat structure:
- Brush or roll a thin, even coat of mixed marine epoxy resin onto the repair area.
- Lay the largest fiberglass cloth patch in place, pressing it gently into the resin.
- Use a plastic squeegee to smooth the cloth, removing air bubbles and saturating all fibers—add a bit more resin if the cloth looks dry in spots.
- Repeat for successive, smaller patches, layering each and ensuring no dry areas between layers.
Avoid flooding, which traps air. Good wet-out looks uniformly translucent, with fibers clearly visible but saturated—never white or floating.
Layering and Stacking: Achieving Repair Strength
For most non-structural cracks, two to five layers of fiberglass (totaling the original laminate’s thickness) are enough. For deeper or longer cracks, more layers—cut wider and longer—may be needed.
- Time between layers: Apply all within 1–2 hours for full chemical bond, or sand between layers if any have cured hard.
- Stacking logic: Largest patch first, working up to the smallest.
- Do not rush—press each layer smooth and check for bubble-free adhesion.
Marine Epoxy Resin Cure Schedule: Timing Matters
Successful fiberglass boat crack repair relies on a controlled epoxy cure schedule:
- Initial set: 3–8 hours, varies by product and temperature.
- Sandable/hard-cure: 12–24 hours; see your epoxy resin’s technical sheet for details.
- Full cure (chemical resistance/strength): 5–7 days—avoid immersion till fully cured.
Cool weather slows curing; warm weather speeds it up. Cover outdoor repairs to protect from dew or rain, and always check for surface tackiness before sanding.
Fairing the Repaired Area for Seamless Finish
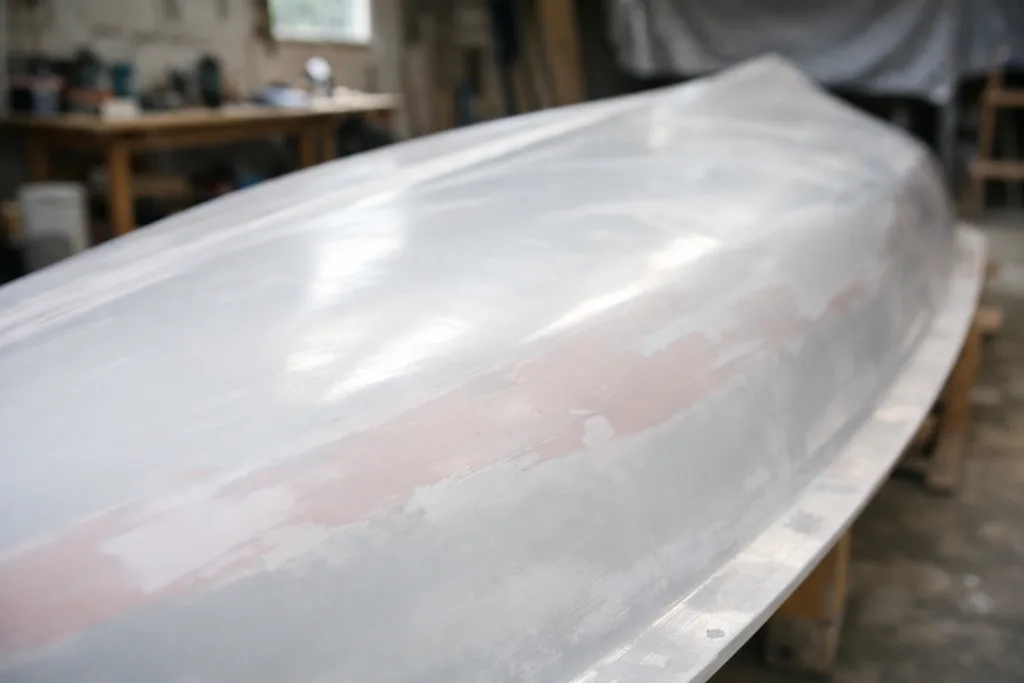
After the repair is fully cured, smooth the patch for a factory-quality finish:
- Smooth rough areas with 80–120 grit sandpaper, feathering patch into original gelcoat.
- Mix epoxy-based fairing compound (never automotive body filler, which can absorb water).
- Apply with a plastic spreader, shaping to match hull lines. Let it cure, then sand smooth.
- Repeat if needed for a perfect contour—patience pays off.
Surface Preparation Before Final Coating
Proper final prep ensures lasting protection:
- Sand the faired surface with 180–220 grit for paint/gelcoat adhesion.
- Wipe area dust-free with a clean, solvent-dampened cloth.
- Mask surrounding areas if spraying or rolling gelcoat.
If you plan to coat over epoxy, see How to Test Adhesion Before You Coat: 3 Quick Ways To Prevent Coating Failure for best practices.
Applying Protective Coating: Paint or Gelcoat
Now protect the repair from UV and water:
- Use a marine-grade topcoat or gelcoat designed for fiberglass boats.
- Apply multiple thin, even coats, following product recoat intervals.
- Allow full cure before launching or exposing to heavy use.
Common Mistakes in Fiberglass Boat Crack Repair
- Underestimating crack depth—leading to hidden lamination voids
- Insufficient grinding and feathering—resulting in a weak patch edge
- Poor resin mixing—causing soft or sticky spots
- Trapped air bubbles—weakening the repair
- Incorrect fairing compound choice—water absorption and swelling risk
- Skipping proper cure time before sanding or immersion
Expert Tips for Pro-Level Repairs
- Work in manageable sections—large repairs can get away from you if resin cures too fast
- Keep tools and workspace clean—dust/oil ruins adhesion
- Layer up thickness to closely match original hull
- If in doubt, build up with more thin layers than fewer thick ones
- Be patient—every added minute of prep and sanding yields a more invisible repair
Tool & Material Checklist for Success
| Tool/Material | Purpose |
|---|---|
| Marine Epoxy Resin | Bonding and laminating |
| Fiberglass Cloth | Patching laminate |
| Orbital Sander/Grinder | Tapering and smoothing |
| Fairing Compound | Smoothing/contouring |
| Disposable Brushes | Wet-out and application |
| Plastic Spreaders/Squeegees | Lay up and fairing |
| Protective Equipment | Safety from dust/fumes |
| Mixing Cups/Sticks | Accurate proportioning |
Maintaining the Longevity of Your Fiberglass Repair
The strength of epoxy resin repairs means well-performed fixes can outlast the original laminate—provided you seal the area from water and UV radiation. Use only marine-grade products, and check repairs during seasonal maintenance for any edge lifting or fresh cracks, especially in high-wear areas.
How Marine Epoxy Resin and Fiberglass Cloth Work Together
When marine epoxy resin soaks into fiberglass cloth, it creates a single composite that resists water, flexes with the hull, and bears loads. High-performance resins, like those supplied by ZDSpoxy, are engineered for consistent viscosity and excellent fiber wetting, while maintaining manageable pot life even in changing jobsite temperatures. Batch controls and field testing ensure each resin performs the same way—vital for repairs that must meet strict marine standards.
Fiberglass Boat Crack Repair: Step-by-Step with Marine Epoxy
- Inspect the damage and mark boundaries
- Grind out the crack and taper the edge
- Cut and dry-fit layered fiberglass cloth patches
- Mix marine epoxy resin as directed
- Wet out the hull and lay down the patches—largest to smallest
- Smooth, check for air bubbles, and add more resin if needed
- Allow to cure fully as per the resin’s schedule
- Fair, sand, and recoat the surface
- Topcoat for UV and water protection
- Inspect after cure—if unsure, seek professional assessment
Integrated Workflow: From Prep to Cure
Bringing it all together, an efficient repair follows these phases:
- Preparation and inspection: Catch potential hidden issues early
- Surface grinding and cleaning: Build a foundation for strong bonding
- Measuring, mixing, and layup: Precision and cleanliness matter here
- Curing: Temperature and timing dictate final performance
- Fairing and finishing: Invisible to the eye, strong underfoot
When to Use Fast-Cure Epoxy vs Slow-Cure
Fast-cure epoxies allow rapid repairs in emergency situations or when temperature is low, while slow-cure epoxies provide more working time and lower risk of heat buildup on large jobs. For guidance on fast-cure vs slow-cure strengths, see Choosing the Right Fast-Cure Marine Epoxy: Strength and Speed for Quick Repairs.
Safety First: Handling Epoxy and Fiberglass Products
Epoxy resins are much safer than polyester, but standard handling precautions always apply:
- Wear gloves and goggles at all times
- Work in a well-ventilated area and use a VOC-rated respirator if needed
- Avoid skin contact and immediately wash off any spills
- Store resins in sealed containers, away from heat and children
Professional Curing Tips for Reliable Results
Consistent cure is essential, especially if the repaired area is structural. Maintain temperature above 15°C (59°F) and keep the patch dry throughout cure. If uncertain about the full cure or suspect deeper internal issues, always have a surveyor inspect the area before heavy use or relaunching.
Conclusion: Building Confidence in DIY Fiberglass Repairs
With the right workflow, materials, and a patient approach, fiberglass boat crack repair using marine epoxy is a confident, repeatable process. Always prioritize careful prep, accurate resin mixing, and a segmented layup for maximum durability and water resistance. Remember, while DIY repairs can restore appearance and function for small cracks, any major or structural issues call for a professional’s assessment and a robust resin system like those outlined by ZDSpoxy. Frequent inspection, combined with careful repair execution, ensures your boat remains strong, safe, and looking its best for years on the water.
Frequently Asked Questions
Which cracks on a fiberglass boat can I safely repair myself?
Most small, shallow cracks or surface crazing in the gelcoat can be repaired by DIYers, as long as there’s no sign of deep delamination or structural damage. If a crack is wide, soft around the edges, or located in a high-stress area (like near the hull/deck joint), get a professional opinion before proceeding.
What’s the difference between marine epoxy resin and polyester resin?
Marine epoxy resin offers much stronger bonding, better water resistance, and greater flexibility than polyester resin. This makes it ideal for lasting, high-strength fiberglass repairs on boats and immersion-prone areas.
How long do I need to wait before sanding or painting over epoxy resin?
Allow the marine epoxy resin to fully cure as indicated by the manufacturer—typically 12–24 hours for sanding, and several days for immersion or topcoating. Sand lightly and remove dust before painting or gelcoating.
Can I use any fairing compound for filling and smoothing?
Always use an epoxy-based fairing compound designed for marine use. Automotive or polyester fillers can absorb water and degrade under marine conditions, leading to premature repair failure.
How do I avoid trapping air bubbles during my fiberglass layup?
Work with manageable resin quantities, use a plastic squeegee, and smooth cloth layers gently. Wet out each cloth layer thoroughly, checking for dry spots. If bubbles appear, gently lift and re-lay that section until air is worked out.
Why is it important to match the cure schedule and working time of the resin with my project?
The right cure schedule ensures complete bonding, prevents heat build-up during larger repairs, and allows for proper sanding and fairing. Following the manufacturer’s guidance prevents failures like amine blush, tacky patches, or weak bond lines.
Related Reading
- Marine Epoxy Putty or Liquid Epoxy? Understand the Key Differences in Marine Repairs
- Essential Qualities of Marine Epoxy Resin for Fiberglass Boat Repairs
- Mastering Cure Times: Pro Tips For Epoxy Pot Life & Timing
- Marine Epoxy vs. Regular Epoxy: Critical Differences in Harsh Environments
- Long-Term Clarity: How to Prevent Yellowing in Marine Epoxy Repairs