Introduction: Why Epoxy Seal Marine Plywood?
Marine plywood is prized for its strength and versatility in boatbuilding, outdoor furniture, docks, and more. But despite its name, marine plywood is not naturally waterproof. Without an effective sealing strategy—especially in humid, wet, or saltwater environments—it remains vulnerable to moisture intrusion, rot, and delamination. The right epoxy seal can transform marine plywood into a durable, moisture-resistant panel capable of performing under challenging conditions for years. In this guide, you’ll learn the essential steps for sealing marine plywood with epoxy—including strategy for layer build-up, edge attention, sanding, and UV topcoat choices—to ensure lasting protection without unrealistic expectations of “waterproof forever.”
Understanding Epoxy Seal Marine Plywood
Epoxy seal marine plywood refers to a system of applying thin, penetrating coats of marine-grade epoxy resin to all surfaces and edges of plywood. The goal is to create a stable moisture barrier while allowing for precise control during application. A well-executed epoxy seal helps prevent rot, delamination, and extends the life of marine plywood in boats, decking, and wet-area constructions.
How Moisture Attacks Plywood: The Science of Rot & Delamination
Plywood is made from thin veneers glued together. When moisture penetrates—even microscopically—it can break down adhesives, cause swelling and shrinkage, and promote fungal growth. This process leads to softening, delamination, and sometimes catastrophic failure, especially along unprotected edges. Understanding these risks underlines why strategic sealing is essential for marine applications.
The Multi-Layer Approach: Penetration, Edge Sealing, and Topcoating
Epoxy sealing is not a one-layer fix. Success relies on the penetration of thin layers deep into wood fibers, building toward a flexible and resilient barrier. Edges require special care due to their high absorbency and vulnerability—the goal is to saturate, seal voids, and then apply an outer shield that blocks UV and physical abuse.
Selecting the Right Epoxy System
Choosing a suitable epoxy system is critical for long-term performance. Look for low-viscosity, marine-grade epoxies with strong wetting ability and compatibility with UV-resistant topcoats. Systems like those from the Marine Epoxy Resin Manufacturer page are designed for this dual-protection system, working together to handle environmental stress and sunlight.
Preparation: Getting Marine Plywood Ready
Start with new or clean, dry plywood. Sand all surfaces (including edges and cutouts) to remove contamination and open wood pores. Wipe with a clean, lint-free cloth to remove dust. Avoid silicone or oil-based cleaners—residues can disrupt epoxy adhesion. Pay attention to existing damage; deep voids or end-grain checks must be filled with epoxy putty or a compatible repair product.
Edge Sealing: The Most Vulnerable Zone
Plywood edges absorb water rapidly. Use multiple coats of thinned epoxy or a purpose-designed sealer to saturate and seal these areas. Allow each coat to soak in before topping up. For added security, consider using products designed for edge and void repair.
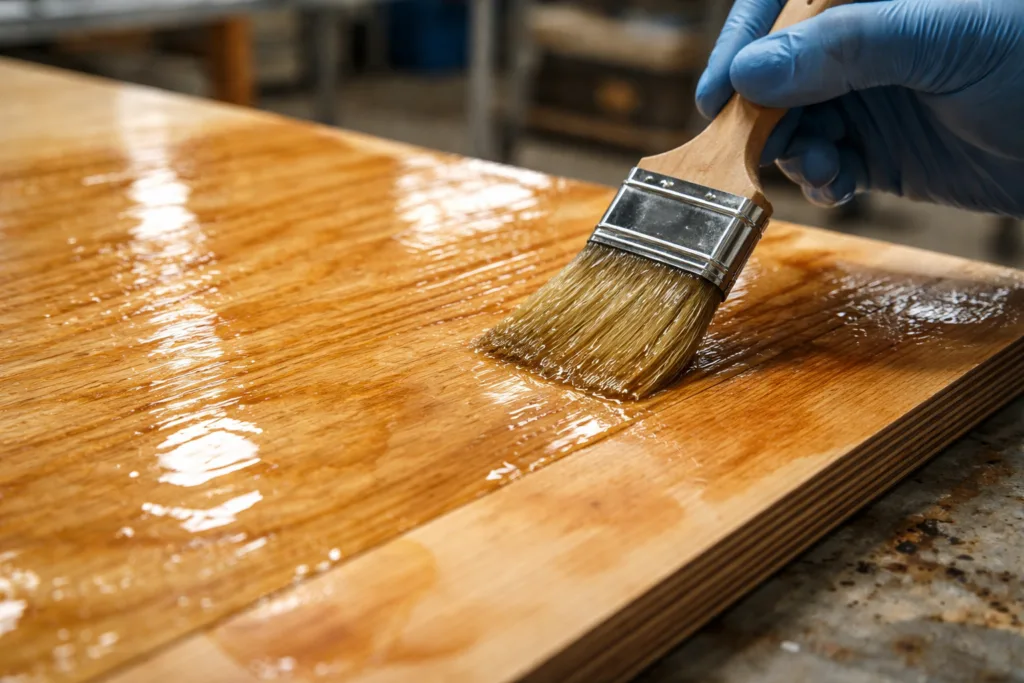
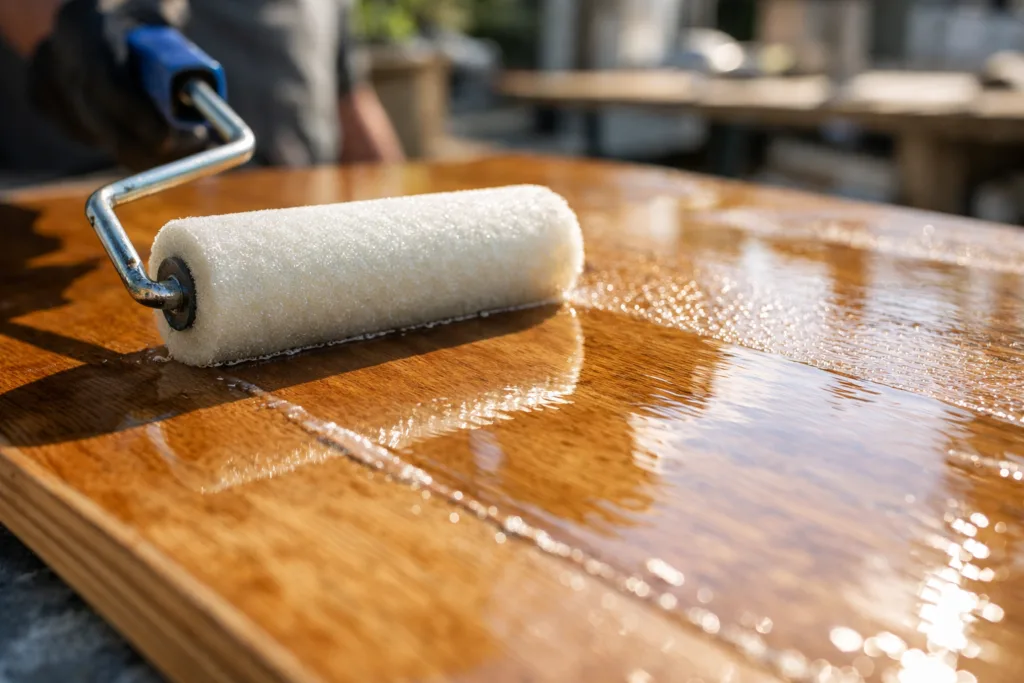
Applying the First Penetrating Coat: Thin, Even Coverage
Mix epoxy according to manufacturer instructions. Apply the first coat thinly with a brush or roller, working quickly to coat all faces, edges, and details. On horizontal surfaces, let epoxy soak in for 20-30 minutes, then re-brush to fill any areas that absorb quickly. Avoid puddling and drips—these can cause uneven cure and weak spots.
The Importance of Multiple Coats: Building a Barrier
One coat is rarely enough. Most marine plywood requires at least two, preferably three, full coats of epoxy, allowing each to partially or fully cure before recoating. Lightly sand between coats if more than 24 hours pass; this ensures a strong bond between layers.
Edge Strengthening Techniques
Consider applying a fillet of epoxy or an epoxy/silica mix to reinforce sharp edges and corners. This method creates a continuous seal and reduces the chance of mechanical damage or “wicking” that can draw water into the core.
Filling Surface Voids: Smoother, More Durable Surfaces
Inspect between coats for pinholes, surface checks, or gaps. Fill with a compatible wood repair putty for easy dent scratch fix or thixotropic epoxy paste. Smooth these repairs with a putty knife and allow to cure before sanding flush.
How Deep Does Epoxy Penetrate?
Depth depends on wood density, moisture content, and epoxy viscosity. Thin, warm epoxy penetrates best—often up to several millimeters in soft or end grain, creating a robust inner barrier. Over-application can lead to surface brittleness, so balance is key.
Timing & Curing Between Coats
Monitor working temperature and humidity. Most systems recommend recoating within the “tack-free” window (usually 6–24 hours) for strong chemical bonding. Cooler conditions slow cure and extend working time, while heat accelerates reactions. Let the final coat fully cure (typically 48–72 hours) before heavy sanding or topcoating.
Surface Preparation for Topcoats and Paints
Once epoxy is fully cured, sand all surfaces with fine abrasive (120–180 grit) to dull the gloss and enhance adhesion. Carefully remove all sanding dust—trapped particles can affect appearance and performance of the final finish.
Why an Epoxy Seal is Not “Waterproof Forever”
No finish is indestructible. Marine environments (especially UV, salt, and abrasion) slowly degrade all coatings over time. Epoxy provides excellent moisture protection, but it can be slowly degraded by long-term UV exposure unless shielded with a proper UV-blocking topcoat system. Regular inspection and maintenance are required to keep the barrier intact.

Choosing a UV-Resistant Topcoat: The Second Layer of Defense
Because epoxies are not inherently UV-stable, always topcoat with a UV-resistant varnish or polyurethane. These finishes protect the epoxy from sun-induced chalking, yellowing, and micro-cracking. Polyurethanes and specialized marine topcoats are highly recommended for boats, decks, or any sun-exposed structure. See the Epoxy vs Polyurethane Marine guide for compatibility insights.
Curing Dynamics: Patience is Key
Temperature, humidity, and airflow affect how quickly epoxy cures and topcoats can be safely applied. Avoid rushing. Too-early sanding can clog abrasives and damage the layer below. Too-soon topcoating risks improper bonding or print-through. Refer to technical data sheets for cure schedules—and allow for extra time in cool, damp conditions.
Sanding Between Steps: The Secret to a Smooth, Reliable Finish
After each coat (and before topcoating), sand surfaces lightly with fine sandpaper. This step removes dust nibs, levels the surface, and provides mechanical “tooth” for the next layer. Wipe away all dust with a tack cloth or compressed air for best results.
Dealing with Problem Areas: Blisters, Pinholes, and Amine Blush
Occasionally, pinholes or blisters appear—often from trapped moisture or outgassing. Sand affected spots and re-coat. Amine blush (a greasy or waxy film) may form during humid curing. Remove it with water and a mild abrasive pad—never solvents—prior to sanding or recoating.
Longevity & Maintenance: Realistic Expectations
Even the best epoxy seal on marine plywood requires periodic checks for scraping, chipping, or UV topcoat wear. Prompt repair of damaged areas prevents water from reaching the plywood substrate. Expect a high-quality system to last several years before recoating is needed—especially with consistent UV protection.
ZDSpoxy Expert Advice: Batch Consistency & On-Site Quality
From the manufacturing side, high batch-to-batch consistency in viscosity and cure speed is critical for predictable results. At ZDSpoxy, technicians track variables like ambient temperature, substrate moisture, and application methods during site trials. Field experience shows that careful edge sealing and strict mixing discipline make the most difference in long-term reliability—especially under marine or coastal splash conditions.
Common Epoxy Seal Marine Plywood Mistakes
Rushing application, skimping on edge sealing, using overly thick coats, or missing UV topcoat steps are typical pitfalls. Epoxy that is too old or improperly stored may cure slowly or unevenly. Avoid shortcuts—each process step adds years to service life and prevents costly failures.
Case Example: Small Boat Deck Sealing Workflow
Consider a new marine plywood small boat deck: (1) Sand and vacuum the sheet; (2) Seal all edges with thinned epoxy (two coats minimum); (3) Apply two full-strength coats across all surfaces; (4) Fill any pinholes or dings; (5) Sand lightly; (6) Topcoat with marine-grade UV polyurethane; (7) Final inspection before installation. This process prevents rot and promises long-term service when repeated for undersides and cutouts.
Is One-Product Enough? Epoxy Resin & Topcoat System Logic
Single-step solutions are rare; a dedicated resin plus topcoat offers technical advantages. Reliable adhesion, flexibility, and UV resistance demand a system approach—refer to the Marine Epoxy Resin Manufacturer for compatible options and technical advice.
Summary Table: Best Practices for Epoxy Seal Marine Plywood
| Step | Detail |
|---|---|
| Surface Preparation | Sand, clean, remove dust |
| Edge Sealing | At least 2 coats, saturate fully |
| Penetrating Coats | Thin, even, allow to soak, 2-3 coats |
| Void Filling | Check/fill holes after each coat |
| UV Topcoating | Apply UV-resistant varnish or polyurethane |
Conclusion: Lasting Protection, Realistic Maintenance
Sealing marine plywood with epoxy is a proven way to block out moisture, resist rot, and achieve long-term structural performance. Success is a matter of thin, careful coats, edge focus, disciplined timing, and a robust UV-resistant topcoat. No system is “forever,” but used properly, marine epoxy resin sealing buys years of worry-free service. For best results, pair marine-grade epoxy with compatible UV topcoats—regular inspection and maintenance will keep your project sturdy and beautiful even in tough conditions.
Frequently Asked Questions
Does marine epoxy make plywood waterproof forever?
Epoxy dramatically improves moisture resistance but does not guarantee waterproofing “forever.” Maintenance, UV topcoats, and timely repairs are still required for lasting protection.
How many coats of epoxy should I use to seal marine plywood?
At least two to three thin coats are recommended for surface and edges. Edge zones may need more coats due to higher absorbency.
Can I use any epoxy for marine plywood sealing?
It’s best to use marine-grade epoxy formulated for wood penetration and exterior conditions. Some general-purpose epoxies may lack wetting ability or flexibility for these applications.
Is sanding required between epoxy coats?
If more than 24 hours elapse between coats, light sanding improves adhesion. Always sand and clean before applying a UV-resistant topcoat.
Why is a UV topcoat necessary after epoxy sealing?
Epoxies are not UV-stable and can degrade, chalk, or yellow with sun exposure. A UV-blocking topcoat preserves the underlying epoxy and extends service life.
What should I do if I find damaged or bare areas after installation?
Promptly sand, clean, and re-apply epoxy and UV topcoat as soon as exposed wood or lifting is found. This prevents premature rot and delamination.
Related Reading
- Clear Marine Epoxy vs Varnish: The Truths That Matter for Sun-Exposed Wood
- How to Repair, Seal, and Bond Wood in Tough Marine Environments
- Low Yellowing & UV Resistance: Achieve Long-Term Clarity in Marine Epoxy Seals
- Marine Epoxy Putty or Liquid Epoxy? Get the Right Solution for Repairs
- Fast-Cure Marine Epoxy: When Speed and Strength Matter Most