Understanding Marine Grade Epoxy for Wood
Marine grade epoxy for wood has revolutionized how boats, docks, and coastal structures resist water and combat wood rot. With the advances in polymer science, these epoxy systems seal, repair, and reinforce wood, ensuring long-term durability even against relentless wave action, UV exposure, and salt. In this guide, we clarify marine epoxy’s three core functions — waterproof sealing, rot repair, and structural bonding — to help you protect wooden surfaces against marine threats.
Why Marine Environments Challenge Wood: The Big Three Enemies
Wood exposed to marine environments faces three major risks: high moisture, biological decay (rot and mold), and mechanical stress. These forces degrade even dense woods like teak unless properly sealed, regularly maintained, and structurally reinforced. Understanding these threats underpins why selecting the right marine grade epoxy for wood is so critical for safety and investment longevity.
Waterproof Sealing: How Marine Grade Epoxy Stops Ingress
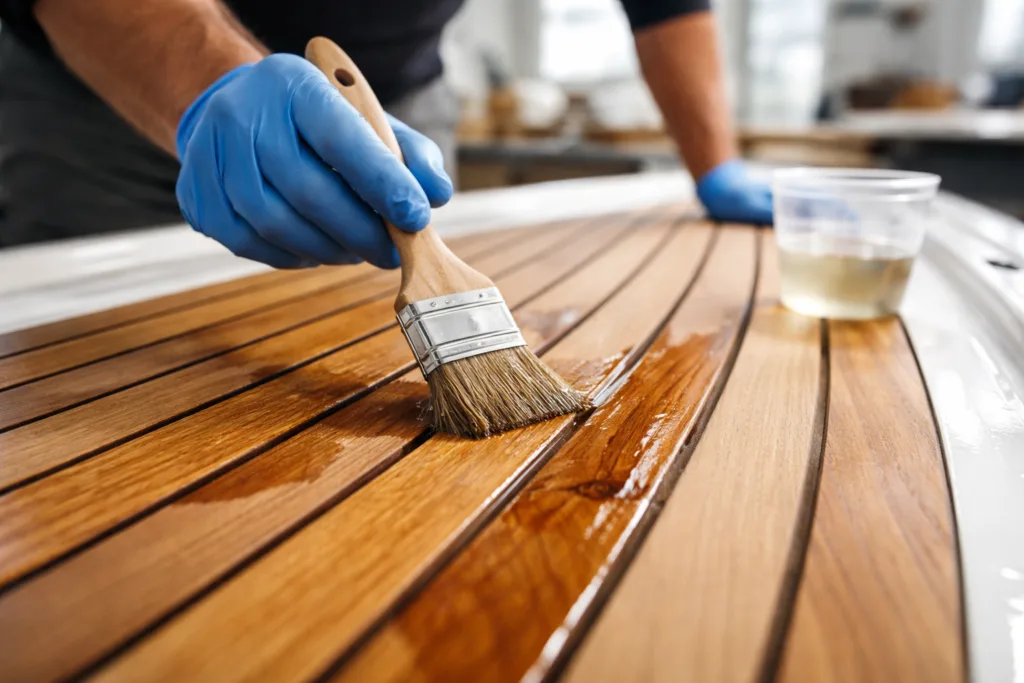
Unlike traditional varnishes, marine grade epoxy forms a dense, nearly impermeable barrier. Low-viscosity formulas seep deep into the wood fibers, filling capillaries and blocking water paths. Applying several thin coats ensures even penetration and durable, flexible protection. This stage, known as “epoxy wood sealing,” is foundational for decks, hulls, transoms, and joinery in any wood boat repair project.
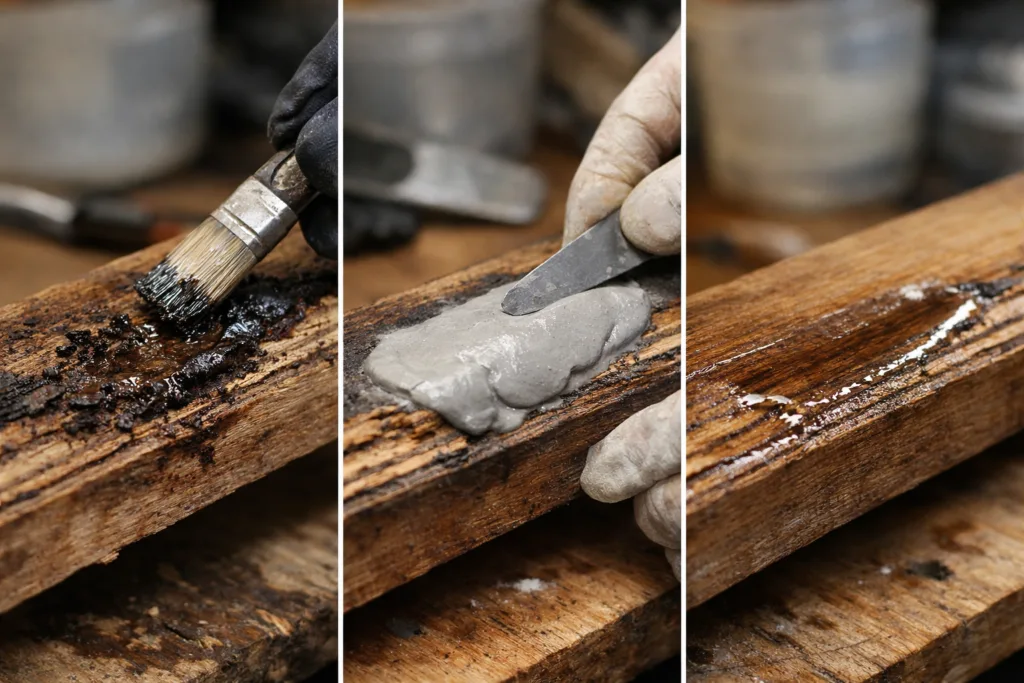
Epoxy Wood Rot Repair: Identifying and Addressing Damage
Wood rot develops when trapped moisture allows fungi or bacteria to break down cellulose. Signs include spongy patches, discoloration, and crumbling surfaces. Epoxy-based rot repair involves removing compromised wood, applying a consolidating primer, and rebuilding lost mass with an epoxy filler or putty. Using solutions like ZDS-2060AB ensures deep, solvent-free penetration and long-term adhesion, even under fluctuating moisture conditions.
Structural Bonding: Achieving Integrity in Marine Woodwork
For connections subjected to stress (scarfs, joints, cleats), marine epoxies deliver remarkable bonding power. The right formula is not only strong but also resilient — able to absorb movement and resist detachment caused by swelling, vibration, or impact. Especially with marine plywood and teak, selecting an epoxy with proven flexibility and peel resistance is essential for hull repairs or furniture installations.
Moisture Content Requirements Before Application
One key to epoxy success is proper substrate moisture. Ideally, wood moisture content should fall below 15% to prevent trapped steam, poor bonding, and eventual blistering. On-site, this requires a wood moisture meter for reliable readings and often means storing materials in dry environments prior to installation. Skipping this step risks undermining even the most advanced marine grade epoxy for wood formulas.
Penetrating Sealers: Why Low Viscosity and Thin Coats Matter
Effective sealing depends on both the properties of the epoxy and the application method. Low-viscosity epoxies wick into fine grain openings, locking out water more reliably than thick, “one and done” coatings. Multiple thin applications (with light sanding in between) promote full absorption and reduce surface film buildup that could trap air bubbles or moisture underneath. For deep repair needs, refer to detailed instructions for solvent-based wood rot primers suited to high-rot areas.
Using Epoxy Putty for Filling and Structural Repair
Where wood loss is significant, such as after decay removal or impact, two-part epoxy putties rebuild geometry and structural capacity. Products like ZDS-189 wood repair putty offer gap-bridging, sandable, and paintable solutions. Good practice involves blending putty with freshly applied consolidating resin to improve bond lines and minimize cold joints.
Marine Plywood: Special Considerations for Epoxy Application
Marine plywood’s cross-laminated veneers provide dimensional stability, but edges and joints are susceptible to water ingress. Sealing every cut edge, fastener hole, and scarf joint with marine grade epoxy prevents delamination and rot over time. Selecting a waterproof epoxy for marine plywood with high elongation and salt spray resistance ensures optimal lifespan in hull or deck construction.
Epoxy for Teak: Preserving Classic Marine Wood
Teak is prized for its natural oil content and weather resistance, but it is still vulnerable to mildew and ultraviolet degradation. Marine grade epoxy for wood, when applied correctly on sanded and degreased teak, anchors finishes, fills micro-checks, and drastically extends surface service intervals. Thin, carefully brushed coats guard against over-saturation that could block future finishes or cause glossiness issues.
Comprehensive Marine Wood Epoxy Application Checklist
- Sand the surface to expose fresh wood (grit 80–120)
- Remove all dust using a vacuum and tack cloth
- Dewax and degrease (especially with oily woods like teak) using solvent wipe
- Measure moisture content — target below 15%
- Apply a suitable epoxy primer/bonding resin (thin, even coat)
- Embed cloth or fill damaged areas with epoxy putty
- Allow initial cure and sand where needed
- Multiple thin seal coats, sand lightly between each
- Final topcoat or paint for UV and abrasion defense
Step-by-Step Walk-Through: Wood Boat Repair Using Marine Epoxy
Start by isolating damaged or water-stained areas. Cut away rot, sand back to healthy fibers, and check adjacent zones for concealed moisture. Prime exposed surfaces with a deep-penetrating, low-odor epoxy (such as ZDS-2060AB) for reliable absorption. For lost-corner or missing-chunk repairs, sculpt shapes with a high-strength, structural epoxy putty. After curing, sand flush and repeat sealing with an unfilled resin. Only move to finishing coats after confirming full cure and desired appearance.
Mixing and Batch Size Tips for Consistent Results
Epoxy chemistry is sensitive to mixing ratio, temperature, and part volume. Always follow manufacturer recommendations (by weight or volume), stir with a flat paddle, and minimize batch size to prevent heat buildup. Mix slowly to reduce air entrapment, and consider double-cup mixing for critical repairs. ZDSpoxy engineers often recommend test mixes and small-batch gel checks before full-scale work.
Surface Preparation: Sanding, Cleaning, and Degreasing
Excellent surface preparation is non-negotiable. Sand to open the grain, clean off all particles, and degrease (particularly for hardwoods and oily species) with an acetone or alcohol wipe. Avoid household cleaners, which can leave residues that hinder epoxy wetting.
The Role of Epoxy Primers in Marine Wood Protection
Epoxy primers bridge the gap between bare wood and finishing coats. They not only boost adhesion but also enhance moisture block, particularly on end-grain where water absorption risk is highest. Using a solvent-free, marine-specified primer also mitigates health concerns from VOCs in poorly ventilated hull spaces.
Layering Glass Cloth for Strength and Flexibility
For hull bottoms, transoms, and decks subject to flex or impact, laying fiberglass cloth into wet epoxy delivers significant reinforcement. The cloth is saturated with resin, rolled flat, then sealed with further coats for a blend of flexibility and puncture resistance ideal for real marine conditions.
Dealing With Common Application Pitfalls
Application issues can include tacky surfaces, bubbles, and uneven curing. Most cures stem from poor mix ratio, excess moisture, or improper surface prep. Allow for each layer to cure sufficiently, sand lightly for adhesion, and keep the working area within recommended temperature and humidity limits. If you encounter persistent problems, refer to insights from ZDSpoxy’s technical articles to troubleshoot site-specific concerns.
Safety and Handling: PPE, Ventilation, and Shelf Life
Epoxy systems require careful handling: use nitrile gloves, eye protection, and prioritize ventilation, especially with solvented grades. Store products cool and dry, and monitor shelf life to avoid expired resins or hardeners. Some marine-grade systems are formulated for low odor and low VOC to address confined marine workspaces safely.
Quality Assurance: Ensuring Long-Lasting Marine Repairs
Check batch records, date codes, and ensure all resins/hardeners show no crystallization or odor changes prior to use. Field testers (small batch cures) prevent surprises during main application. Detailed logs of prep, mixing, and batch numbers help maintain accountability and repeatable quality, a habit common to experienced epoxy users and manufacturers alike.
Comparing Epoxy Wood Systems: Marine vs. General Purpose
| Feature | Marine Grade Epoxy | General Purpose Epoxy |
|---|---|---|
| Moisture resistance | Excellent, with salt tolerance | Moderate, may fail over time |
| Flexibility | Formulated for wood movement | Often rigid, prone to cracking |
| UV stability | Can be high if specified | Usually not UV rated |
| Typical uses | Boat repair, dock, sealing | General home/garage repairs |
Epoxy Selection Logic: Matching Strength, Flow, and Conditions
The optimal marine epoxy for wood balances flow (penetration), strength (compression/tensile), exotherm (minimal heat buildup), and cure time. Fast-setting types (like some ZDSpoxy AB kits) are suited for urgent dock repairs, whereas slow-cure options excel in large laminations where heat control and open time are needed. Always base your selection on both site demands and application method.
Expert Tips for Applying Epoxy in Variable Conditions
Work within recommended temperature ranges (10–30°C), use fresh abrasive pads before recoating to ensure bonding, and beware of morning dew or condensation. For large or vertical surfaces, use slow-cure epoxy and thin application to minimize sagging. Always stage your work for batch continuity and consistent cure windows.
When to Use Slow Cure vs. Fast Cure Marine Epoxy
Slow cures are preferred for major repairs, laminating, or when working time is critical. Fast cures work best for spot-fixes or in colder conditions, but may develop more heat and require faster application. Learn more about the science and scenarios behind cure speed in articles dedicated to marine resin curing dynamics.
Checking for Cure and Bond Integrity
Simple scratch tests, torque checks, and moisture meter readings after curing ensure your repair has set properly. Any tackiness, odor, or off-color may indicate under-cure — revisit mix ratios and jobsite conditions as remedial action.
Finishing and Topcoating for Marine Longevity
Epoxy is moisture-tough but not always UV-stable; apply marine paints or UV-resistant varnishes for color retention and environmental resilience. Sand lightly before overcoating, and consult system compatibility tables for primer/topcoat strategies that align with your epoxy manufacturer’s guidance.
Long-Term Maintenance: Inspections, Touch-Ups, and Prevention
Schedule periodic inspections, especially after winter or high-use seasons. Fill minor dings immediately with epoxy putty, and apply spot coat refreshers as maintenance. This consistent care ensures the full benefit of marine grade epoxy for wood over a vessel or structure’s lifespan.
Industry Standards and Compliance for Marine Epoxies
Top marine epoxies comply with international standards for toxicity, emission, and marine immersion durability. Always verify datasheet compliance with ISO, ASTM, or relevant marine certifications for critical projects.
Conclusion: Mastering Marine Grade Epoxy for Wood

Marine grade epoxy for wood stands at the forefront of reliable wooden vessel and marine structure preservation. Its ability to waterproof, repair, and provide enduring strength puts it generations ahead of traditional coatings or glues. By following disciplined prep, using multiple thin coats, choosing fill systems wisely, and respecting cure timelines, anyone can secure wood against the ocean’s toughest challenges. Stay observant, stay methodical, and remember — the difference between a lasting repair and a recurring headache often lies in epoxy system discipline and finish details.
Frequently Asked Questions
What is marine grade epoxy for wood?
It is a high-performance two-part resin system designed to waterproof, repair, and bond wood in wet, salty, or submerged conditions, providing resistance to rot and structural failure.
How do I repair wood rot with marine epoxy?
Remove all soft or spongy wood, apply a penetrating epoxy primer, rebuild shape with epoxy putty, then seal with resin and apply protective topcoat.
Can epoxy seal both new and old marine plywood?
Yes, but for aged wood, extra sanding and diligent moisture checks are key; always seal cut edges and drilled holes for maximum durability.
Should I use multiple thin coats or a thick single coat?
Multiple thin coats are preferred for deep penetration, even sealing, and to minimize defects like bubbles or blushing — especially in marine climates.
How does epoxy compare to varnish for wood boats?
Epoxy provides superior waterproofing and mechanical strength but needs a UV-protective topcoat, while varnish is mainly decorative and less protective.
How can I ensure proper cure and bonding?
Keep the work dry, measure mix ratios precisely, limit batch size, and sand between coats. Test bonds locally before relying on major repairs structurally.
Related Reading
- Epoxy vs. Polyester Resin: Which Delivers Lasting Repairs at Sea?
- Selecting the Ultimate Marine Epoxy Resin: A Performance-Driven Guide
- Marine Epoxy Putty vs Liquid Resin: 7 Differences Explained
- Marine Epoxy or Varnish? Get the Top 7 Truths for Durability
- Unpacking Low Yellowing and UV Resistance for Clear Marine Epoxies