Understanding Osmotic Blistering in Epoxy Floors
Osmotic blistering in epoxy floors is a common and frustrating problem that can ruin even the most carefully installed coatings. For facility managers, flooring contractors, and installers, identifying the factors that lead to this costly issue is vital. In this article, you’ll discover the 5 main culprits of osmotic blistering in epoxy floors and how to prevent them. We’ll examine the mechanisms behind moisture vapor emission, substrate preparation mistakes, and the role of humidity testing using best-in-class methods. With practical insights and real-world experience, you’ll learn how to eliminate these failures from your next project and ensure your epoxy floors maintain their appearance and durability.
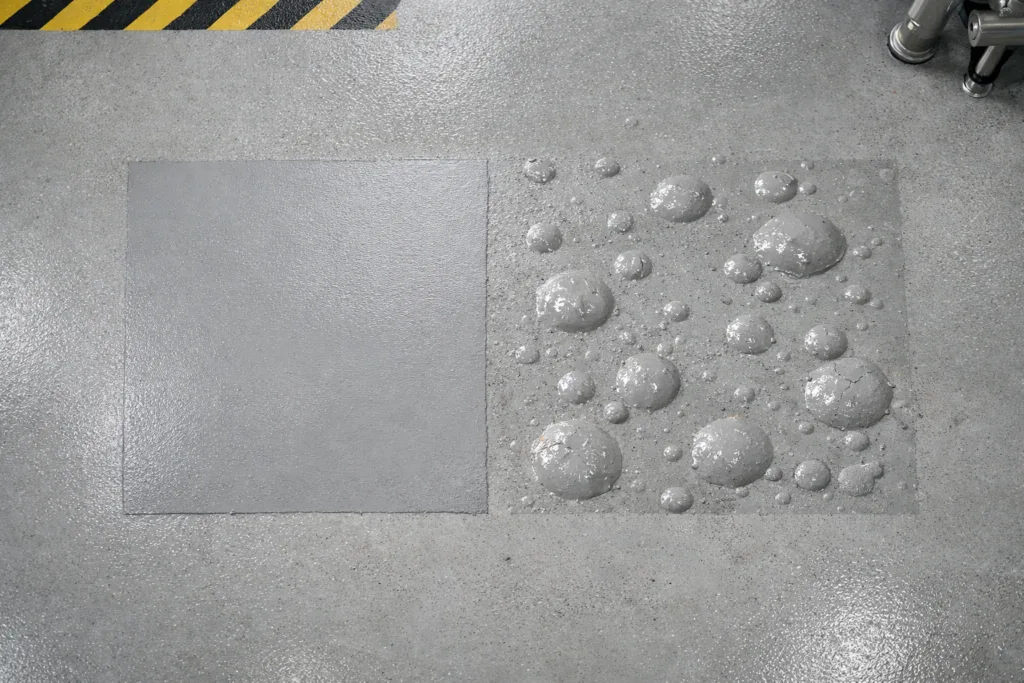
What Is Osmotic Blistering in Epoxy Floors?

Osmotic blistering occurs when water vapor or other contaminants move through the concrete slab and create localized pressure beneath a seamless epoxy coating. Over time, this pressure creates raised bubbles or ‘blisters,’ often filled with liquid, which break the bond between the floor and the epoxy. These blisters compromise aesthetics and cause long-term failure if not properly addressed.
How Epoxy Floor Blistering Develops
Blistering usually starts below the surface. Moisture-rich environments, warm temperatures, and insufficient substrate evaluation set the stage. Water, salts, or other chemicals migrate upward, drawn by differences in concentration. If the floor coating is not vapor-permeable or properly bonded, pressure builds beneath the epoxy. Eventually, the weakest point gives way, forming a blister.
The 5 Main Culprits of Osmotic Blistering in Epoxy Floors and How to Prevent Them
Osmotic blistering isn’t random. By understanding the main causes, you can decisively reduce the risk on any project.
Moisture Vapor Emission from Concrete
Fresh concrete contains significant water. If the slab hasn’t dried below the recommended level, moisture will continue to move upward, causing floor coating issues. Even older slabs can absorb moisture from the ground, especially if there is no effective vapor barrier. The result? Popcorn-like blisters forming days, weeks, or months after installation.
- Check moisture using RH probes or calcium chloride testing before installation.
- Observe local groundwater, season, and HVAC operation schedules.
For jobs that demand strict limits, ZDSpoxy suggests high-reliability, laboratory-standard humidity testing for accurate, repeatable results.
Improper Substrate Preparation
The concrete surface must be clean, rough, and sound. Residues of oil, curing agents, paint, or dust can form barriers, reducing the bond strength between epoxy and substrate. Weak bond lines make it easier for vapor to accumulate and produce blisters.
- Use mechanical grinding or shot-blasting to reach the correct surface profile.
- Vacuum dust and avoid contamination with new oil stains or water after preparation.
Proper preparation also means matching the right epoxy primer for concrete substrates. This foundational layer boosts the bond and offers moisture tolerance for high-performance flooring projects.
Humidity Testing Overlooked or Inaccurate
Skipping humidity testing or using outdated methods is one of the fastest routes to failure. Moisture meters can be misleading if used in isolation. Modern best practices recommend in-situ relative humidity probes or laboratory-calibrated calcium chloride kits. This step is critical to discover hidden moisture that could cause osmotic blistering, even in dry-appearing slabs.
- Test in multiple slab locations, especially close to perimeter walls and high-traffic areas.
- Follow product-specific moisture limits to avoid warranty voids or costly remediation.
Incorrect Epoxy Product Selection
Some coatings are formulated for aesthetics rather than resistance to vapor or chemical migration. For high-risk installations, it’s essential to specify vapor-tolerant or moisture-blocking primers and topcoats. Using a water-based acrylic epoxy primer can add a layer of moisture defense and help resist osmotic effects.
- Compare datasheets for permissible moisture limits, vapor permeability, and intended substrate compatibility.
- When in doubt, consult your manufacturer’s technical documentation or request a job-specific recommendation.
Poor Mixing, Application, or Curing Conditions
Human factors play a role. Inadequate mixing, thick application, low ambient temperatures, or rushing before full substrate cure can trap air or create dense, unyielding coatings. These errors often result in uneven cure, pinholes, and an environment where blisters can easily form.
- Follow the recommended mix ratios and mixing time exactly. ZDSpoxy engineers emphasize batch size discipline and tool cleanliness for reliable results on site.
- Apply coatings at correct film thickness and avoid re-coating before full cure of underlying layers.
Remember, seasonal changes can unexpectedly affect curing time and humidity, so always monitor on-site conditions.
Identifying Early Signs of Floor Coating Issues
Catching warning signs before blisters enlarge can save time and reduce repair costs. Look for the following:
- Small pinholes or bubbles appearing shortly after application
- Areas with dull patches or loss of gloss
- Surfaces that feel soft or sticky days after cure
- Distinct “hollow” sound when tapped
Intervening at the first sign of trouble can help you repair before a complete reinstallation is necessary.
How to Prevent Osmotic Blistering: A Step-by-Step Approach
Prevention is always superior to repair. Here’s a proven roadmap to avoid osmotic blistering on your next epoxy flooring project:

- Assess environmental and substrate moisture risks at design stage
- Choose vapor barrier systems where necessary
- Strictly prepare the substrate by mechanical means
- Test slab humidity with laboratory-grade equipment
- Select properly designed primers and topcoats, such as high-gloss clear epoxy topcoat
- Follow manufacturers’ instructions for mixing, application, and curing
What Is Moisture Vapor Emission and Why Does It Matter?
Moisture vapor emission is the upward movement of water vapor through concrete, often driven by the difference in air pressure and humidity between below and above the slab. Even slabs that feel dry may emit moisture that can lead to coating failure. This persistent movement is especially common in ground floors lacking a proper vapor barrier membrane. Ignoring vapor emission rates is almost certain to result in blisters after installation, even with premium coatings.
The Role of Substrate Preparation in Preventing Blisters
No matter the coating’s technology, a poorly prepared substrate increases failure risk. The International Concrete Repair Institute (ICRI) specifies the Concrete Surface Profile (CSP) for certain coatings. A profile that is too smooth does not allow proper anchoring. Surface cleanliness—including removal of all laitance, dust, and contaminants—is equally important.
Contractors should never underestimate the time, tooling, or skill necessary. Skipping these steps may save hours upfront but will cost days or weeks if blistering triggers a redo later.
ZDSpoxy’s Humidity Testing: Laboratory-Level Prevention
ZDSpoxy routinely advises clients to go beyond quick surface checks when in doubt. Using calibrated in-situ probes and validated calcium chloride kits, their laboratory methods reveal the true humidity below the surface—not just what you see at the top. This reduces subjective judgment, improves warranty compliance, and helps select the right process for each site’s unique moisture profile.
Choosing the Right Epoxy Resin System
Selecting the proper product suite isn’t just about meeting the spec sheet. For floors exposed to high vapor loads or chemical attack, consider systems like chemical resistant resin flooring solutions. These may use special primers, mid-coats, and topcoats designed for demanding industrial and commercial spaces.
Real-World Site Conditions: Lessons from the Job Floor
On-site, real conditions rarely match textbook scenarios. Tools may get dirty, temperatures shift, and unexpected delays happen. ZDSpoxy’s field support emphasizes meticulous mixing, application at the rated substrate and air temperature, and consistent oversight in humid or fluctuating weather. Field moisture testing alongside batch documentation helps contractors respond to real-world challenges, protecting both immediate results and long-term floor durability.
Blister Remediation and Repair: Practical Approaches
If blisters do occur, all affected areas must be assessed and repaired. This often means removing the blistered section, addressing moisture issues, and restoring profile before coating is reapplied. Quick patch fixes rarely last if the underlying moisture vapor or prep issue remains unsolved. Comprehensive remediation restores integrity and prevents recurrence.
How Floor Design and Use Impact Blistering
The intended function of the floor matters. Heavy traffic, chemical exposure, and frequent cleaning or thermal shock put additional stress on the system. Specifying more robust vapor-tolerant or chemical-resistant systems for pharmaceutical, food, or industrial plants reduces the chance of blistering related to use conditions. Adjustments in topcoat selection, thickness, or base preparation may be necessary for aggressive environments.
Best Practices Checklist for Contractors
- Always test for moisture—never assume a slab is dry
- Choose compatible primers and topcoats for environment and use
- Keep job records: mixture ratios, humidity measurements, and surface condition photos
- Keep the worksite dry and free of new contaminants prior to coating
- Schedule follow-up checks, especially during the warranty period
Conclusion
Osmotic blistering in epoxy floors is preventable with systematic attention to moisture, prep, and product selection. Always prioritize humidity testing, thorough substrate preparation, and using the correct resin system for your site. Learning from these five main culprits protects your facility, reputation, and budget. Flooring solutions are constantly evolving, so stay up-to-date on testing practices and material science to minimize the risk of future failures.
Frequently Asked Questions
What is osmotic blistering and why does it happen in epoxy floors?
Osmotic blistering is when trapped moisture or contaminants create bubble-like bumps under epoxy coatings. It happens due to improper slab drying, poor substrate preparation, or moisture vapor movement through the concrete.
How can I prevent moisture vapor emission from ruining my floor coating?
Use proper humidity testing (e.g., RH probes, calcium chloride kits), ensure proper slab drying, and select vapor-tolerant primers or membranes for high-moisture sites.
What is the best way to prepare a concrete substrate for epoxy flooring?
Mechanically profile the surface by grinding or blasting, thoroughly vacuum debris, and spot-treat stains or contaminants. Follow with the manufacturer’s recommended primer.
Why is humidity testing so crucial for epoxy floor application?
Humidity testing detects hidden moisture that could lead to osmotic blistering, ensuring the substrate meets the manufacturer’s requirements for long-term performance.
Which epoxy systems are best for high-moisture or chemically aggressive environments?
Systems with vapor-blocking or chemical-resistant components, such as moisture-tolerant primers and specialty topcoats, perform best. Check technical data sheets for compatibility.
Can blistered epoxy floors be repaired, or do they need complete replacement?
Local repairs are possible if the root cause (moisture, contamination, prep) is resolved. Otherwise, full removal and reinstallation may be necessary to restore the floor.