Introduction: Why Pre-Grout Inspection for API Pump Skids Matters
Pre-grout inspection for API pump skids is the foundation of safe, reliable equipment installation. When dealing with high-value assets and critical processes, especially in industries like oil and gas, chemical, or power generation, skipping a careful inspection can lead to downtime, costly maintenance, or even catastrophic failure. Adhering to API standards isn’t just paperwork—it’s a direct investment in the equipment’s lifespan and plant performance.
This comprehensive checklist takes you through key steps, root-cause risks, and actionable advice to help project managers, rotary equipment engineers, and QA teams achieve seamless grout installations for pump skids, no matter the duty or location. We’ll also share practical insights about site challenges, real inspection strategies, and ZDSpoxy’s experience with complex grouting jobs to bring standards into real-world focus.
Understanding Pre-Grout Inspection for API Pump Skids
Before pouring a drop of grout, your inspection determines whether the baseplate, grout forms, anchor bolts, and surrounding concrete are genuinely fit for purpose. A disciplined pre-grout inspection for API pump skids aligns everyone—engineers, contractors, and owners—on requirements set out in API standards for rotating equipment foundation performance.
The Role of API Standards in Pump Skid Grouting
API standards, notably API 610 (Centrifugal Pumps) and API 686 (Recommended Practices for Machinery Installation), are the backbone of pump skid specification and installation. These documents spell out quality benchmarks for foundation flatness, anchor positioning, grouting materials, and curing protocols. Adhering to these standards is not only key for quality assurance but also ensures regulatory compliance, insurance validation, and performance predictability.
What Happens If Pre-Grout Inspection Is Skipped?
Overlooking inspection steps can lead to several common failures after grouting: baseplate voids, out-of-tolerance alignments, premature grout cracking, or progressive machinery soft foot. According to ZDSpoxy’s field reports, many pump vibration or misalignment issues are discovered years after subpar pre-grout checks, costing far more than the original time savings. Proactive inspection is always cheaper than post-grout rework.
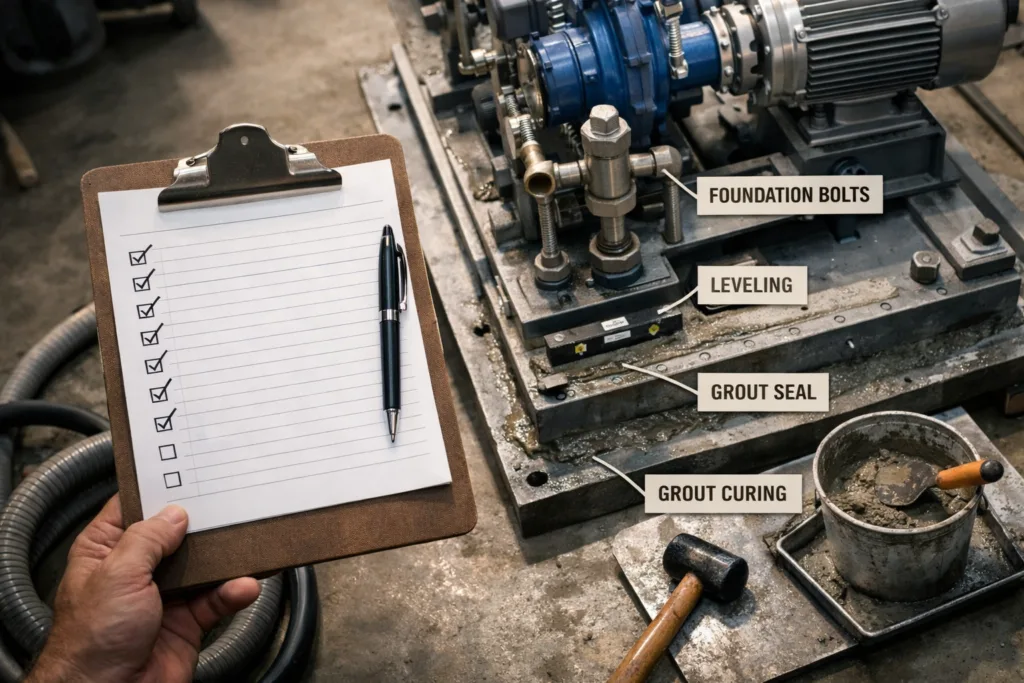
Pre-Grout Inspection Checklist for API Pump Skids
The following checklist covers all critical areas for robust quality assurance when preparing an API pump skid:
- Verify concrete foundation strength and cure
- Check surface flatness within 1.5 mm per API criteria
- Inspect for oil, laitance, or contaminants—surface must be clean and roughened
- Confirm anchor bolt location, size, projection, and cleanliness
- Baseplate layout: ensure fit, level, and shimming plan is complete
- Weld and bolt tightness integrity check (record QA results)
- Pump base primer compatibility test if used
- Formwork and grout hole location/sealing inspection
- Equipment cold alignment log review before grout
- Check for formwork leaks, air pocket traps, and proper grout headroom
If in doubt, refer to the API 610 baseplate grouting method as a gold standard, or consult the impact of grouting on pump seal life for downstream implications.
Step-by-Step Guide: Each Pre-Grout Inspection Area Explained
Concrete Strength and Curing Review
Ensure the underlying concrete foundation has reached a minimum compressive strength (typically 25–35 MPa, per API), confirmed through cylinder or core tests. Foundation must also be cured (usually 21–28 days) and free of high moisture or chemical contamination. Spot checks for oil, rebar corrosion, or surface delamination are critical to avoid future grout failures.
Surface Cleanliness and Profile Assessment
The concrete should be roughened to an ICRI CSP 3–5 profile and stripped of any oil, grease, dust, or weak laitance. Use mechanical scarifiers, then vacuum the surface. ZDSpoxy notes that chemical contamination or old curing compounds are top causes for incomplete grout bonding.
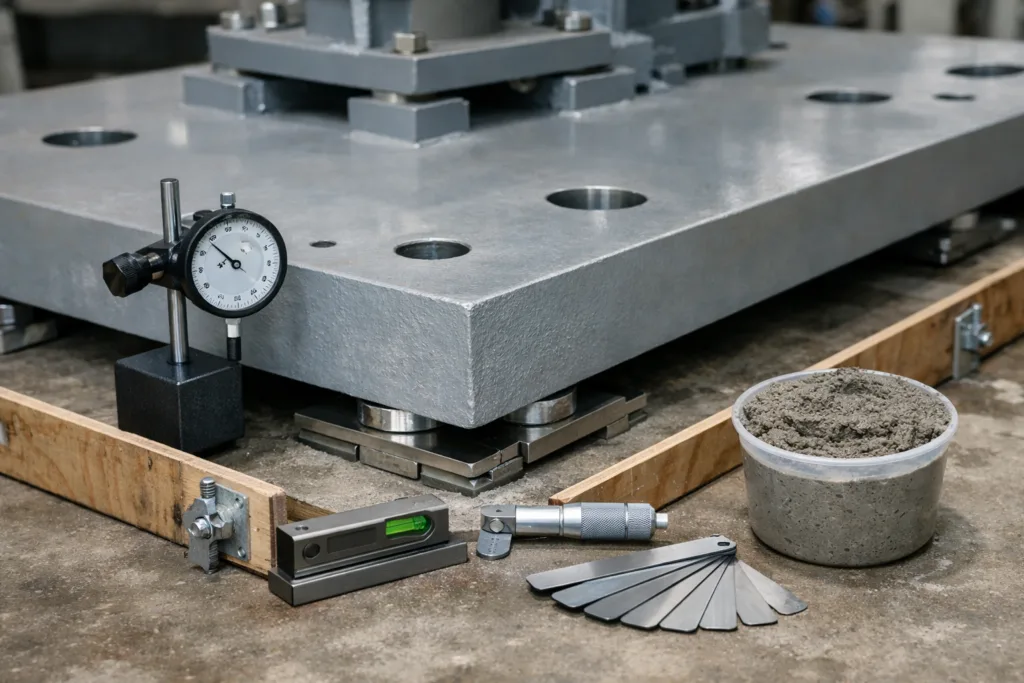
Checking Foundation Flatness and Elevation
Use precision straightedges, levels, and laser tools to measure surface tolerances. Flatness is vital—out-of-spec surfaces create voids and resonance risk. High spots often interfere with total grout contact and lead to unwanted machine stresses after cure.
Anchor Bolt Quality and Positioning
Inspect each anchor bolt for corrosion, straightness, size, and specified projection. Remove thread protectors, blow out sleeves, and ensure nuts spin freely. Position must match the baseplate template precisely—or all downstream alignments will suffer.
Baseplate Setup and Leveling
Dry-fit the baseplate with temporary shims or epoxy chocks per job spec. No twist, sag, or rocking should be present. For precision, document all shim positions and consider soft foot correction if needed before grout installation. ZDSpoxy recommends epoxy shims in some severe vibration environments.
Weld and Bolt Integrity Checks
Confirm weld soundness by visual and (if needed) NDT inspection. Tighten all permanent bolts/fasteners to spec. Record all verification checks in a QA log for traceability.
Primer Coat Compatibility
If a primer or corrosion protection is used beneath the baseplate, verify full cure and compatibility with chosen grout type (especially for epoxy systems). Incompatible primer may lead to debonding or soft joints. Not sure which to specify? Refer to ZDSpoxy’s Solvent-Free Epoxy Primer for chemical compatibility data.
Formwork and Grout Hole Preparation
Inspect all grout forms, headbox locations, and exhaust holes for soundness, cleanliness, and leak-tightness. Forms must be firmly set but easy to remove, with no gaps beneath grout lines. All holes should be marked on inspection drawings and verified as open pre-pour.
Prepping for Air Entrapment and Void Elimination
Ensure forms and pump base allow unimpeded grout flow, with a slight slope for air escape. Frequent missed step: check for hidden pockets beneath ribs or brackets. Use tape or sealant to control leaks. For tricky tight gaps, consider ZDS-3382AB Low Viscosity Epoxy Grout, ideal where high flow is essential without sacrificing compressive strength.
Equipment Alignment Pre-Grout
Document pump and motor shaft alignment in the cold, un-grouted state. Take measurements at several points, flagging any excessive soft foot or distortion. The ability to correct base movement before grouting is far simpler, as realignment after grout cure can be extremely labor-intensive.
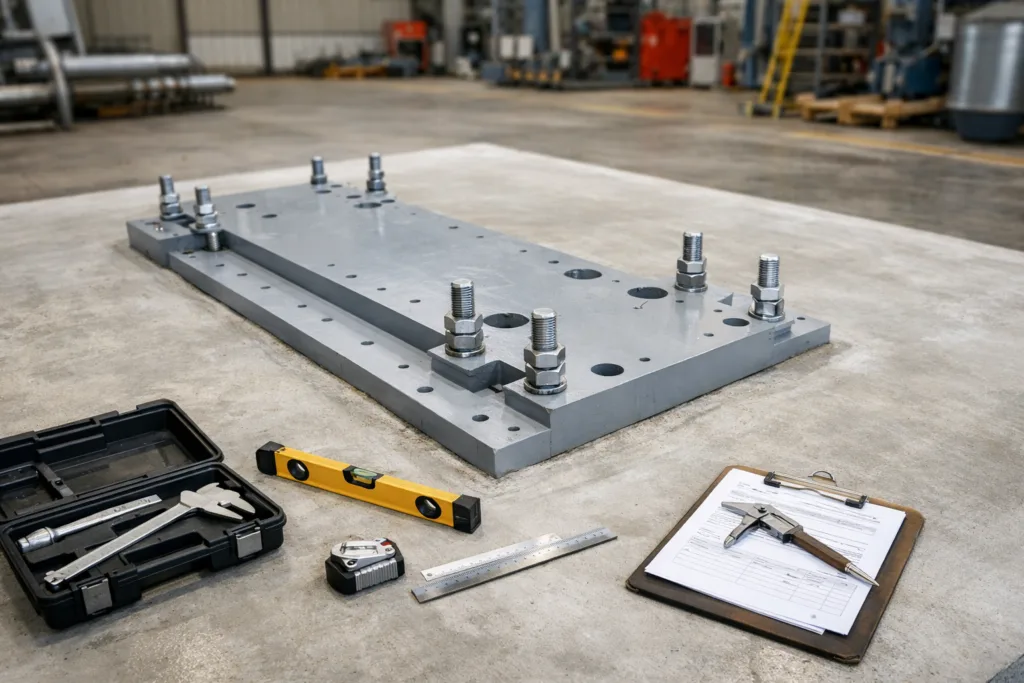
Pre-Grout Inspection: Tools and Methods for Quality Assurance
Successful inspection relies on methodical documentation and calibrated tools. Typical items used include:
- Precision levels, laser levels, and straightedges (for flatness and elevation checks)
- Dye penetrant and NDT tools for weld checks
- Feeler gauges and torque wrenches for bolt validation
- Compressive strength testers or core samples for foundation reviews
- High-powered vacuums and mechanical scrapers for cleaning
- Alignment instruments (dial indicators, laser alignment tools)
Maintain thorough pre-grout QA records for every API pump skid. These are often part of turnover documentation and can settle disputes between contractors and owners.
Best Practices for Grouting API Pump Skids
While every site differs, proven practices to maximize successful grouting and minimize future vibration or loosening include:
- Always use the same baseplate, shims, and bolt assemblies as inspected—do not swap parts post-inspection.
- Pre-wet concrete or substrate with water (remove all standing water before epoxy grout) to reduce premature cure or outgassing.
- Seal all gaps under forms and at grout head to minimize leaks and air pockets.
- Mix smaller, controlled batches of grout to minimize waste and control working time.
- Refer to manufacturer’s mixing and placement instructions (such as those found for Heavy Machinery Epoxy Grout).
- Keep a cross-functional team (maintenance, QA, concrete contractor) involved for last-minute clarifications.
Case Study Insight: Common Failures When Skipping Inspection
In a recent refinery upgrade, skipping a thorough pre-grout foundation inspection resulted in over 15% of pump skid baseplates exhibiting grout voids and misalignment after cure. Most failures traced back to minor but overlooked surface contamination and anchor bolt misplacement. These issues required costly chiseling and re-shimming. QA data verified that jobs using disciplined pre-grout inspection, aligned with API 686, experienced dramatically lower vibration, alignment correction, and seal replacement rates over the following five years.
Quality Control Throughout the Grouting Process
Quality assurance is not a one-off step. Records should cover pre-grout, during grout, and post-grout checks: verify batch mixing, pour sequence, working time, ambient temperature, and joint finish. Visual inspection for early cracks and audit of cure times are just as vital as initial checks. Document every significant variable for regulatory review and future troubleshooting.
Tips for Troubleshooting Before and After Grouting
What if a critical tolerance is not met? Stop, document, and correct before pouring grout. If foundation moisture is too high, pause the job and consult with the resin manufacturer on interim solutions. After grouting, check for unexpected movement, misalignment, or soft foot, and address issues promptly while grout is still workable if possible.
ZDSpoxy Experience: Practical Advice for Reliable Outcomes
From the ZDSpoxy manufacturing floor to client job sites, consistency in pre-grout inspection and documentation is a make-or-break step. In projects with unusual geometry or environmental extremes, attention to anchor bolt cavity cleaning, primer compatibility, and pot life tracking are the most effective ways to avoid remedial work. Always plan batch sizes for the weather and substrate temperature to guarantee flowability and proper exotherm control on the slab.
Summary Table: Pre-Grout Inspection Checklist Items
| Inspection Item | Check Performed | Status (OK/Not OK) |
|---|---|---|
| Concrete Strength & Moisture | Compressive test/core, moisture meter | |
| Surface Flatness/Profile | Straightedge/laser level, visual profile | |
| Cleanliness (Oil, Laitance) | Visual, wipe tests | |
| Anchor Bolts | Position, projection, cleanliness | |
| Baseplate Fit/Level | Dry fit, feeler gauge, shims | |
| Weld/Bolt Integrity | Visual/NDT checks, torque wrench | |
| Primer/Coating | Cure test and compatibility | |
| Formwork/Gaps | Leak check, secure fit | |
| Air/Void Paths | Visual, flow simulation as needed | |
| Equipment Alignment | Dial indicator or laser check |
Pre-Grout Inspection for API Pump Skids: Final Thoughts
The complexity and capital value of API pump skid installations demand a rigorous pre-grout inspection process. From concrete quality to the smallest fastener, every detail shapes long-term reliability, vibration performance, and maintenance costs. By methodically working through this checklist, engineering teams ensure that grouting is never an expensive patch—but rather the foundation of system stability. Quality assurance, rooted in API standards and practical checks, is a one-way ticket to project success and equipment longevity.
Frequently Asked Questions
Why does API require such detailed pre-grout inspections for pump skids?
API standards emphasize pre-grout inspections to ensure all foundations, anchor bolts, and baseplates meet precise tolerances, preventing machine misalignment, vibration, and premature failure.
What tools are commonly used for pre-grout inspection?
Tools include straightedges, laser or optical levels, torque wrenches, feeler gauges, and compressive strength testers—all essential for validating alignment, elevation, and fit.
How do I handle surface contamination during inspection?
Remove oil, grease, laitance, and dust with scarifiers, industrial vacuums, or compatible cleaners. Any contamination can compromise grout bond and equipment stability.
What if foundation moisture is too high before grouting?
Postpone grouting, enhance ventilation, or use drying methods. High moisture can lead to poor bonding and is a leading cause of early grout failure.
When should I use low-viscosity epoxy grouts for skids?
Low-viscosity epoxy grouts work best in tight gap or complex geometries where flow is critical and full contact is needed without sacrificing compressive properties.
How often should I document pre-grout inspection results?
Record every step for each skid. Documentation supports QA, regulatory review, and provides a clear trail for future troubleshooting or warranty claims.
Related Reading
- Hidden Costs of Skipping Grout: How Seal Life and Budgets Suffer
- Step-by-Step: Achieving Void-Free Centrifugal Pump Skid Installs
- Metal Fabrication Stability: Why Grout Hole Design is Mission Critical
- 9 Field-Proven Grouting Techniques to Eliminate Pump Base Failures
- Vertical vs. Horizontal Pump Grouting—Essential Lessons for Reliability