Understanding Vacuum Infusion Boatbuilding
Vacuum infusion boatbuilding is a widely adopted method for creating lightweight, strong, and consistent composite hulls. This technique uses a vacuum to draw specialized infusion epoxy through dry reinforcements—such as fiberglass or carbon fiber—resulting in a finished composite laminate with minimal air pockets and optimal fiber-to-resin ratios. The process is not only about placing the correct materials but also depends on the careful selection and handling of resin systems, flow media, leak tests, and process controls. This article provides a practical checklist and resin selection guide, especially focused on avoiding dry spots and runaway exotherm, without diving into detailed equipment choices.
Critical Steps in the Vacuum Infusion Process
Successful vacuum infusion relies on tightly controlled steps: careful reinforcement placement, airtight bag sealing, resin system selection, flow media planning, and vigilant monitoring during resin transfer. Each phase interlocks to determine the final laminate’s strength and quality.
Vacuum Infusion: Process Flow Checklist
- Confirm mold release and surface cleanliness
- Lay up reinforcements (glass, carbon, core materials)
- Apply peel ply and flow media—plan main flow paths
- Install resin feed lines and vacuum outlets
- Seal with vacuum bag film and check for leaks
- Test bag integrity (leak test)
- Mix and degas infusion epoxy with correct ratios
- Start resin feed, monitor flow fronts and temperature
- Clamp resin lines after complete saturation
- Allow full cure before demolding
Why Infusion Epoxy Selection Matters
The right epoxy resin acts as the backbone of your infused composite. It must flow easily under vacuum, adequately wet out fibers, and cure safely in thick sections without excessive heat (exotherm). Infusion epoxy differences in viscosity, pot life, and cure behavior can mean the difference between a flawless hull and costly repairs.
Resin Selection Criteria for Infusion Success
Choosing infusion epoxy isn’t just about cost or label claims. Here are practical criteria that experienced composite engineers use for reliable infusion boatbuilding:
- Low Viscosity: Resin must flow quickly through dense reinforcements
- Pot Life: Sufficient working time to fill the entire mold—aim for 45–120 minutes for hulls
- Controlled Exotherm: Limited heat buildup during cure to prevent warping, print-through, or resin boil
- Balanced Reactivity: Not too slow (risk of incomplete cure in cool shops) and not too fast (risk of runaway reactions)
- High Wetting Ability: Ensures resin fully saturates fibers and avoids dry spots
For further technical notes on marine epoxy resin manufacturer standards and trends, see our Marine Epoxy Resin Manufacturer resource for advanced users.
Matching Pot Life and Flow Time to Project Size
One common pitfall: using an infusion epoxy with insufficient pot life. If your pot life is too short compared to the mold volume, the resin may gel before flow completion, causing dry areas and wasted materials. On large boat hulls—even at ambient temperatures—aim for products with >60-minute pot lives. If in doubt, perform a small-scale test or consult product data.
Leak Tests: The Hidden Key to Laminate Quality
Before introducing resin, always perform a vacuum leak test. Even tiny leaks risk air infiltration, leading to voids, resin starvation, or incomplete fiber wet-out.
- Pump down the bag and watch vacuum gauge stability for at least 10 minutes
- Check all flange seals, bag pleats, and resin/vacuum line penetrations
- Mark and reseal leaks immediately—not after starting resin feed
Tip: Repeated leak-test failures can trace back to surface dust, crimped flow media, or reusable seal tapes losing grip from age or oil. Prioritize clean preparation and high-quality bagging materials.
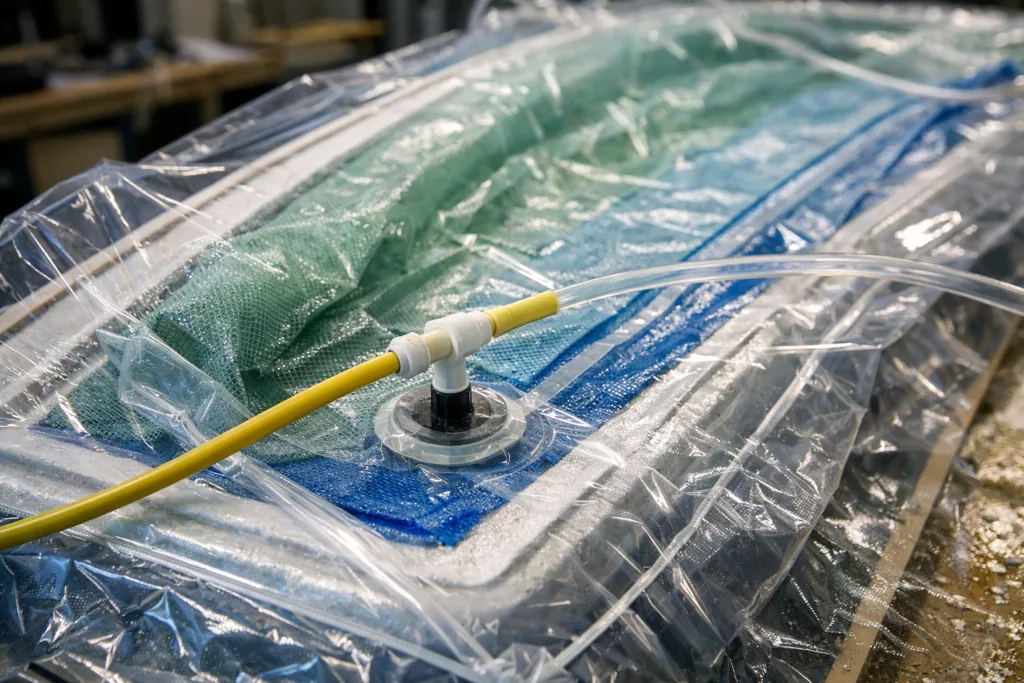
Role of Flow Media: Achieving Consistent Wet-Out
Flow media—usually a green or mesh sheet placed atop reinforcement—dramatically accelerates horizontal resin travel, helping avoid dry zones. Its placement and coverage directly control resin delivery. Always extend flow media near (but not into) vacuum ports to prevent resin racing straight to vacuum without saturating glass below. Remove excess flow media before cure for a smooth finish, or experiment with varied mesh densities in high- and low-flow zones.
How to Avoid Dry Spots in Infusion
- Map flow media to evenly cover all broad areas
- Place resin feed lines so flow fronts meet at mid-panel, not at vacuum port
- Watch for bridging (air gaps) under mesh along contoured hull molds
- Monitor flow visually at key checkpoints using clear bag film or strategically placed windows
For concise tips on fiber wet-out and repair, reference our material on Proven Workflow for Fiberglass Boat Crack Repair Using Marine Epoxy Resin.
Preventing Runaway Exotherm: Thick Section Safety
Epoxy resin cures via chemical reaction, releasing heat (exotherm). During vacuum infusion, piles of material or large resin pools—especially in corners or deep bilge sections—can spike temperatures dangerously, distorting the laminate or causing surface defects.
- Use low-exotherm infusion systems for thick parts
- Limit individual batch size (mix in small containers if possible)
- Sequence fillings to avoid pooling in flat sections
- Check real-time resin temperature with a simple IR thermometer near expected hotspots
ZDSpoxy technical staff often recommend staged infusions or multi-part layouts for extra-thick hulls where exotherm control is critical. It’s also routine to note the ambient shop temperature since curing speed can double with just a 10°C increase.

The Resin Trap: Emergency Insurance
A resin trap is a must-have between your vacuum outlet and pump. This device captures stray resin if it passes the laminate, protecting your expensive vacuum pump from sticky disaster. Check that your trap volume exceeds any possible resin overflow.
Viscosity Control and Room Temperature Realities
Epoxy viscosity (thickness) changes dramatically with temperature. Too cold, and resin won’t flow. Too hot, and pot life shortens dangerously. Always check manufacturer-stated viscosity at your actual working temperature. If it’s under 400–600 mPas at 25°C, you’re usually in the safe zone for vacuum infusion domains. To maintain manageability:
- Store resin in a temperature-controlled space
- Pre-warm drums/containers as needed, but never overheated
- Use digital thermometers or viscosity cups as process checks
- Test a small batch in a cup to confirm flow at shop temperature
For deeper technical comparisons between clear marine epoxies and other marine resin systems, visit our article Clear Marine Epoxy vs Marine Varnish: The Top 7 Truths of Lasting Wood Protection.
Pot Life: Balancing Speed and Safety
Pot life is the working window between mixing epoxy and when it becomes too gelled for application. It shrinks rapidly as temperatures rise, especially in large mixes. Always match pot life to the infusion project’s scale. Too short, and resin may grab in the pot or feed lines mid-process. Too long, and you risk slow, incomplete cures and project delays.
The Infusion Epoxy Mix Checklist
- Check resin/hardener ratio—use a gram scale, not ‘eyeball’ measurement
- Mix thoroughly, scraping walls and corners of the bucket
- Degas with a vacuum or let stand to release bubbles before pouring
- Pour in thin layers if preparing large batches to lessen exotherm
- Monitor resin clarity and consistency before use
Checklist Table: Infusion Readiness Quick Reference
| Step | Check | Why It Matters |
|---|---|---|
| Mold Release | No residue, full coverage | Prevents stuck laminate, avoids surface defects |
| Bag Seal | No audible leaks, stable vacuum | Guarantees even lamination—no voids |
| Flow Media Placement | Covers all thick sections | Ensures fast, even wet-out; avoids dry spots |
| Resin Trap Fitted | In line, not bypassed or undersized | Protects pump, prevents contamination |
| Resin Pot Life | Time allows for full mold infusion | Prevents mid-fill gelation |
| Batch Size Control | Keep batches below 5L in warm weather | Reduces runaway exotherm |
Troubleshooting Common Infusion Issues
How to Fix Dry Spots
- Add supplemental feed lines if flow stalls in corners
- Double-check all bag pleats for bridging air
- Increase flow media coverage or use higher-porosity mesh
- Check vacuum source for adequate CFM during draw
Runaway Exotherm Prevention Tips
- Closely monitor resin temperature at several locations
- Reduce batch size or work in cooler ambient temperatures
- Switch to slower infusing hardener or cooler part and resin handling
- Lay up in thinner sections if possible
Advanced Advice: Field Notes from ZDSpoxy Engineers
Consistent, high-quality infusions depend on more than products—they need disciplined process control. ZDSpoxy process engineers note that batch consistency, real-time gel time checks, and keeping a log of room temperature, humidity, and vacuum readings make the difference between flawless hulls and patchwork fixes. In field projects, routine quality checks (viscosity using a cup, pot life timer running with each batch, and a tracked checklist) have enabled our teams to achieve repeatedly void-free, strong infusions even on challenging, large hull designs. Always prioritize accurate mixing ratio and environmental preparation—these two areas account for the majority of avoidable failures in marine infusion.
Conclusion: Smarter Resin Selection, Smoother Infusion Processes

Vacuum infusion boatbuilding offers efficient, consistent hull construction if you follow a process-based checklist and focus on critical resin selection criteria. Emphasize leak-free bag setups, strategic flow media placement, pot life and viscosity matching, and vigilant process monitoring. By applying these principles—and the infusion checklist above—boatbuilders can avoid costly dry spots and runaway exotherm, staying firmly in control from resin mix to hull demolding. As infusion technology and resin systems continue to advance, consistent success will come from technical discipline and continual process improvement.
Frequently Asked Questions
What’s the ideal infusion epoxy viscosity for boatbuilding?
For most vacuum infusion boatbuilding projects, resin viscosity should be between 200–600 mPas at 25°C to ensure proper wetting and flow through fiber layers without air entrapment.
How do I prevent dry spots in a complex hull infusion?
Dry spots can be prevented by careful layout of flow media, placing feed lines so they meet flow fronts centrally, and checking bag integrity to ensure full vacuum distribution. Monitoring the resin’s progress visually and adjusting flow paths also help.
What causes runaway exotherm, and how do I stop it?
Runaway exotherm happens when too much epoxy cures in a short time—usually due to large resin pools, a fast hardener, or warm shop conditions. Use slower hardeners, limit batch size, and avoid pooling to prevent this.
Why is a resin trap important in vacuum infusion?
A resin trap protects your vacuum pump by capturing any excess resin pulled through the laminate, preventing pump contamination and potential failure during the infusion process.
What’s the safest way to check for leaks before infusing?
Pump the bag to full vacuum, observe gauge stability, and listen for leaks. Mark and re-seal any leaks found before introducing any resin into the setup.
How does pot life affect large-scale marine infusions?
Pot life must be long enough to allow resin to fill the entire mold. For larger hulls, select infusing resins with pot lives over 60 minutes to avoid premature gelation before complete wet-out.
Related Reading
- Expert Guide: Hand Lay-Up Epoxy Resin Techniques for Stronger Marine Laminates
- Achieve Crystal-Clear, UV-Resistant Marine Epoxy in Harsh Environments
- Epoxy vs Polyester in Boat Repair: What Every Builder Should Know
- How to Maintain Long-Term Clarity: UV Resistance Keys for Marine Epoxies
- Choosing the Right Epoxy Resin for Vacuum Infusion Carbon Fiber Marine Projects