Waterproofing Renovation Checklist: Your Definitive, Step-by-Step Guide
If you’re planning a home or commercial space renovation, following a rigorous waterproofing checklist is essential. Even a minor error in this process can cost thousands in repairs, cause persistent mold issues, or reduce the service life of your entire floor or wall. With water leaks ranking among the most serious hidden hazards in property improvement, this guide gives you a clear, field-tested, printable roadmap. We detail every critical renovation waterproofing step — from initial inspection to final acceptance — and set observable benchmarks for quality at each stage. Plus, you’ll find exactly where to snap the eight must-have reference photos for documentation and peace of mind.
Printable Waterproofing Renovation Checklist: All the Steps, Explained
Below is a full breakdown of each waterproofing checklist step, the exact qualification standard (what “pass” looks like), and practical tips. Download or print this list before your next renovation project!
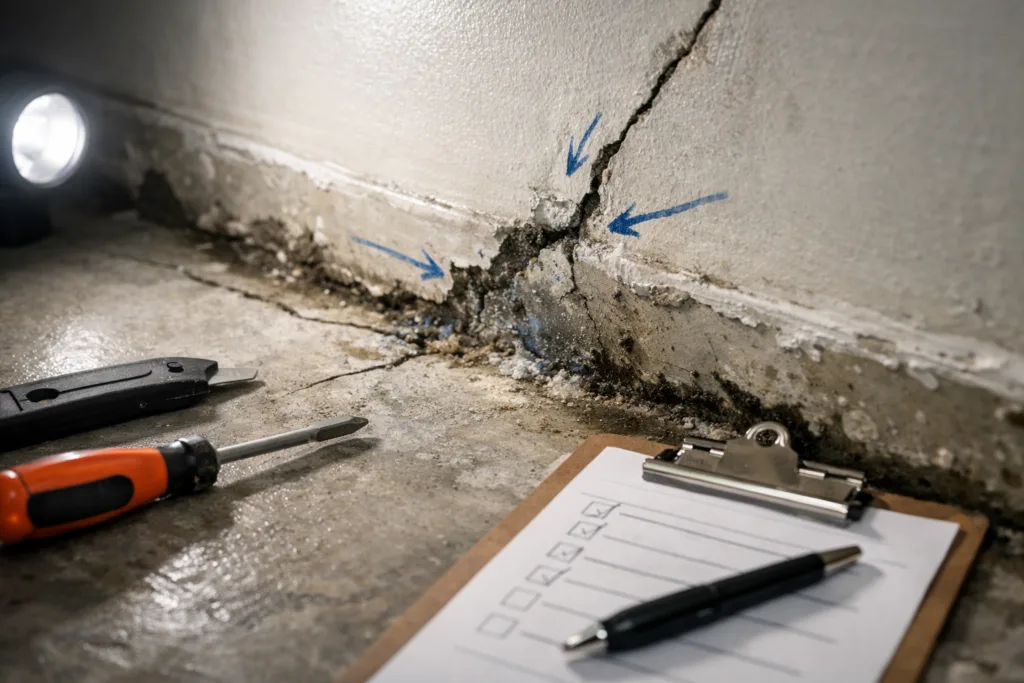
Inspect: Assess Old Surfaces and Document
- What to do: Survey all target areas (floors, walls, joints, edges, drains).
- What’s “Pass”? Document all visible damage (cracks, bubbling coatings, swelling, staining, or musty odors). Areas for repair clearly marked. Take clear photos (overviews, closeups, and nearby features).
Clean: Remove Contaminants Properly
- What to do: Mechanically scrub surface; vacuum up all dust and debris. Remove oils using a degreasing agent.
- What’s “Pass”? Surface feels clean and dry to touch; no loose dust, dirt, oil, or grease stains visible. Photo: After-cleaning wide shot.
Repair: Patch Cracks, Voids, and Gaps
- What to do: Open cracks/chips wider with grinder or chisel for better bond. Fill with appropriate repair mortar or epoxy system.
- What’s “Pass”? Repairs are flush and level, with zero raised edges. No gaps, holes, or moving cracks remain. Photo: Repairs in-progress closeup.
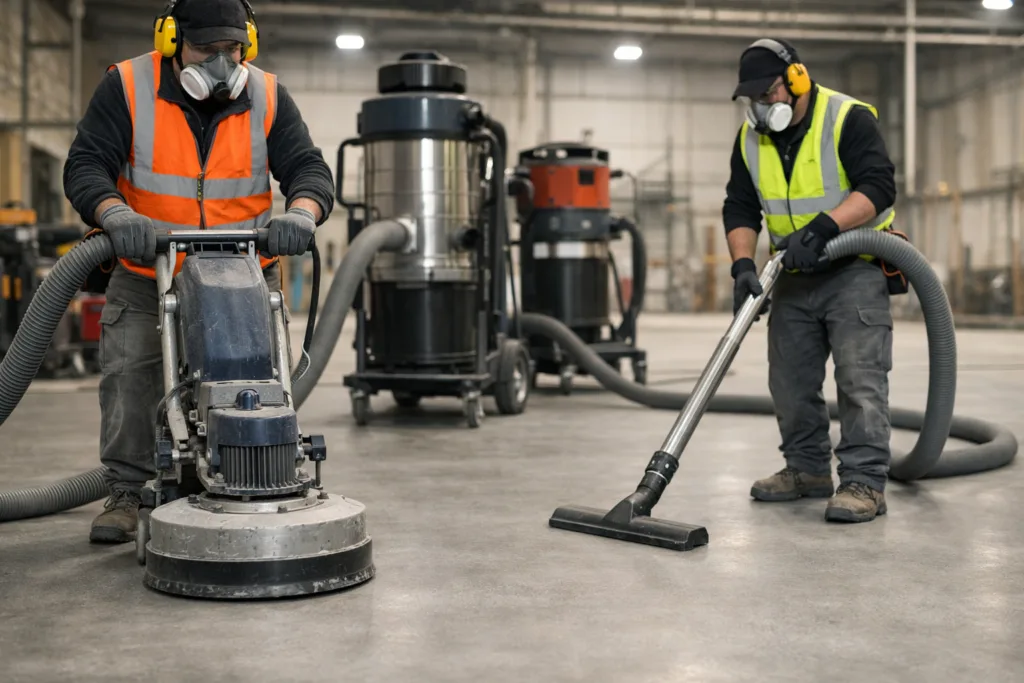
Grind: Prepare for Maximum Bond
- What to do: Mechanically grind or sand the surface to remove old coatings, laitance, and polish until evenly dull (matte effect).
- What’s “Pass”? Consistent non-glossy finish across entire area, free of glossy spots. Photo: Closeup showing ‘matte’ texture.
Dust Removal: Final Clean-Up
- What to do: Vacuum thoroughly. If required, use an air blower to remove any remaining dust from cracks or corners.
- What’s “Pass”? Lint-free cloth wiped anywhere on the surface comes back clean. No visible dust under bright side lighting. Photo: After-vacuum showing bare, clean surface.
Primer Application: Solid First Layer
- What to do: Apply compatible primer (epoxy, polyurethane, or acrylic, depending on system) using roller or brush. Follow manufacturer’s mixing and coverage guidelines.
- What’s “Pass”? Uniform coverage with no bare or missed spots; primer fully wets out the substrate. No puddles or ‘blinding’. Photo: During-application overview, closeup of primer penetration.
Topcoat Application: Full Waterproofing Layer
- What to do: Apply main waterproofing coating (polyaspartic, polyurethane, etc.) evenly using the specified tool (trowel, roller, or spray). Respect working and curing times. Apply in multiple coats if specified.
- What’s “Pass”? Final film is continuous, with specified thickness everywhere; no bubbles, pinholes, or missed zones. Consistent color/appearance. Photo: Finished coat, wide angle and closeup of detail/edge.
Curing: Protect Until Fully Set
- What to do: Prevent dust, foot traffic, and water exposure until the minimum cure time is reached, per the product’s datasheet and environmental temperature/humidity.
- What’s “Pass”? Coating cannot be dented with fingernail. No sticky or soft areas. Document elapsed time and environmental conditions. Photo: Protective signage/barrier.
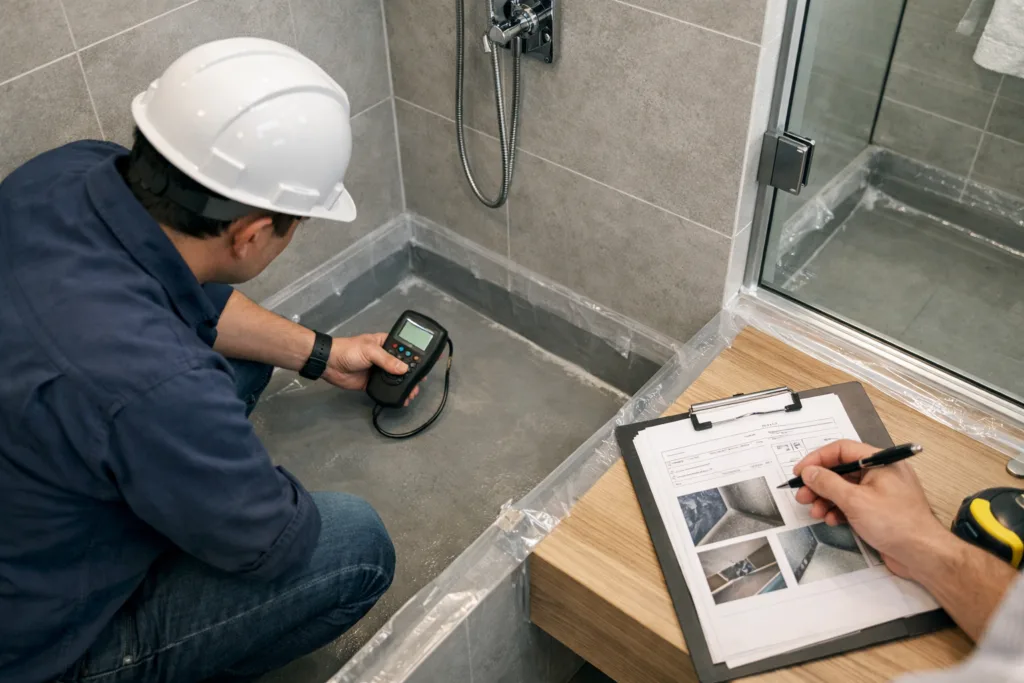
Final Inspection and Acceptance
- What to do: Inspect for continuity (coverage, thickness), mechanical defects (blisters, peeling), and appearance (color, gloss).
- What’s “Pass”? No visible flaws or missed spots; thickness within technical spec. Take final ‘as built’ photos showing whole area, corners, and critical details.
Required Project Photos — What and When to Snap
- Area overview pre-renovation
- Visible defects/cracks
- After cleaning
- During/in-progress patch repair
- Matte texture after grinding
- Primer application closeup
- Final coating, wide shot
- Final detail/corner, closeup
Understanding the Science: Why Each Step Matters
The logic of a proper waterproofing checklist is rooted in building science and decades of contractor experience. For example, surface contaminants like dust or oil can prevent even the highest grade waterproofing from bonding—resulting in future peeling and failure. Repairing cracks before coating prevents water from bypassing your barrier. Grinding to a non-gloss matte ensures mechanical ‘tooth’ for the primer to grip, while a final vacuum ensures no loose particles remain under your coatings.
Critical Standards: Accept/Reject Benchmarks at Each Stage
On any professional renovation site, work is only as good as its inspection criteria. Below is a table summarizing each step’s “pass” requirements so you can hold your crew (or yourself) accountable.
| Step | Qualification Standard | Photo Required? |
|---|---|---|
| Inspect | Damage mapped & marked, issues photographed | Yes |
| Clean | No dust, oil, or stains; dry to touch | Yes |
| Repair | Flush/level, no movement, no open gaps | Yes |
| Grind | Consistent matte finish, no gloss | Yes |
| Dust Removal | No visible dust, white cloth test clean | Yes |
| Primer | Even, no areas missed or ‘starved’ | Yes |
| Topcoat | Continuous film, specified thickness, no defects | Yes |
| Curing | No soft/sticky spots, minimum cure confirmed | Yes |
| Final Acceptance | No visible flaws, meets spec, ‘as built’ photos | Yes |
Printable Checklist: The 9 Essential Renovation Waterproofing Steps
- Inspect all areas — document damages
- Clean thoroughly — ensure dry, grease-free surfaces
- Repair cracks/voids — use proper filler or epoxy
- Grind for adhesion — achieve dull, matte finish
- Remove all dust — vacuum and wipe test
- Apply primer — even coverage, no skips
- Apply main waterproofing coat — solid, continuous film
- Allow curing — restrict access until set
- Inspect and sign off — confirm all standards met
Waterproofing Checklist for Balconies, Bathrooms, Pools, and More
Different areas of the property face unique waterproofing challenges. For example:
- Terrace balcony outdoor floor: Exposed to UV and heavy rainfall. Attention needed for edge details, expansion joints, and traffic areas.
- Kitchen bathroom tile waterproofing: Must resist both splash and vapor. Transitions, floor drains, and pipe penetrations are critical zones.
- Swimming pool waterproofing: Requires chemical resistance and flexibility for thermal movement. Application must be even, and all penetrations sealed thoroughly.
- Exterior wall renovation: Consider water migration through porous brick or concrete walls. Use of hydrophobic coatings with high UV resistance is important.
Refer to the relevant solutions hub for application specifics, suitable materials, and climate-adapted strategies.
Pro Tip: How ZDSpoxy Crafts Durable Waterproofing Renovations
ZDSpoxy engineers often prioritize surface moisture and mixing discipline above all else. For example, applying an epoxy primer like ZDS1271AB Rapid Curing Epoxy Primer for Floors ensures optimal bond even if residual dampness remains after cleaning, provided the surface isn’t actively wet. Mixing exact ratio batches in small increments prevents premature gel or weak film formation.
On-site, always record batch numbers, observe cure temps, and never skip the white-cloth dust test before priming. ZDSpoxy’s lab observes that skipping grinding/duct removal accounts for over 70% of early delamination cases. PPE, good airflow, and batch-wise documentation are hallmarks of a truly professional job.
Waterproofing Renovation Steps: Each Key Phase in Detail
Inspection: Start Right
Begin with a systematic walkthrough. Identify cracks, edge lifts, or signs of water ingress. Mark problem areas with tape or chalk. Capture wide shots and closeups, labeling photos by location for your reno records.
Cleaning: The Hidden Foundation
No waterproofing product can bond over oil, grease, or persistent dust. Power-scrub, use a neutral pH detergent if needed, allow to dry, and visually confirm total cleanliness. Don’t forget under fixtures or at wall-floor junctions.
Repair Work: Level Before You Seal
Highlight any cracks, voids, or previous patch failures. Fill chips/holes with an epoxy mortar like ZDS1340AB Hydrophobic 2K Epoxy Repair Mortar for maximum adhesion to damp surfaces. For walls or wet areas, allow full cure before proceeding.
Grinding and Sanding: The Key for Bonding
Use an orbital sander or grinder to open up the substrate. Why? A glossy surface stops resins from anchoring deep into the pores. Achieve a consistent matte (non-reflective) texture before you go further.
Remedial Dust Removal
Any leftover dust particles can act as ‘release layers’, risking bubbles, blisters, or detached coatings. Sweep, vacuum, then use a lint-free wipe in various corners. Proper dust removal is among the least glamorous, but most essential, waterproofing checklist steps.
Primer: The Interface Layer
Lay down a quality primer, always in accordance with product directions. The primer must thoroughly “wet” the surface and be absorbed—avoid puddling or missed areas. Fast-cure epoxy primers give rapid turnaround and can be re-coated in hours under normal humidity.
Topcoat: Main Waterproofing Film
Apply topcoat after primer cures (check datasheet recoat window). For stone courtyards or resin bound systems, select a system like resin bound stone systems for both drainage and sealing. Ensure complete and even coverage, especially at transitions, joints, or penetrations (drains, posts, pipes).
Curing: Hands-Off Is Key
After topcoat application, allow to cure per specs — this usually ranges from 8–24 hours for foot traffic, up to 72 hours for heavy load or water exposure. Isolate the area, keep signage visible, and avoid accidental scuffs, which can compromise your work.
Final Inspection: Document and Approve
Do a thorough walkthrough. Look for missed spots, inconsistent texture, or surface defects. Use a coating thickness gauge if you want high confidence. Snap final photos for your project file and warranty support (if applicable).
Common Pitfalls and How to Avoid Them
- Skipping crack repairs: Even hairline cracks become leak points.
- Poor cleaning/prep: Adhesion fails, requiring remedial work.
- Incorrect primer/coating: Compatibility with substrate and site conditions is non-negotiable.
- Neglected corners, details, or transitions: These are where most leaks start.
- Premature traffic: Walking on uncured coatings can create hidden weaknesses.
Conclusion: Your Path to a Watertight Renovation
By following this detailed waterproofing checklist for renovation waterproofing steps, you can dramatically reduce project risk. Each stage—inspection, cleaning, repairing, grinding, dust removal, priming, topcoating, curing, and acceptance—has its own “pass” criteria and documentation points. Don’t forget to proactively take photos at every essential step; this creates a strong evidence trail for quality and helps in future maintenance planning. With diligence—and some engineering insight—you can deliver reliable, long-lasting waterproofing protection.
Frequently Asked Questions
What if I cannot grind the surface due to noise or dust restrictions?
In such cases, use a specialized chemical etching agent if allowed, or consult with the coating manufacturer for approved non-mechanical prep options. Mechanical prep is rarely skipped in quality projects.
How do I choose between epoxy and polyurethane waterproofing?
Epoxies provide strong adhesion and stiffness, great for dry to slightly damp concrete. Polyurethanes offer more flexibility (handle movement/cracking) and are better for very damp or outdoor surfaces. Always match the system to the site’s movement and moisture profile.
Can waterproofing renovation be applied over old tiles?
Yes—if the tiles are firmly bonded, clean, and lightly abraded to remove gloss. Any loose/failed tiles must be removed and patched with appropriate repair mortar first.
How important is photo documentation during waterproofing?
It’s vital. Photos provide proof of proper preparation, application, and defects found or fixed. They protect both the contractor and client in disputes or warranty claims.
When can I allow heavy foot traffic on a renovated waterproofed area?
Wait for full curing—often 48-72 hours from topcoat application, depending on site temperature and product. Refer to the datasheet for your system. Early foot traffic can embed dirt or cause hidden weaknesses.
If I find a sticky or soft patch after curing, what should I do?
Remove the uncured area, ensure the surface is clean, and re-apply primer/topcoat as per product guidelines. Soft spots often indicate incomplete mixing or incorrect ratios.
Related Reading
- 7 Hidden Factors That Influence the Real Cost of Waterproofing Renovation
- Waterproofing Lifespan: How to Make It Last Longer in Every Climate
- 10 Clues Your Space Needs Waterproofing Renovation Now
- How to Waterproof Over Old Surfaces Without Major Demolition
- Comprehensive Waterproofing Renovation Solutions—Selecting the Right System