Choosing epoxy grout for porcelain tile, glass tile, and mosaics is not just a color decision. It is a material compatibility decision that affects joint appearance, installation speed, cleaning difficulty, and long-term durability. From our manufacturing perspective, the best results come when specifiers and installers evaluate four things together: the tile surface, the joint geometry, the exposure conditions, and the working characteristics of the grout system. Porcelain, glass, and mosaic assemblies can all perform well with epoxy grout, but each one has visual and application sensitivities that should be addressed before the first batch is mixed.
Explore epoxy grout system options for tile and mosaic installations when project requirements involve tight joints, chemical exposure, demanding cleaning conditions, or a need for more controlled color consistency than cementitious grout typically provides.
The three biggest takeaways are straightforward. First, compatibility matters more than assumptions: low-porosity porcelain, reflective glass, and mesh-backed mosaics all respond differently to epoxy working time, viscosity, and cleaning method. Second, color stability is influenced not only by the grout formula, but also by UV exposure, tile reflectivity, cleaning chemicals, and residual haze left on the surface. Third, installation discipline is non-negotiable. Accurate mix ratio, batch size control, mock-ups, temperature awareness, and timely cleanup are what separate a clean, uniform finish from a costly rework situation.
What epoxy grout is and when it is the right choice
Epoxy grout is a reactive resin-based joint filling material that typically combines epoxy resin, hardener, pigments, and mineral fillers. Unlike cementitious grout, which cures primarily through hydration and remains relatively porous, epoxy grout cures through a chemical reaction and forms a denser, more stain-resistant joint. That difference changes how it behaves during mixing, placement, tooling, cleaning, and service.
For porcelain, glass, and mosaics, epoxy grout is often selected when the project needs stronger resistance to water intrusion, household or commercial staining, frequent cleaning, or mild-to-moderate chemical exposure. It can also improve color consistency because factory-controlled components reduce the on-site water variation that often affects cement-based grout shade. However, those benefits come with tighter installation controls. Pot life, exotherm, haze management, and surface sensitivity are more critical with epoxy systems.
In practical terms, epoxy grout is often the right choice when the tile assembly will see repeated cleaning, food service conditions, wet areas, decorative feature walls, pools, spas, laboratories, or premium interior finishes where joint uniformity matters. It is less forgiving than basic grout, so it should not be chosen only because it sounds more durable. It should be chosen because its performance profile matches the actual service environment and the installation team is prepared to follow the product procedure closely.
Why porcelain, glass, and mosaics need different epoxy grout decisions
Porcelain tile
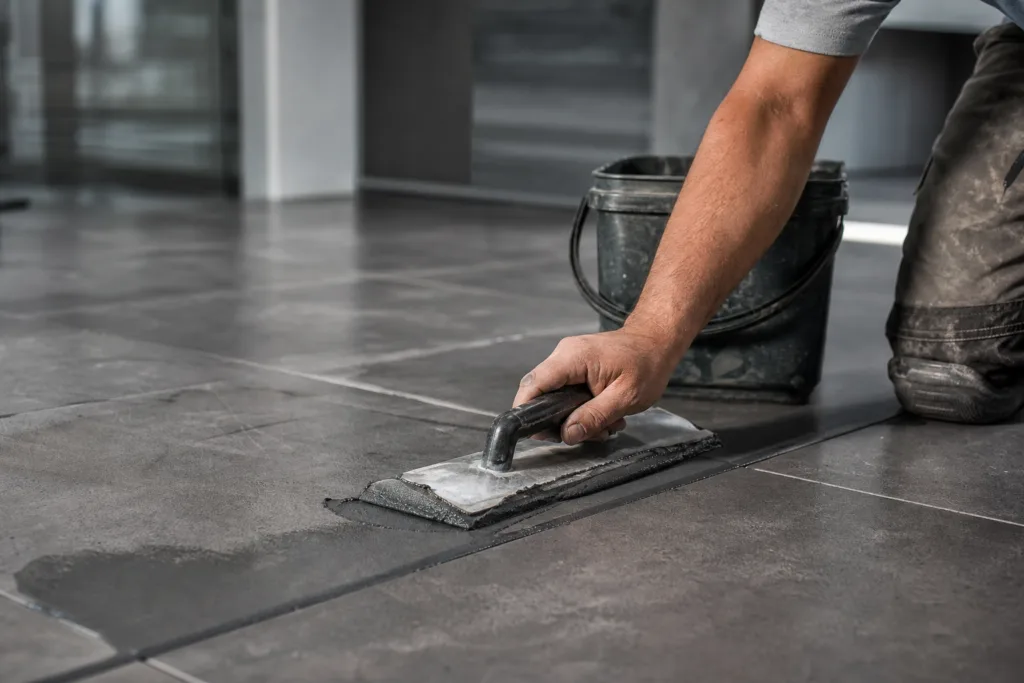
Porcelain is dense and low in porosity, which is good for stain resistance but demanding for grout cleanup. Because the surface absorbs very little, any residual resin film remains on the face rather than soaking in. That means haze can become highly visible, especially on matte dark porcelain or polished light porcelain. Porcelain also varies in edge design. Rectified porcelain with narrow joints may require a lower-viscosity epoxy and more precise packing to avoid voids.
Thermal movement should not be ignored. Large-format porcelain can experience dimensional change from heating cycles, sunlight, or underfloor heating. The grout should not be expected to replace movement joints. Perimeter joints and field movement joints still need an elastomeric sealant system suited to the assembly.
Glass tile
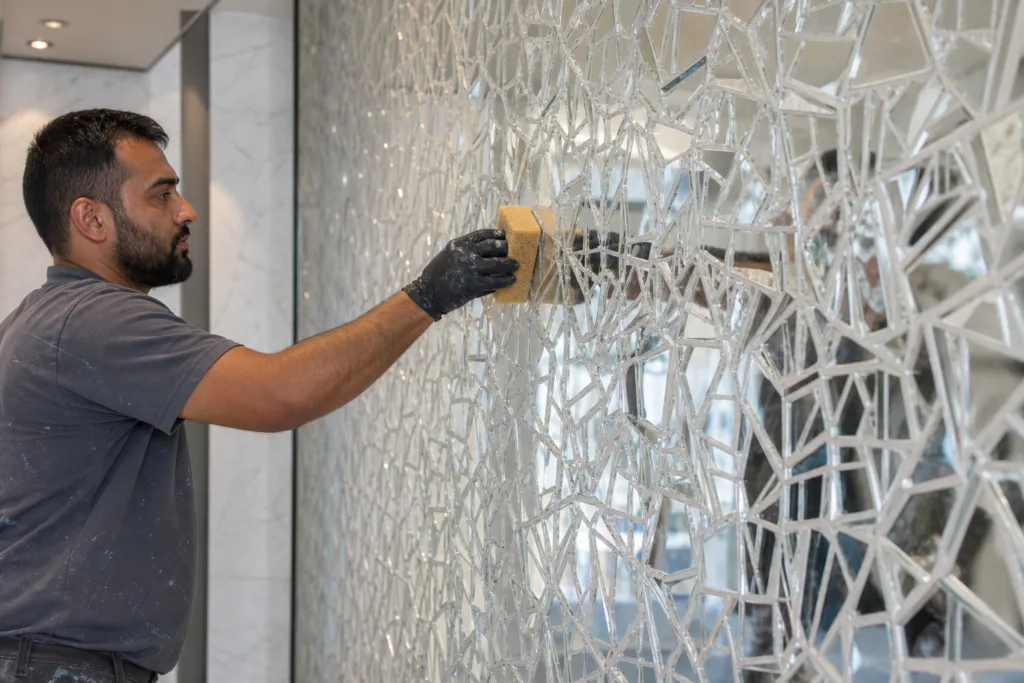
Glass introduces appearance risks that are much less important with porcelain. Transparency, translucency, reflectivity, and edge lighting can all change how grout color is perceived. A grout that looks neutral in the pail may appear darker, lighter, warmer, or cooler once placed beside reflective glass. On translucent tile, the backing color, adhesive coverage, and joint profile can visually influence the final appearance. UV exposure can also matter more on glass applications where sunlight is transmitted or reflected intensely.
Glass is also scratch-sensitive. The filler package, application pressure, and cleaning tools must be chosen carefully. Overaggressive tooling or abrasive pads can damage glossy surfaces or create visible swirl marks that become more noticeable after cure.
Mosaic tile
Mosaics create a different problem: there are many more joints per square meter, often with shallow depth, inconsistent spacing, mesh backing, and tight working areas. This makes grout rheology especially important. A heavy or stiff mix may bridge over narrow joints instead of fully filling them. A formulation with better flow can help pack fine seams more effectively, which is why projects with dense mosaic patterns often benefit from products such as ZDS-4131AB low-viscosity epoxy grout for fine seams and mosaics when the joint geometry is very tight.
Mosaic installations also need attention to backing support. Uneven adhesive ridges, incomplete bedding, or unstable sheet alignment can create lippage and inconsistent joint depth, which become more visible once epoxy grout is installed because the finished surface tends to look sharper and more defined.
Compatibility matrix for tile assembly decisions
When we review tile grout projects, we look at the full assembly rather than the grout in isolation. The table below summarizes common decision points.
| Component | What to Check | Potential Risk | Practical Control |
|---|---|---|---|
| Porcelain tile | Surface texture, polish level, edge accuracy | Haze visibility, incomplete joint packing | Mock-up cleanup timing and tool selection |
| Glass tile | Transparency, coating, scratch sensitivity, sunlight exposure | Color shift, scratching, visible streaking | Trial panel, non-abrasive cleanup, UV-aware color selection |
| Mosaic sheets | Mesh backing, spacing consistency, joint depth | Voids, uneven appearance, trapped residue | Sheet inspection and low-viscosity grout where needed |
| Thinset or adhesive | Full cure status and chemical compatibility | Curing inhibition, bond issues, moisture retention | Verify adhesive cure before grouting |
| Substrate | Moisture, porosity, movement, contamination | Bond loss, cracking, staining migration | Moisture check, surface preparation, movement joint design |
| Sealants at movement joints | Adhesion to tile edges and joint geometry | Joint edge separation or sealant failure | Use compatible flexible joint chemistry and primer if required |
One common incompatibility is grouting over adhesive that has not fully cured. Residual moisture or uncured adhesive chemistry can affect grout bond or lead to uneven appearance. Another is assuming that all glazed or coated glass behaves the same. Some decorative glass products have back coatings that can be sensitive to chemicals or visual show-through. A sample panel should always be treated as a specification control, not a formality.
Where the substrate is damp, porous, or inconsistent, bond reliability may depend on primer strategy before tile installation or repair work. In renovation conditions, we sometimes see better system control when a substrate is first stabilized with ZDS-2870AB high-adhesion epoxy primer for damp or porous substrates, especially where moisture or weak surface zones could undermine the tile assembly.
Joint appearance fundamentals that affect the final look
Joint appearance is shaped by width, depth, profile, and tooling pressure. Many project disputes are really appearance disputes rather than performance failures. On porcelain, a slightly recessed joint can emphasize tile edges and create a shadow line, while a flush profile can make the surface look more monolithic. On glass mosaics, even a small variation in joint fullness may become highly visible because reflected light amplifies differences.
Narrow joints require complete packing. If the grout only caps the top of the joint, the cured surface may later reveal pinholes or low spots. Wider joints need consistent tooling so the profile does not alternate between concave and flat. Consistency matters more than a single visual style. The mock-up should define the target profile, cleaning method, and acceptable variation level.
Sheen also matters. Epoxy grout may cure with a different surface character than cementitious grout, and that can influence perceived color. A slightly smoother cured face can reflect more light, making the same pigment appear lighter in some viewing angles. This is especially important when matching bright whites, pale greys, or decorative metallic-adjacent finishes.
Color stability and what really changes grout color over time
Color stability in epoxy grout is usually better controlled than with water-mixed grout, but it is not immune to change. The main variables are pigment stability, resin yellowing tendency, UV exposure, heat, aggressive cleaners, and surface residue. For interior porcelain installations away from direct sunlight, color stability is usually governed more by installation cleanliness than by pigment drift. For glass tile near windows, facades, pools, or bright feature walls, lightfastness becomes more important.
From our formulation perspective, the phrase “color stable” should be understood as conditional. A factory color may remain highly consistent when exposed to ordinary indoor service but shift if it experiences sustained sunlight, elevated temperature, or oxidizing cleaners. Highly reflective glass can exaggerate subtle yellowing or darkening because the eye reads both the grout itself and its reflection.
Specification teams should request color data relevant to service conditions, not just a color card. Useful questions include whether the grout has been evaluated for UV-related appearance change, how the resin system performs under elevated temperature, and whether the recommended cleaner leaves a film. For highly reflective glass, the safest path is often to test at least two nearby colors under actual lighting conditions rather than selecting only from a printed swatch.
Reflectivity, translucency, and color float-through on glass and mosaics
Glass tile can visually “borrow” color from adjacent layers. If the tile is translucent, the observer may see some combination of the tile body, backing, adhesive, and grout edge. This is why the same grout can look different on opaque porcelain and semi-transparent glass. On mosaics, the repeated joint pattern can intensify that effect.
Control methods are practical rather than complicated:
- Use a project mock-up with the actual tile, adhesive, grout, and lighting.
- Check the visual result both when the surface is clean and when it is viewed at an angle.
- Do not judge final color from unmixed components or from a cured sample on a different substrate.
- Confirm whether the glass tile has a painted, metallic, or film-backed surface that may alter edge appearance.
- Avoid assuming that a lighter grout always looks cleaner; on some reflective glass, it may emphasize joint irregularity.
For very fine glass joints or tight grout lines, flow and cleanup behavior become decisive. In those cases, a controlled low-viscosity system such as ZDS-3382AB low-viscosity epoxy grout for tight grout lines and glass tile can reduce the effort required to fully pack narrow spaces while helping the installer avoid overworking the surface.
Rheology, filler type, and finish selection
Rheology is the way the mixed grout flows under pressure and at rest. It affects how easily the material enters the joint, how well it stays there, and how much residue remains on the tile face. For mosaics and very tight porcelain joints, lower viscosity often improves filling efficiency. For wider joints or vertical work, more body may be useful to reduce sag and washout.
Filler selection also matters. Some systems are designed for smoother visual finish, while others prioritize hardness or packing resistance. On scratch-sensitive tile, the filler package should be reviewed carefully. This is not only about whether the product is described as sanded or non-sanded; it is about the total interaction between filler hardness, tile finish, grout float pressure, and cleanup pad choice.
In our epoxy resin formulation work, we usually treat joint width, tile sensitivity, and installer pace as linked variables. A highly flowable grout may be ideal for intricate mosaics but require tighter control on vertical joints. A stiffer grout may offer cleaner shaping on straight porcelain runs but become difficult in dense small-format patterns. The right choice is the one that balances filling, appearance, and workable cleaning time for the actual crew and site conditions.
Preparation, sample panels, and pre-installation controls
Preparation has a direct effect on both appearance and bond. Joints should be free of dust, release agents, standing water, soap residue, and uncured adhesive squeeze-out. Tile faces should also be checked for temporary protective coatings or factory residues that could trap haze or change the visual outcome.
A mandatory sample panel should confirm:
- Tile and adhesive compatibility
- Selected grout color under actual lighting
- Joint profile and visual uniformity
- Cleaning timing and approved tools
- Whether the tile surface shows scratching, streaking, or haze
- Acceptance standard for final appearance
Procurement teams should make the mock-up part of approval, not an optional installer step. It is one of the few low-cost controls that can prevent large-scale replacement. A good sample panel is especially important for mixed-sheen porcelain, decorative glass, metallic-backed glass, and mosaics with irregular hand-cut appearance.
Mixing and handling controls from a manufacturer perspective
Epoxy grout performance depends on ratio accuracy. Partial mixing without weighing, casual solvent addition, or improvised thinning can change cure, hardness, color, and stain resistance. Components should be mixed exactly as specified, using the recommended mixing tool and speed. Overmixing can entrain air; undermixing can leave soft spots or color streaks.
Batch size control matters because epoxy generates heat as it reacts. A large mass in a bucket will typically warm faster than the same material spread out on the tile surface. That temperature rise shortens pot life and can make the grout noticeably stiffer during application. On warm days, installers should reduce batch size, pre-stage cleanup materials, and avoid mixing more than can be placed and washed within the safe working window.
Cool-site work creates the opposite problem: slower cure, higher viscosity, and delayed hardness development. Where the project schedule or environment demands better low-temperature response, a system such as ZDS-3315AB low-temperature epoxy grout (24h cure) for cool-site installations may be more practical than forcing a standard formulation into unsuitable conditions.
On specification-sensitive projects, manufacturer data should include pot life, open time, recommended application temperature, and cure schedule at multiple temperatures. These values are more useful than a single nominal cure time because they help site teams plan labor realistically.
Application techniques by tile type
For porcelain tile
Use a float angle that pushes material fully into the joints without scraping unnecessarily across the face. On polished or dark porcelain, work in manageable sections and begin cleanup on the schedule established in the mock-up. Delayed wash is a common source of haze. Avoid flooding the surface with excess water or cleaner beyond product guidance, since that can spread residue rather than remove it.
For glass tile
Keep pressure controlled and use approved non-abrasive cleanup tools. Overworking the surface can create streaking or pull material from the joint edges. Because reflective glass makes residue more visible, the installer should inspect the surface from more than one angle during cleanup, not only head-on.
For mosaics
Pack diagonally across the sheet pattern to help drive grout into narrow seams. Watch for mesh or paper-sheet irregularities that create hidden shallow areas. On dense mosaics, a lower-viscosity grout can improve filling, but the trade-off is that cleanup timing becomes even more important. The crew should avoid spreading too large an area before the first wash begins.
Cleaning strategy and haze prevention
Most epoxy grout complaints on porcelain and glass are really cleanup issues. Haze forms when a thin resin film remains on the tile face and cures there. The removal difficulty increases rapidly once that film hardens. The correct approach is immediate, staged cleaning with the tools and chemistry approved for the grout system.
Useful cleaning controls include:
- Prepare wash water, sponges, pads, and buckets before mixing.
- Follow the product timing window instead of washing by guesswork.
- Use separate passes for residue loosening and final detailing.
- Change cleaning water frequently enough to avoid redistributing resin.
- Inspect under raking light before moving to the next area.
- Do not rely on aggressive scraping after cure as a standard correction method.
Glass tile requires particular caution because residue may show as smears or streaks rather than classic haze. On porcelain with texture, the risk is resin remaining in micro-relief patterns. Trial cleaning on the mock-up should define not only the cleaner, but also the sponge density, pad type, and inspection angle.
Curing conditions, movement joints, and sealant compatibility
Epoxy grout cures best within the manufacturer’s recommended temperature range and under stable conditions. Very low temperature can leave the grout slow to harden and difficult to clean. Very high temperature shortens working time and may increase color variation if different batches are installed under different thermal conditions. Rapid cooling, condensation, or water exposure before sufficient cure can affect surface appearance and bond development.
Grout is not a substitute for movement accommodation. Perimeter joints, changes of plane, control joints carried through the tile work, and large field movement joints should be filled with a compatible flexible sealant rather than rigid grout. Sealant chemistry should be checked against tile edge sensitivity and service conditions. Silicone or polyurethane systems may require primer depending on substrate and movement demand. The important point is to coordinate joint design before installation, not after cracking appears.
Where buyers need broader material guidance or custom formulation support for tile and industrial jointing systems, ZDSpoxy approaches these projects by matching viscosity, cure behavior, color stability expectations, and installation environment rather than treating grout as a one-size-fits-all material.
Common mistakes, troubleshooting, and acceptance checks
The most common mistakes are predictable: skipping mock-ups, using oversized batches, grouting over incompletely cured adhesive, selecting a color without checking it under actual light, and delaying cleanup until haze has started to set. On mosaics, insufficient support under sheets can create uneven joints that no grout can visually fix. On glass, overaggressive washing can scratch or streak the surface. On porcelain, residual film may be missed until it fully cures and becomes difficult to remove.
| Issue | Likely Cause | Corrective Logic |
|---|---|---|
| Haze on porcelain | Late cleanup or dirty wash water | Use approved haze removal process after trial on inconspicuous area |
| Streaks on glass | Overworking or unsuitable cleaning pad | Refine cleanup tools and reduce surface agitation |
| Poor cure | Incorrect ratio, low temperature, incomplete mixing | Review batch practice and verify site temperature |
| Low spots or pinholes | Insufficient joint packing or shallow joints | Improve packing pressure and check joint depth consistency |
| Color inconsistency | Variable cleanup, lighting effects, residue, temperature swings | Compare against mock-up and inspect for surface film before replacement |
| Cracking near edges | Movement stress or missing flexible joints | Correct joint design and seal movement locations properly |
Before acceptance, teams should inspect color consistency, joint fullness, visible residue, and early hardness development. Where performance is critical, simple spot checks for chemical resistance or surface hardness after cure can be useful, provided they are defined in the project quality plan. If a project calls for adhesion pull-off or other destructive verification, that requirement should be agreed in advance and performed on designated sample areas.
Specification and procurement checklist
Decision-makers can reduce risk by requesting the right information early. A practical specification package for epoxy grout should include:
- Technical data sheet with mix ratio, viscosity guidance, pot life, open time, and cure schedule
- Recommended joint width range and tile suitability notes
- Color chart plus project-specific mock-up approval record
- Cleaning procedure and compatible cleanup materials
- Limitations for UV, heat, immersion, or chemical exposure where relevant
- Sealant compatibility notes for movement joints
- Storage conditions and shelf life
- Statement of required substrate and adhesive cure before grouting
- On-site support expectations for premium or complex installations
A simple selection flow can help: if the tile is translucent or highly reflective, prioritize mock-up-driven color confirmation; if joints are very fine, prioritize low-viscosity filling behavior; if the site is cool, prioritize temperature-appropriate cure; if sunlight exposure is significant, review yellowing and appearance limits before final color approval.
Conclusion

Successful use of epoxy grout for porcelain tile, glass tile, and mosaics depends on treating the grout as part of the whole assembly, not as a standalone finish product. The right formulation must match joint size, tile sensitivity, exposure conditions, and installer working pace. Color stability should be verified under actual light and service expectations, especially with reflective glass. Most importantly, cleanup timing, mock-ups, and batch control are not minor details; they are the main controls that protect final appearance and long-term performance. For specifiers, contractors, and procurement teams, the strongest decision is usually the one that balances durability with installability under real site conditions.
FAQs
Is epoxy grout for porcelain tile always better than cement grout?
Not always. It is often the better choice when stain resistance, lower porosity, chemical resistance, or color consistency matter, but it also requires tighter control during mixing and cleanup. If the crew is not prepared for epoxy handling or the project does not need its performance advantages, a well-selected cementitious grout may be sufficient.
Can epoxy grout be used safely with glass tile?
Yes, but only after confirming scratch sensitivity, color appearance, and cleanup method on a mock-up. Glass tile can magnify haze, streaks, and color shift, so the grout formulation, filler type, and cleaning tools should be checked carefully before full installation.
What joint widths are most sensitive when using epoxy grout on mosaics?
Very narrow joints are the most sensitive because incomplete filling, trapped residue, and inconsistent depth become more likely. In these cases, low-viscosity grout, smaller working areas, and close attention to first-wash timing usually produce more reliable results.
Why does epoxy grout sometimes look different on glass than on the sample card?
The perceived color can change because glass reflects and transmits light differently than opaque tile. Tile backing, adhesive shade, edge translucency, lighting angle, and surface sheen can all influence the final appearance, which is why a project-specific sample panel is more reliable than a printed chart alone.
How soon should epoxy grout haze be removed from porcelain or glass tile?
It should be addressed within the product’s recommended cleanup window, typically during staged washing soon after placement rather than after full cure. Waiting too long allows the resin film to harden, which makes removal more difficult and increases the risk of visible residue or aggressive rework.
What should procurement teams request before approving an epoxy grout system?
They should request the technical data sheet, installation instructions, color approval process, mock-up requirement, cure schedule at expected site temperatures, cleaning procedure, movement joint coordination notes, and any service-condition limitations related to UV, chemicals, moisture, or heat.
Related Reading
- epoxy grout applications and recommended uses
- Epoxy Tile Grout Selection and Specification Guide
- Epoxy Grout for Bathroom Tiles: waterproofing and color guidance
- Selecting and Specifying Epoxy Grout for Kitchen Tile and Backsplash
- Epoxy Grout for Swimming Pools and Pool Tile: chemical and UV resistance