Marine plywood performs well in demanding environments, but it is still a wood-based panel with veneer edges, end grain exposure, glue lines, and moisture pathways that must be managed carefully. When buyers ask us how to choose epoxy resin for marine plywood, the real question is usually broader: what system will seal the panel effectively, bond structurally, and hold up under repeated wet-dry cycling, vibration, and temperature change. From our manufacturing perspective, the right answer depends on where the plywood sits in the assembly, how much water exposure it will see, whether the resin must penetrate, gap-fill, laminate, or inject, and how controlled the application conditions will be.
Explore marine epoxy resin solutions for plywood sealing and boatbuilding projects if you are comparing systems for hull panels, deck rebuilds, transom replacement, or long-term moisture protection strategies.
This guide is written for boatbuilders, contractors, engineers, maintenance teams, and procurement groups that need practical decision logic rather than vague product claims. In marine plywood work, epoxy normally serves three primary purposes: creating a moisture barrier, forming structural bonds, and supporting glassing, fairing, or core stabilization. Each purpose places different demands on viscosity, pot life, cure speed, thixotropy, water uptake, and glass transition temperature. A low-viscosity sealer may wet out veneer and end grain well but offer poor gap-filling behavior. A structural adhesive may provide excellent bond-line strength but be unsuitable for broad-area wet-out. A low-temperature curing system can extend the working season, but cure profile and final performance still need verification.
Why marine plywood still needs epoxy protection
Marine plywood is manufactured with durable veneers and water-resistant glue lines, but that does not mean it is self-sealing. The most vulnerable zones are usually panel edges, fastener penetrations, scarf joints, exposed end grain, cutouts, corners, and any area where coatings become discontinuous. In boats, decks, and transoms, water does not need a large opening to start a problem. Repeated moisture ingress can lead to veneer swelling, fungal decay where oxygen and temperature allow it, bond-line stress, staining, freeze-thaw damage in colder climates, and eventual loss of stiffness.
Many failures blamed on plywood are actually failures in specification or application sequence. Common examples include thin sealing coats that leave starved areas, resin applied over damp wood, edge grain left incompletely encapsulated, structural joints assembled with laminating resin instead of a filled adhesive, and UV-exposed epoxy left without a protective topcoat. For this reason, marine plywood projects should be approached as a system design problem rather than a single-product purchase.
What performance matters most for epoxy resin for marine plywood
When we help customers evaluate a formulation, we usually start by mapping performance requirements to the use-case. A transom core replacement does not need the same rheology or film-building behavior as a clear sealing coat on a small tender. Likewise, a deck overlay that will be glassed with biaxial fabric needs consistent wet-out and low air entrapment more than deep penetration into compromised wood.
| Application | Primary Need | Important Resin Traits | Main Risk if Mismatched |
|---|---|---|---|
| Bare plywood sealing | Moisture exclusion | Low to medium viscosity, good wetting, low water uptake, recoat control | Patchy encapsulation and early moisture ingress |
| Scarf joints and transoms | Structural bonding | High bond strength, gap-filling ability, controlled thixotropy, suitable pot life | Bond-line starvation or joint creep |
| Glassing decks and hull skins | Fabric wet-out and laminate integrity | Laminating viscosity, air release, manageable gel time, post-cure potential | Dry spots, bubbles, weak laminate |
| Injection and core stabilization | Penetration into voids | Very low viscosity, adequate working time, moisture tolerance where needed | Poor penetration and trapped damaged zones |
| Fairing and surface correction | Sandable build and profile control | Filler compatibility, non-sag behavior, stable cure | Print-through, soft spots, poor coating compatibility |
Beyond basic bond strength, several technical parameters deserve close attention:
- Viscosity: affects penetration, wet-out, film build, and injection capability.
- Pot life and gel time: determine batch size, working speed, and risk of exotherm.
- Cure schedule: affects early handling, final hardness, and whether post-cure is needed.
- Glass transition temperature: important where decks or dark-painted surfaces may heat significantly in sun.
- Water uptake: lower uptake generally supports better long-term dimensional stability.
- Elongation and modulus: help balance rigidity with tolerance to movement and vibration.
- UV resistance: epoxy itself is rarely the final answer outdoors and typically needs a protective topcoat.
Types of epoxy systems used on marine plywood
Penetrating and sealing systems
These are usually lower-viscosity resins intended to wet the plywood surface, penetrate open grain and edges, and create the first moisture-control layer. They are suitable for bare panels, end grain, and some restoration work, but they should not automatically be treated as structural adhesives. For weathered or partially degraded wood, a stabilization primer may be appropriate before rebuilding the section. In projects where local deterioration has started but the panel is still salvageable, a product such as ZDS-2060AB solvent-free rot repair primer for marine plywood stabilization can fit the logic of consolidating weakened fibers before subsequent filling or lamination.
Laminating and wet-out resins
These systems are designed to saturate fiberglass and bond it to plywood with controlled flow and manageable air release. They generally sit in a low to medium viscosity range and should stay workable long enough to allow squeegee passes, edge control, and correction of dry areas. For decks and hull skins, resin choice should match fabric type. Woven fabrics may wet differently than biaxial fabrics, and thick reinforcements can benefit from a resin with slower gel time and strong de-airing behavior.
Structural bonding epoxies
For scarf joints, transom laminations, plywood-to-framing bonds, and hardware reinforcement zones, a filled or thixotropic structural epoxy is typically more appropriate than a plain laminating resin. Here, gap-filling performance matters because real-world fit-up is rarely perfect. The adhesive must remain in the joint, resist sagging where needed, and maintain bond-line integrity under clamp pressure rather than being squeezed out completely.
Low-viscosity injection systems
Injection-grade epoxies are useful for localized delamination, edge saturation, and some core stabilization scenarios. The best candidates have predictable flow into voids without curing so fast that they lock up before the damaged zone is reached. Injection can preserve sections that are still structurally recoverable, but it is not a cure-all. Once veneers have lost too much integrity or moisture content remains uncontrolled, replacement is often more reliable.
Moisture-tolerant and low-temperature cure systems
These formulations are selected where ambient conditions are less than ideal, such as cool-weather repair windows, marine yards with variable humidity, or field work where substrate conditions are hard to normalize. Even so, “moisture-tolerant” should never be interpreted as permission to apply over visibly wet or contaminated plywood. It simply means the system is engineered to be more forgiving within a defined envelope.
Selection matrix by job type
| Scenario | Recommended System Type | Target Characteristics | Notes |
|---|---|---|---|
| Seal bare plywood faces and edges | Sealing epoxy | Low-medium viscosity, low water uptake, multi-coat compatibility | Pay special attention to end grain and cutouts |
| Bond scarf joints | Structural adhesive epoxy | Gap filling, thixotropy, high adhesion, suitable open time | Clamp to alignment, not to squeeze out all adhesive |
| Rebuild transom laminate | Structural bonding plus laminating system | Bond-line strength, laminate wet-out, thermal stability | Use separate formulations when needed rather than one compromise resin |
| Glass over deck plywood | Laminating epoxy | Controlled wet-out, air release, moderate pot life | Peel ply can simplify secondary bonding and reduce amine blush preparation |
| Stabilize weakened edges or voids | Injection or consolidating epoxy | Very low viscosity, penetration, manageable cure profile | Verify whether damage is too advanced for stabilization |
| Fill seams and local voids | Filled epoxy repair material | Non-sag, sandability, adhesion to sealed wood | Use after consolidation if substrate is soft or friable |
At specification stage, many buyers also ask whether one all-purpose resin can do everything. In small repairs that may seem attractive, but in larger projects it often creates compromises. From our formulation work, the better approach is to define where low viscosity is needed, where thixotropy is needed, and where a fairing profile is needed. Matching each step to the function usually produces better durability and less rework.
Surface preparation and moisture control
Surface preparation is frequently the difference between a system that performs for years and one that fails in a season. Marine plywood should be clean, dry within the accepted project threshold, and mechanically prepared to expose sound material. Practical moisture targets vary by climate and specification, but the key is consistency and verification rather than assumption. A moisture meter can be useful, but readings should be interpreted carefully because species, coatings, salts, and temperature can affect results.
Best practice usually includes checking multiple zones, especially edges, penetrations, and shadowed areas where drying is slower. If old coatings are present, remove them fully where the epoxy must bond structurally. Sanding should create a fresh, coherent profile rather than polishing the surface. Dust removal is essential, and solvent wiping should be used carefully because it can redistribute contaminants if done poorly.
For degraded or highly exposed timber assemblies, some teams prefer a more aggressive penetration strategy before rebuilding. In heavy-duty restoration environments, ZDS-1060AB solvent-based wood rot repair primer for heavy-duty marine exposures may align with projects that need deeper saturation behavior in damaged zones, provided the downstream coating and cure sequence are evaluated properly.
Step-by-step sealing protocol for plywood encapsulation
A repeatable sealing protocol matters more than applying a random number of coats. The objective is not just to make the plywood look glossy; it is to build a continuous barrier with reliable edge protection and sound intercoat adhesion.
Step 1: Verify substrate readiness
Confirm that the plywood is dry, structurally sound, and free from waxes, oils, old antifouling residues, dust, and loose fibers. Check cutouts, panel edges, corners, and fastener holes carefully because these become the earliest water entry points.
Step 2: Choose the right viscosity and batch size
For first coats, use a resin that wets the substrate well without gelling too quickly in the pot. Smaller batches reduce exotherm and make coverage more consistent. Temperature has a major effect here: warmer conditions shorten working time and can reduce penetration if the resin starts to kick too early.
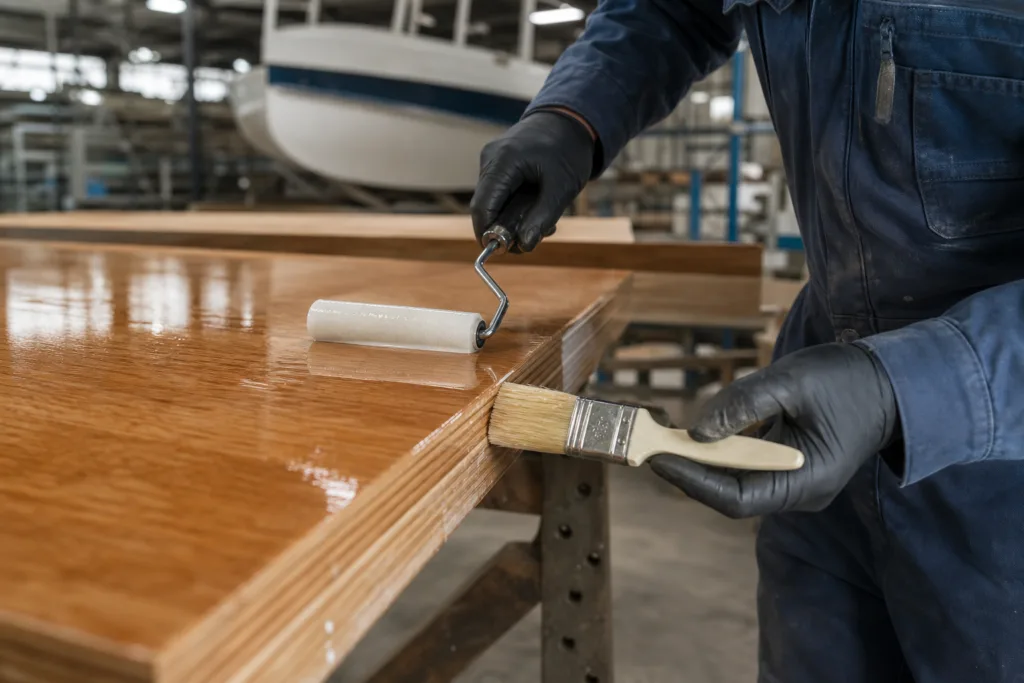
Step 3: Apply the first coat to faces and edges
Use brush, roller, or squeegee depending on panel geometry. Edges and end grain often need extra attention because they absorb faster than face veneers. Rather than flooding large pools, aim for full wetting and even distribution. If the first coat soaks in rapidly, that is a sign the panel may need additional build coats.
Step 4: Recoat within the defined window
The next coat should be applied according to the system’s recoat window. Too early and the film may move or trap solvents or air from later layers. Too late and sanding may be required for mechanical keying. In our experience, projects run more smoothly when the crew plans the full sequence before mixing the first batch.
Step 5: Build thickness where risk is highest
Edges, hardware holes, hatch cutouts, transom corners, and underside faces that will be difficult to maintain later deserve extra build. If seam voids or local gaps are present, a dedicated filler such as ZDS-1240 epoxy wood gap filler for sealing seams and voids in plywood structures can help create a more continuous barrier before topcoating or laminating.
Step 6: Inspect before overcoating
Look for dull porous patches, bubbles, fish-eyes, contamination marks, and undersealed edges. A simple practical inspection method is to compare sheen uniformity under angled light. In higher-control projects, teams also prepare small witness panels to verify cure and adhesion sequence before proceeding to the full assembly.
Bonding scarf joints, transoms, and structural assemblies
Structural joints need different logic from surface sealing. A scarf joint, for example, should have enough bonded area to distribute load while maintaining alignment through clamping or fixturing. The adhesive should be viscous enough to avoid drainage yet wet enough to contact the wood fully. If the bond line goes dry because clamp pressure is excessive or filler loading is poor, strength can fall sharply even when the joint looks clean from the outside.
For transoms and load-bearing deck sections, consider the complete stack: plywood condition, adhesive choice, laminate schedule, hardware penetrations, and service temperature. Dark coatings and enclosed spaces can raise substrate temperature well above ambient, which is why Tg should not be ignored in marine design. If the cured system softens too close to service temperature, long-term creep resistance can become a concern.
Where local surface defects remain after consolidation, ZDS-189 wood repair putty for plywood core and dent repairs (marine applications) may fit the finishing stage before fairing and topcoating, particularly in non-primary load zones where profile correction and substrate continuity are needed.
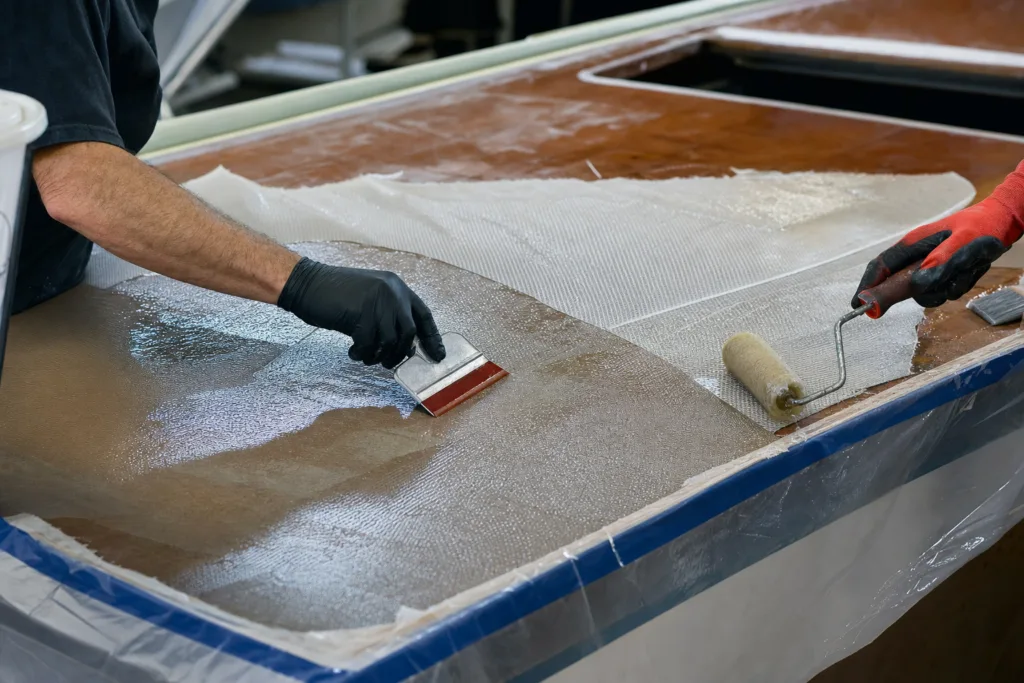
Glassing and laminating over marine plywood
Glassing plywood can increase abrasion resistance, improve moisture control, and help distribute local stresses, but only if the laminate is applied correctly. Dry spots, entrapped air, and uneven resin distribution are the most common field issues. The selected fabric also affects handling. Woven cloth can lie flatter on broad surfaces, while biaxial reinforcements may offer better directional strength for some structural repairs.
Wet-out should be complete without leaving the laminate resin-rich. Excess resin adds weight and can still trap air rather than improving strength. A squeegee or laminating roller is usually more effective than relying on brush application alone. Peel ply can be valuable where secondary bonding is planned because it can leave a cleaner, more bond-ready surface once removed.
From a manufacturer selection standpoint, this is often where technical support matters. A supplier should be able to discuss resin viscosity range, gel time at realistic shop temperatures, exotherm behavior by batch size, and recommended post-cure or topcoat timing. On complex plywood laminate jobs, teams that work with ZDSpoxy commonly ask for that application-specific guidance before fixing a process window or approving a private-label or OEM marine system.
Core stabilization, injection, and the replace-versus-repair decision
Injection is useful when delamination is localized, veneers remain substantially intact, and trapped moisture can be addressed. It is much less effective when the core is broadly saturated, biologically degraded, or crushed. The key decision is whether the resin can realistically penetrate and bond remaining material into a coherent structure. If not, replacement is safer and often less expensive in lifecycle terms.
When injection is appropriate, port spacing, void mapping, and pressure control matter. Over-pressurizing can create new separations or force resin into unintended areas. Under-pressurizing can leave dead zones untreated. The practical sequence is to dry and assess first, inject second, and verify fill or bond response before enclosing the area.
Fairing, finishing, and UV protection
Epoxy provides strong moisture resistance, but most epoxies are not final exterior finishes. UV exposure can lead to chalking, yellowing, and surface degradation, especially on bright-finished or lightly protected wood assemblies. That is why a proper topcoat, varnish, paint, or primer system is part of the long-term specification rather than an optional cosmetic step.
Fairing compounds should be compatible with the underlying epoxy and the intended coating stack. Sandability matters, but so does dimensional stability. A filler that sands very easily but remains too soft can print through or telegraph under topcoats later. For decks, abrasion and maintenance expectations should also influence the finishing system selection.
Common problems and troubleshooting
| Problem | Likely Causes | What to Check | Practical Fix |
|---|---|---|---|
| Amine blush | Humidity and curing conditions | Waxy surface film before recoating | Wash and abrade as required before next layer |
| Tacky or soft cure | Incorrect mix ratio, low temperature, poor mixing | Metering records, substrate temperature, pot residue | Remove weak film and reapply with correct controls |
| Bubbles or pinholes | Porous wood outgassing, over-rolling, rising temperature | Timing of coat, wood temperature trend | Seal earlier, use thinner first coat, adjust application timing |
| Delamination | Contamination, blush, poor sanding, wet substrate | Bond interface and prep history | Cut back to sound material and rebuild correctly |
| Yellowing | UV exposure | Whether a UV-protective topcoat was used | Add appropriate protective finish |
| Moisture blisters | Incomplete sealing, trapped moisture, coating over damp wood | Moisture readings, edge sealing quality | Dry, remove failed zones, reseal continuously |
A quick diagnostic rule is to ask whether the issue started with chemistry, surface condition, or environment. Most failures can be traced to one of those three roots. That is useful because it keeps troubleshooting objective and helps teams avoid blaming the wrong material stage.
Quality control, testing, and what to ask an epoxy supplier
Procurement and engineering teams should request more than a basic product description. Useful supplier data can include viscosity range, mix ratio tolerance, pot life at stated temperature, cure-to-sand time, water absorption behavior, Tg after ambient cure and after post-cure where relevant, and bond performance on wood substrates. For structural jobs, small trial coupons or mock-ups can reveal a great deal before full production begins.
Reasonable field QC can include moisture verification before coating, batch logging, ambient temperature and humidity recording, witness panels, and simple adhesion or cohesive failure checks on representative samples. For larger projects, it is also worth confirming shelf life, storage window, packaging consistency, and whether batch-specific QC data can be supplied.
When evaluating a manufacturer, ask practical questions:
- Can the resin be tuned for lower temperature cure, longer pot life, or faster handling?
- Is there data for plywood bonding, moisture exposure, and laminate use rather than generic resin-only values?
- What filler systems are recommended for fillets, gaps, and fairing?
- What is the recoat logic if amine blush or delayed recoating occurs?
- Can custom OEM or private-label marine formulations be supported with batch control?
Cost-performance trade-offs and specification logic
The lowest initial resin price rarely defines the lowest project cost. Marine plywood failures are expensive because rework usually means sanding, reopening sealed assemblies, replacing hardware, and losing labor time. A slightly higher-cost system that improves wet-out, extends working time in warm conditions, or reduces water uptake may create better value over the service life of a boat or deck.
At the same time, overspecifying can also waste budget. Not every plywood panel needs the most heat-resistant or most specialized system. The practical goal is fit-for-purpose performance. In our manufacturing perspective, the most successful specifications are usually the ones that state substrate condition, exposure class, application temperature, cure expectations, and required finish build clearly enough that the resin system can be matched without guesswork.
Conclusion
Choosing epoxy resin for marine plywood is not just about buying a two-part product with marine wording on the label. It requires matching resin type to function: sealing for moisture control, structural bonding for joints and transoms, laminating for glass reinforcement, and injection or stabilization for recoverable damaged zones. If applicators control moisture, surface preparation, mix accuracy, and recoat timing, epoxy can dramatically improve the durability of boats, decks, and transom assemblies built with marine plywood. The most dependable results come from defining the service conditions first and then asking the supplier for technical data, cure guidance, and formulation logic that fit the actual job.
FAQs
Can I apply epoxy to damp or green plywood?
It is usually better to wait until the plywood reaches a stable, acceptable moisture level because excess internal moisture can weaken adhesion, create blisters, and reduce long-term sealing performance. Moisture-tolerant epoxies can widen the application window, but they do not replace proper drying and verification.
How many coats are normally needed to seal marine plywood?
The exact number depends on plywood porosity, edge exposure, and target film build, but many projects need more than one coat to achieve a continuous barrier, especially on end grain and cut edges. Rather than counting coats alone, inspect absorption and sheen uniformity to confirm full encapsulation.
What viscosity is best for epoxy injection into plywood voids or delaminated areas?
Injection work usually calls for a very low-viscosity system that can penetrate narrow gaps before gelation, but it still needs enough working time to travel through the damaged zone. The right choice depends on void size, temperature, and whether the wood remains structurally recoverable.
When do I need to sand between epoxy coats?
If the next coat is applied outside the recommended recoat window, or if the cured surface shows blush, contamination, or gloss that could reduce mechanical keying, sanding is usually required. Within the proper recoat window, some systems allow direct overcoating after inspection and cleaning as specified.
Is one epoxy system enough for sealing, bonding, and laminating marine plywood?
For small simple jobs, one system may cover multiple steps, but larger or more demanding assemblies often perform better when separate formulations are used for sealing, structural bonding, and fiberglass wet-out. This reduces compromise in viscosity, thixotropy, and cure behavior.
What should I request from an epoxy manufacturer before approving a marine plywood specification?
Ask for viscosity, pot life, cure schedule, recommended substrate preparation, water resistance data, Tg information where relevant, and guidance on fillers, recoat timing, and topcoat compatibility. For critical work, request sample trials or witness-panel procedures so the process can be verified before full application.
Related Reading
- epoxy resin options tailored for wood and boatbuilding projects
- what is marine epoxy resin? uses and selection basics for boats
- how marine-grade epoxy differs for real-world marine use
- 2-part marine epoxy: mix ratios, pot life and cure control for reliable repairs
- osmosis barrier coat epoxy: building hull defenses against osmosis