Understanding Print-Through in Fiberglass Epoxy Laminates
Anyone working with composite construction using fiberglass laminates has likely encountered print-through—those visible waviness or pattern marks on a finished surface that reveal the outline of the underlying reinforcement or core. Print-through on fiberglass epoxy isn’t just a cosmetic concern; it’s a sign of resin selection, application, and cure schedule. Managing thermal control, resin chemistry, and laminate schedule makes the difference between a glass-smooth finish and one marked by visible lines and distortions.
In this guide, we break down print-through mechanisms, practical methods for prevention, and how exotherm, post-cure, and even temperature affect results. Whether you’re building boats, wind blades, or architectural panels, knowing how resin chemistry interacts with process steps lets you avoid disappointing finishes and unnecessary rework.
What Is Print-Through on Fiberglass Epoxy?
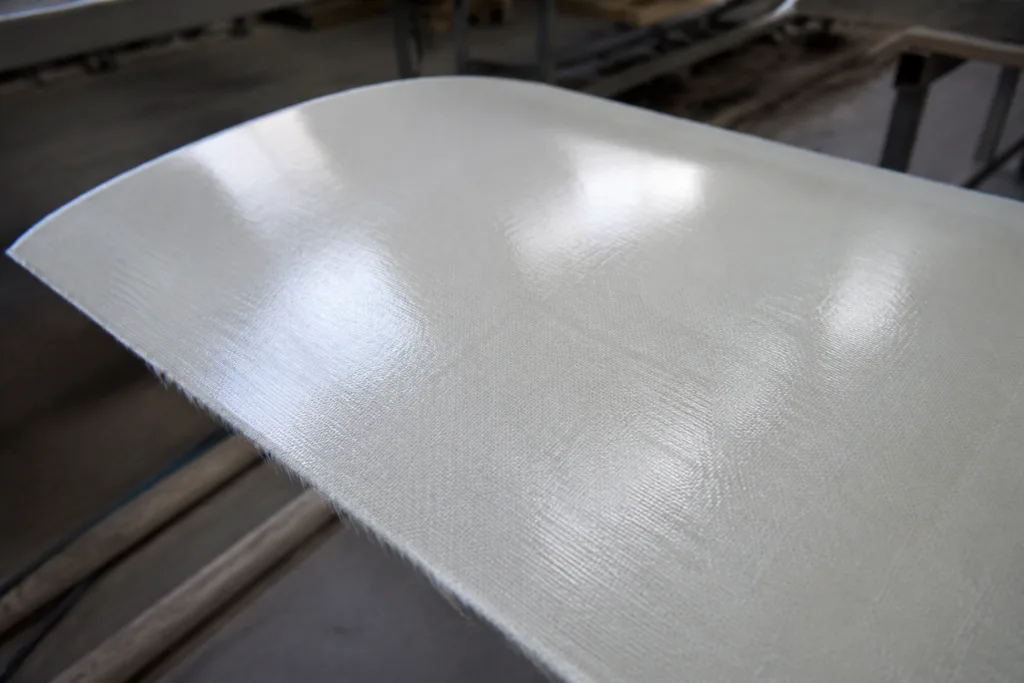
Print-through describes surface imperfections that take the form of visible texture or shadow, echoing the pattern of the fiberglass or core beneath the topcoat. Common types include fiber print, core print, and weave print. Most often, it’s a wavy distortion, sometimes subtle but often catching the light and shadowing at certain angles.
Why Does Print-Through Matter?
Surface quality has a direct impact on finished value. In marine, automotive, or architectural projects, print-through on fiberglass epoxy can be an immediate red flag for quality, even if underlying strength remains unaffected. A mirror-like finish signals both craftsmanship and a well-managed lamination system. For owners, it means less fairing, sanding, and painting—saving labor and materials.
The Science Behind Print-Through: Exotherm, Cure, and Shrinkage
Print-through isn’t just caused by the laminate schedule alone—thermal energy released during the epoxy’s cure (exotherm) is the key driver. As the resin heats and then cools, differential shrinkage at the interface between resin-rich layers and the reinforcement creates invisible tension. These shrinkage stresses become visible as the top layer relaxes, pulling into the texture below.
- The sharper the exotherm spike (temperature rise), the greater the risk of surface marks.
- Faster cure systems often print worse than slow-cure epoxies—especially in thicker builds.
- Poor thermal dissipation (thick pours, fast hardeners) multiplies print-through chance.
Types of Print-Through
Weave Print-Through
The most common, this follows the grid of woven roving or cloth layers. If the first topcoat is too thin, or if too much resin pulls away during cure, weave pattern shadowing results.
Core Print-Through
Usually a larger-scale ripple, this occurs when the pattern of a sandwich core (e.g., PVC foam, balsa, honeycomb) telegraphs through thin laminate layers, especially under post-cure heating cycles.
Bulkhead or Insert Print-Through
When resin-rich or thickened areas above stiffeners, edges, or inserts cure at different rates than the surrounding laminate, they print visibly, sometimes after post-cure is complete.
Role of Exotherm in Resin Cure and Print-Through
“Exotherm” refers to heat generated by epoxy curing. Thick pours or rapid hardener lead to a dramatic temperature spike, increasing the resin’s shrinkage and relaxation—which accentuates print-through. Managed exotherm is the foundation of high-end finishes.
| Resin System | Exotherm Risk | Print-Through Risk |
|---|---|---|
| Fast-Cure Epoxy | High | High |
| Slow-Cure Epoxy | Low | Low |
| Polyester Resin | Very High | Very High |
| Specialty Low-Exotherm Epoxy | Very Low | Very Low |
Laying the Groundwork: Laminate Schedule and Print-Through
A “laminate schedule” specifies how many layers, types, and resin weight of each stage. Strategic scheduling can mitigate print-through:
- Start with a resin-rich “skin coat” or surfacing veil to provide a buffer over structural layers.
- Employ slow-cure, low-viscosity resins for all skin and cosmetic layers.
- Stagger reinforcement seams or transition bulkheads over at least 2-3 plies.
For help understanding optimal resin choices for such schedules, see this Complete Guide to Hand Lay-Up with Laminating Epoxy Resin for Marine Fiberglass.
Temperature’s Impact on Epoxy Cure and Print-Through
Substrate and room temperature influence exotherm and cure rate:
- Cooler workshops slow down cure, reducing exotherm peaks and limiting shrinkage.
- Warm shops (over 30°C) speed cure, sharply increasing print risk.
- If possible, allow base laminates to cure at lower temperature before post-curing at higher temp; this helps control exothermic stress.
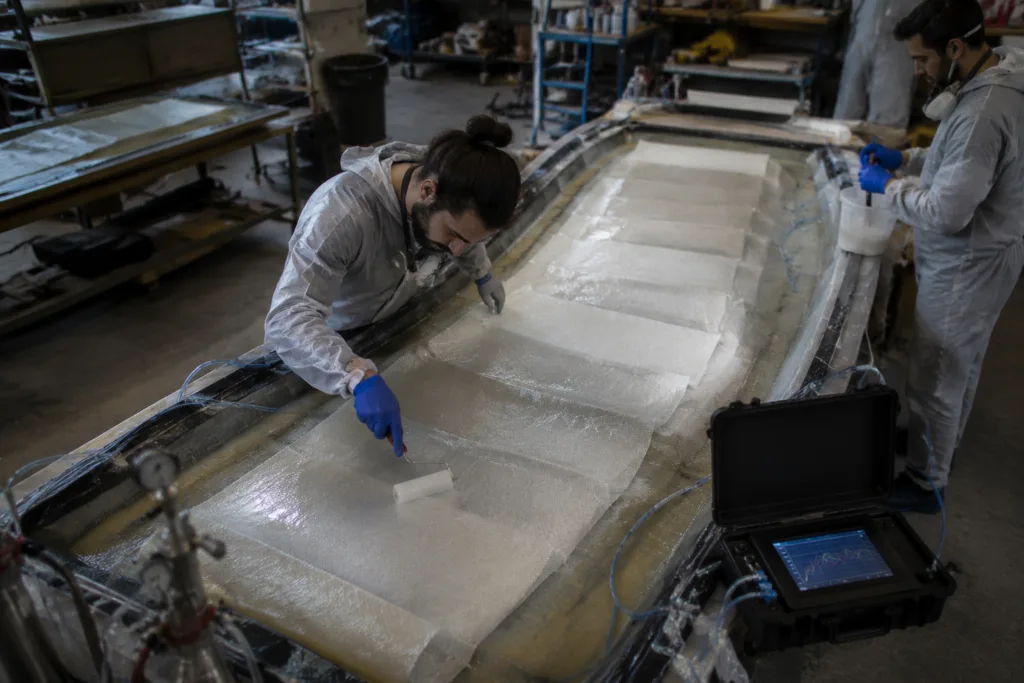
Fairing: When and How to Fair to Reduce Print-Through
Fairing is the art of filling surface lows and removing highs for that “show finish.” The key is timing: always fair onto fully cured laminate, never “green” (uncured or soft) resin. Otherwise, as the core shrinks, print-through can resurface through the faring layer. Use fairing epoxy compounds specifically engineered with reduced shrinkage for best results.
Coating System Selection Matters
Topcoats and primers play a vital role. High-build epoxy surfacers or polyaspartic primers can help mask minor print-through. For critical applications, solvent-free or low-exotherm primers such as ZDS-2060AB deliver high film build and minimal shrinkage, setting a solid foundation for topcoats.
Managing Post-Cure to Control Print-Through
Post-curing means heating a part (typically 40–60°C) after initial hardening, achieving full chemical cross-linking of the epoxy. This step can minimize future movement but must be controlled:
- Allow laminate resin to gel and reach room temp cure before post-curing.
- Ramp up temperature slowly (not more than 10°C/hour) to avoid uneven expansion, which will exaggerate print-through.
Where possible, apply fairing and high-build coats after post-cure. This prevents resin shrinkage from telegraphing patterns to finished surfaces.
Best Practices to Prevent Print-Through
- Use Epoxy Resin Formulated for Low Exotherm: Always check product data for cure profile. For thicker applications, use slow-hardener blends or special low-shrink epoxies.
- Careful Laminate Stacking: Alternate cloth lay-up with surfacing veils, especially near the cosmetic face.
- Batch Size and Pot Life Discipline: Mix small batches to minimize in-cup exotherm. Never pour thicker than data sheet limits (often 5–8mm per layer for standard epoxies).
- Thermal Management: Move freshly cast parts aside from heat sources or use fans to maintain even temperature.
- Allow Full Cure Before Cosmetic Work: Do not sand, fill, or prime until the resin has fully post-cured (verify with a fingernail test or barcol hardness).
Common Mistakes That Cause Print-Through
- Pouring all layers in one go for “speed”—leading to uncontrollable exotherm, shrinkage, and worse print-through.
- Using high-reactivity resins on large surfaces without heat management.
- Fairing onto uncured substrate, which later shrinks and causes core patterning to appear.
- Skipping post-cure, only to find surface prints developing weeks later in service heat or sunlight.
Practical Steps: Print-Through on Fiberglass Epoxy
Let’s break down a real-world approach for high-finish fiberglass laminates:
- Apply a thin, uniform surfacing veil with slow-cure epoxy for the first layer.
- Build primary structure with reinforcement, carefully observing ambient temperature and batch size limits to avoid hot spots.
- Allow each stage to reach a full cure before continuing. If you can leave a thumbnail impression, it’s not ready.
- Post-cure at a ramped temperature profile after final laminate set.
- Only then, begin fairing with purpose-formulated fillers.
- Sand, check for print, and repeat any fairing as needed.
- Finish with a high-build primer and, finally, topcoat for lasting gloss.
Resin Choice: The Heart of Print-Through Control
Your resin selection is critical. High-performance laminating epoxies minimize shrinkage and exotherm. For instance, ZDSpoxy found during R&D that adjusting hardener ratio, using low-viscosity base resin, and introducing staged layer builds dramatically reduced print-through—even when using lower-cost fiberglass mat, compared to a pure woven cloth-only schedule.
Batch-to-batch consistency also matters. Inconsistent viscosity or hardener reactivity can lead to unpredictable shrinkage and surface tension. That’s why manufacturers maintain tight QC during production, spot-checking cure profiles and blend uniformity before large-cast runs.
Fairing Compound Selection for Long-Term Results
Many project failures surface months later as fairing putty shrinks or releases compressive stress from the substrate below. Choose epoxy-based fairing fillers over polyester pastes. For fine detail repair after initial fairing, low-shrink, flexible putties such as ZDS-189 are formulated to maintain flatness and fill minor pinholes without slumping or pull-back.
Lamination and Infusion: Achieving Superior Surfaces
Resin infusion and other advanced manufacturing methods bring new opportunities (and pitfalls) for print-through. The ability to precisely meter resin, control temperature ramps, and minimize handling during cure makes these methods a gold standard. For a deeper dive into vacuum infusion and how resin choices affect print-through, see Boatbuilding Mastery: Resin Selection and Process Control for Flawless Vacuum Infusion.
Key Takeaways: Print-Through Prevention Checklist
- Prioritize slow-cure, low-exotherm epoxies—especially for cosmetic faces.
- Design laminate schedules with built-in surfacing veils and thick, sandable lay-ups.
- Respect cure schedule—never rush fairing or topcoating steps.
- Manage temperature and batch size to keep exotherm in control.
- Apply fairing only to fully cured, post-cured base laminates for lasting finish.
- Invest in resin systems with quality control documentation and proven low-shrinkage data.
Print-Through on Fiberglass Epoxy: Expert Recommendations
Print-through is not an inevitable flaw; it’s a controllable outcome. By selecting the right resin, using a strategic laminate schedule, minding exotherm, and following proven post-cure and fairing practices, you secure the high-gloss, wave-free surfaces demanded in marine and construction settings. Even budget-friendly projects can see dramatic improvements simply by adopting better cure schedules and thermal management. With a practical, knowledge-driven approach, your next fiberglass epoxy project can remain free of surface telegraphing for the long haul.
Frequently Asked Questions
What causes print-through on fiberglass epoxy laminates?
Print-through is mainly caused by resin shrinkage during cure, exothermic heat, and insufficiently thick or resin-rich surface layers. Fast cure and high temperature increase the effect.
How do I prevent weave or core print-through on my finished laminate?
Prevent print-through by using slow-cure, low-exotherm epoxy, including surfacing veils, and allowing full cure before fairing and priming. Control temperature & batch size as a rule.
Is polyester resin more prone to print-through than epoxy?
Yes. Polyester resin’s high shrinkage and exotherm make it much more prone to print-through, especially on cosmetic faces, compared to properly formulated epoxy systems.
When should I perform fairing on epoxy laminates to minimize print-through?
Only fair after the laminate is fully cured and, ideally, post-cured. Early fairing over green or soft laminates can allow later shrinkage and telegraph core or reinforcement patterns.
Can post-curing eliminate existing print-through marks?
Post-curing can reduce some latent shrinkage, but once print-through appears, it’s usually permanent unless mechanically removed by fairing and priming steps.
What is the best resin type for reducing print-through?
Specialty low-exotherm, slow-cure epoxies are best to reduce print-through. Choose systems with proven records in cosmetic marine or architectural applications for optimal results.
Related Reading
- Master the Art of Thick-Pour Epoxy without Overheating
- Eliminate Bubbles and Pinholes with Expert Lamination Tactics
- Solve Boat Repair Issues by Avoiding 7 Major Epoxy Delamination Traps
- Marine Laminating: The Ultimate Guide to Resin and Lay-Up Choices
- Keep Your Finish Clear: Advanced Methods for Glassy Marine Epoxy Surfaces