Understanding Mold Smell After Rain and Wall Damp After Rain Causes
Experiencing a mold smell after rain or noticing wall damp after rain causes frustration and confusion for many property owners. While waterproofing coatings can block water on the surface, it is crucial to first diagnose the true source of moisture before any repair or renovation. This article uses a practical diagnostic route: focusing on how, where, and when wetness appears to pinpoint the water source—before any expensive treatments.
Recognizing the Signs: When Does Dampness Appear?
Rain-related wall dampness and mold tend to follow clear patterns. Recognizing these signs is the first step in investigation—one that ZDSpoxy engineers and site teams emphasize on every project. Your diagnosis begins when you ask: Is the wall only wet after rain, or does it stay damp all the time?
Pattern #1: Dampness Appears Only After Rain
Typically, wet walls and a musty smell only after rain suggest external sources: balcony, terrace, or exterior wall water ingress. Rain triggers visible wet spots, swelling paint, and odor.
- Key clue: No dampness during dry periods or with indoor plumbing use, but wall is wet within hours of rainfall.
- Next steps: Photograph water tracks, peeling paint, or new stains after the rain stops. Pay special attention to areas beneath windows, behind built-in cabinets, or shared exterior walls and exterior wall renovation zones.
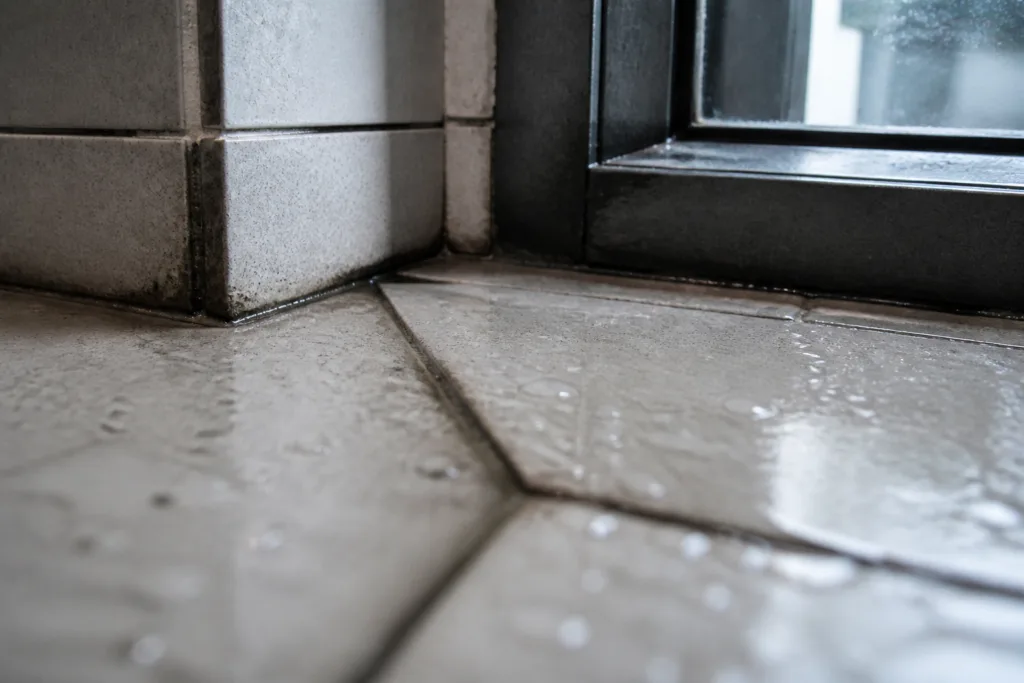
Pattern #2: Dampness Is Constant, Not Rain-Dependent
If the wall is always wet—regardless of outdoor weather—the cause often lies with plumbing/gas lines, air conditioning pipes, or embedded pipes. Water may seep from a slow leak or from condensation due to humid air meeting cold surfaces.
- Key clue: Wetness does not get notably worse after rain. Instead, corners or lower wall areas stay moist morning to night.
- Next steps: Photograph pipe entry points, chase covers, and floors around any water fixtures.
- Tip: Use tissue or kitchen roll to check for invisible leaks. Press firmly onto suspected damp locations. Look for cold condensation on metal fixtures or floor tiles.
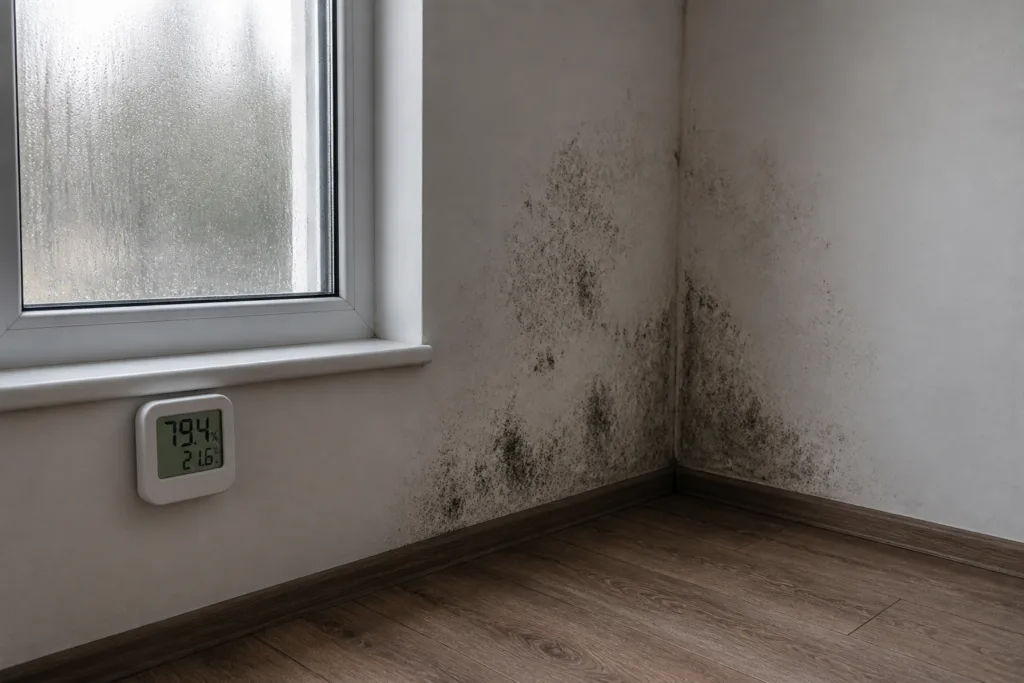
Pattern #3: Mold in Corners or on Hidden Walls
Stubborn black mold patches in corners or behind furniture—even if the main wall is visually dry—nearly always point to poor ventilation plus ongoing moisture in the substrate or plaster. On-site, ZDSpoxy teams observe this pattern in closets and unventilated rooms—often combined with previous incomplete waterproofing renovation.
- Key clue: Mold grows in dark, enclosed, or shielded spots rather than open, sun-lit walls.
- Next steps: Photograph both the moldy surface and the layout of room—especially nearby closets, packed shelving, or unventilated corners. Remove objects for photos to show scale.
First Priority: Always Identify the Moisture Source
No matter the symptom—mold smell, soft walls, new stains—lasting results start with source control. Do not rely on fresh wall coatings to treat active moisture. They may lift, bubble, or fail. Always isolate where the water comes from first.
- If moisture comes after rain, focus inspections on windowsills, balcony floor edges, terrace wall bases, parapet flashings, and exterior wall cracks. For these structures, system-level solutions like terrace balcony outdoor floor and facade coatings may be part of your treatment plan.
- For constant wetness, check piping, floor drain connections, and aircon routes before considering a interior wall renovation. Plumbing repairs may precede any surface fixes.
Common Entry Points: Where Rainwater Seeps In
When mold odors intensify after rainfall, trace likely entry points:
- Cracked exterior wall render: Exposed concrete or brick soaks up rain.
- Poorly sealed window frames: Water bypasses caulking/foam and enters along frame or under sill.
- Open balcony edges: Unprotected tile joints, corners, and skirting let water run under flooring or through structural gaps.
- Clogged or missing rooftop drains: Pooling water “backs up” behind facade, down into walls.
| Entry Point | What to Look For | How to Photograph |
|---|---|---|
| Exterior wall cracks | Hairline or open cracks, efflorescence | Wide shots of wall, close-up of cracks |
| Balcony joints | Soft grout, dark/wet tile edges | Flash on, angle to show water trails |
| Window frames | Stains under frames, peeling paint | Frame edge under window, full wall overview |
| Roof drains | Water pooling, debris blocking | With drain grate removed, show slope/backup |
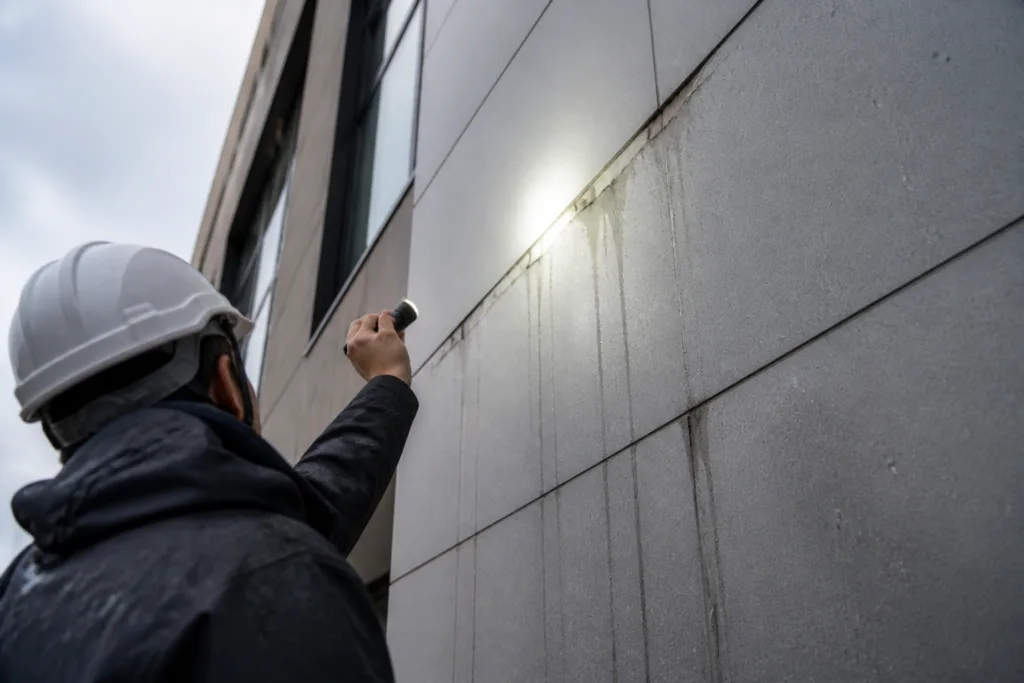
How to Perform a Reliable Moisture Investigation
ZDSpoxy crews prioritize evidence gathering and methodical analysis:
- Start investigation right after rain when fresh water marks are visible.
- Use a flashlight at a low angle to highlight moisture reflections or surface changes.
- Take at least three photos per area: one wide showing full wall, one close-up on defect, one showing surroundings (including object layout, floor, ceiling, windows, etc.).
- Feel for softness, temperature changes, bubbling, and hollow sounds when tapping paint—it may mean delamination due to underlying water vapor or salt movement.
External Wall & Balcony Water Ingress
External wall and balcony areas rank top for rain-derived mold and odor. Even small cracks or failed grout lines can move surprising amounts of water, especially during heavy storms or wind-driven rain. The connection between balconies, terrace flooring, and exterior wall coatings is especially important.
- Water can track along reinforcement steel or insulation panels, surfacing meters away from its entry point.
- Document each layer and entry zone—tile, membrane, screed, wall base.
Constant Damp: Plumbing Leaks, Condensation, and HVAC
If you have ruled out rain as a trigger, investigate plumbing. Tiny leaks in copper or PVC, poorly insulated AC lines, or missing vapor barriers inside the wall assembly can be invisible but introduce gallons of moisture each day. Diagnosing pipe leaks may involve plumber consultation and reopening wall chases for inspection.
- Moisture meters can help, but simple comparison of wet and dry days is often enough.
Condensation and Indoor Humidity: Hidden Dangers
High indoor humidity (often above 65%) leads to condensation on cold surfaces—especially in hidden corners, behind wardrobes, or where ventilation is blocked. Trapped air leads to stubborn mold and musty smells that appear despite dry weather outdoors.
- Thermal bridging (cold spots) on concrete columns, window frames, and wall-floor intersections are top spots to check.
Areas Most at Risk: Corners, Closets, and North Walls
These micro-environments rarely dry rapidly following rain. Walls that rarely see sunlight—especially on the north side—are naturally cooler and hold moisture longer. Add blocked air flow (packed furniture, heavy curtains), and these zones become permanent homes for mold.
- Remove all items and photograph the empty area to assess true wetness.
Recording Evidence: Photographing for Accurate Diagnosis
Good photos are crucial if you need support from renovators or insurance adjusters. ZDSpoxy recommends clearly labeling each photo by angle, date, and notable features. Direct feedback from actual renovation sites proves time-stamped images support both root cause tracking and later warranty claims.
- Take before, during, and after repair photos. Include close-ups (showing damage), context shots (showing room, wall, or facade layout), and any features (windows, drains) related to water ingress patterns.
When to Involve Experts or Testers
Call for professional assessment when unsure about pipe routing, wall structure, or water entry. For difficult wall damp after rain causes, leak testers use colored water, smoke, or pressure tests to simulate rain, and moisture meters to diagnose hidden wet layers. Their reports often specify exact remediation steps—saving time and money in the long run.
Choosing and Timing Waterproofing Renovation Solutions
Only after the root cause has been found, dried, and repaired, should you consider applying new coatings or waterproofing renovation solutions. ZDSpoxy emphasizes substrate moisture checks before resin application—high background water leads to adhesion failure or blisters even with premium epoxies or polyurethanes. When using waterproofing systems for terraces or balconies, always specify the right primer, crack-bridging layers, and tested finishes for your zone’s conditions.
Poor Ventilation: The Surprising Mold Generator
Even after water entry is solved, poor air flow lets surface mold return—especially in corners, behind cabinets, and blocked rooms. Opening doors regularly, adding vents, or low-wattage fans helps keep surfaces dry. Long-term, solutions may include vapor-permeable coatings or switching to less moisture-absorbent materials.
Surface Preparation: Ensuring Lasting Results
Before any coating, ZDSpoxy technical teams meticulously prepare every surface. This includes sanding off loose paint, removing salt deposits, opening cracks for repair, and drying the substrate fully. Moisture content is confirmed using meters or tape tests. Only then can prime coats, patch systems, and flexible finishes be applied for true durability.
Should You Use Waterproof Coatings Before Stopping the Leak?
Never apply waterproof or decorative coatings to an actively wet wall. Even “breathable” systems trap capillary water, increasing risk of mold under the finish or rapid coating failure. Proper order: dry out, fix source, then coat and finish. In areas like terraces or facades, select resin or membrane systems according to expected movement, joint details, and real exposure levels.
Documenting and Communicating with Renovators
Clear diagnosis speeds repair and lowers costs on wall damp after rain causes. Use your photo evidence to show contractors exactly what needs fixing. Make sure that their scope includes preventive re-sealing of nearby joints, corners, and any critical balcony or wall changes—not just cosmetic touch-ups.
Summary Table: Diagnostic Pathways for Different Scenarios
| Situation | Possible Source | First Action | Photo Focus |
|---|---|---|---|
| Wet only after rain | Exterior/balcony leak | Check walls, sills, joints right after rain | Cracks, window frames, tile edges |
| Always wet | Plumbing/condensation | Test pipes and drains, check insulation | Pipe entries, floor corners, fixtures |
| Mold in corners | Poor ventilation, cold bridge | Remove furniture, measure humidity | Enclosed corners, behind objects |
Post-Diagnosis: What to Expect from Coating and Renovation Works
Once leaks are fixed, expect the underlying structure to take several days—sometimes weeks—to dry fully, depending on weather, insulation, and material thickness. Rush jobs or skipping the drying phase often lead to surface failures. Only apply coatings, grouts, or decorative finishes when dry—the ZDSpoxy factory-standard workflow always includes moisture checks before delivery for warranty protection.
Mold Smell After Rain, Wall Damp After Rain Causes
To eliminate mold smell after rain and fully resolve wall damp after rain causes, always use a step-wise diagnosis: match the symptom pattern, document with photos, isolate the source, and only then commit to repair or renovation. This approach saves cost, ensures longer-lasting building health, and prevents repeat issues. Trusted engineering practices, combined with tested waterproofing and ventilation solutions, offer peace of mind for both owners and renovation teams alike.
Frequently Asked Questions
Why does my wall smell moldy only after rain?
This usually signals water entering from outside, like a terrace, balcony, or cracked exterior wall. Rain drives moisture through gaps, causing hidden mold growth and odor.
How do I tell if the damp is from pipes or rain?
If walls only get wet after rain, it’s likely from outside water ingress. Constant wetness points to plumbing leaks or condensation inside the wall structure.
What photos should I take when diagnosing wall damp?
Shoot wide, close-up, and context images showing walls, corners, window frames, and any visible defects right after rain. Include date and angle for each shot.
Can I just paint over moldy or wet spots?
No. Applying coatings without stopping active moisture or fixing the source makes failures likely. Always address the underlying leak first for durable results.
What is the best way to dry out walls after leak repairs?
Ventilate rooms, use fans or dehumidifiers, and remove coverings to accelerate drying. Only apply coatings or finishes once moisture readings are in safe range.
How do I stop mold from growing back in corners?
Improve ventilation, reduce humidity, and keep corners clear. Breathable finishes or anti-mold additives can help, but airflow is key for long-term control.
Related Reading
- Essential Guide to Waterproofing Corners, Joints & Drains for Lasting Repairs
- Is Coating on Damp Concrete Ever Safe? What Every Renovator Must Test First
- How Thick Should Waterproof Coatings Really Be? Step-by-Step Application Guide
- Diagnosing Cracks: The Right Techniques for Hairline and Moving Crack Waterproofing
- Recoating Old Surfaces: Judgement Flowchart for Smart, Reliable Upgrades