Understanding Waterproofing Corners and Joints, Drain Waterproofing Detail
When it comes to durable construction, small details like corners, joints, drains, thresholds, and expansion joints often determine whether a waterproofing system succeeds or fails. Surprisingly, these “hidden” points are where leaks and cracks almost always start. This article examines why waterproofing corners and joints, drain waterproofing detail, and other edge elements present unique challenges—and how to address them systematically for long-term durability.
Why Corners, Drains, and Joints Are Leak-Prone
Let’s face it: water seeks out the path of least resistance. Corners, edges, and junctions bring together multiple materials, changes in angle, and see both structural movement and foot traffic. Drains concentrate flow, thresholds transition levels, and expansion joints constantly move. Each of these creates points of stress and potential separation. Add surface irregularities, inadequate preparation, or misguided product selection—even the smallest flaw can result in leaks or early failures.
The Physics of Water Infiltration
Water is stubborn: capillary action will draw even tiny droplets into hairline cracks that form at wall-to-floor transitions or around drain edges. Gravity steers surface water downslope toward drains and perimeter joints, making these details the first to fail. Repeated wetting and drying, temperature swings, and building movement intensify the risk over seasons and years.
Common Failure Types at Detail Locations
- Cracks or delamination at wall/floor junctions
- Loss of bond around metal drains or thresholds
- Sealant shrinkage or detachment in expansion joints
- Ponding water at low spots where changes in slope occur
- Mold growth at persistent leak points
The 4-Step Standardized Detail Process
From years of field and lab testing, the path to reliable waterproofing in these difficult areas comes down to four repeatable steps:
Step One: Meticulous Cleaning
Remove all debris, dust, oil, laitance, release agents, and loose concrete with mechanical means, then vacuum the area. Around drains or metal details, use a wire brush. For tile or resin overlays, remove previous sealants or coatings to sound substrate.
Step Two: Precision Repair
Repair cracks or voids with a suitable patching compound—ideally two-component epoxy or polyurethane for strength and chemical compatibility. For moving joints, make sure existing sealants are elastic and bonded. Fill bugholes, honeycombing, or surface scaling as needed.
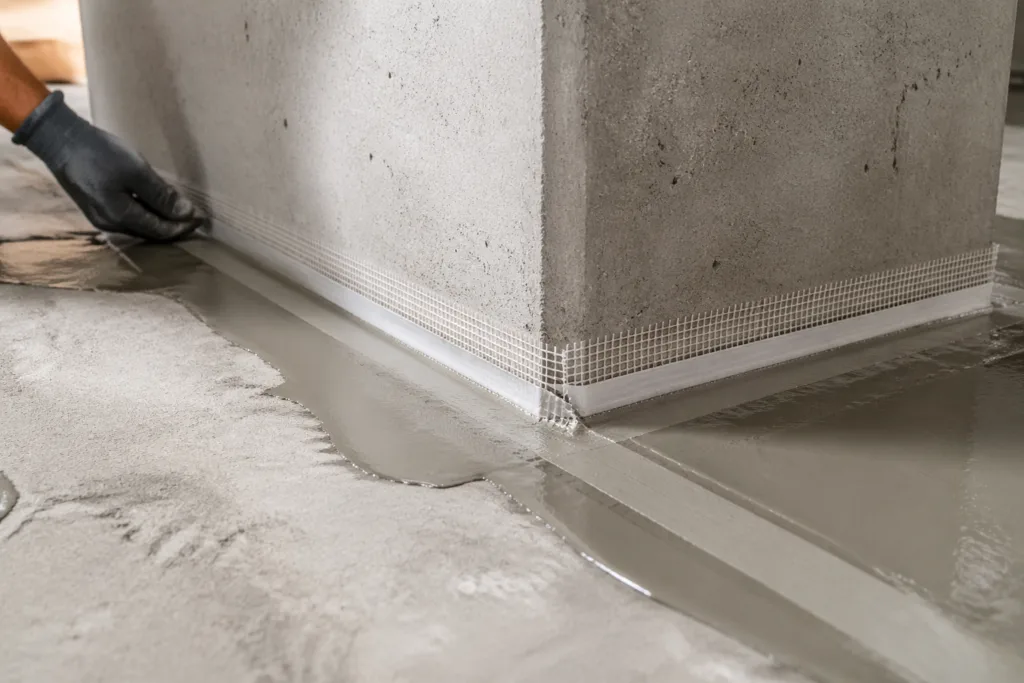
Step Three: Strategic Reinforcement
Install reinforcing bandages (like non-woven fabric tape), corner fillets, or special mesh over the cleaned and repaired area. This bridges gaps, absorbs movement, and prevents stress concentration—particularly vital at 90-degree transitions and drain surrounds.
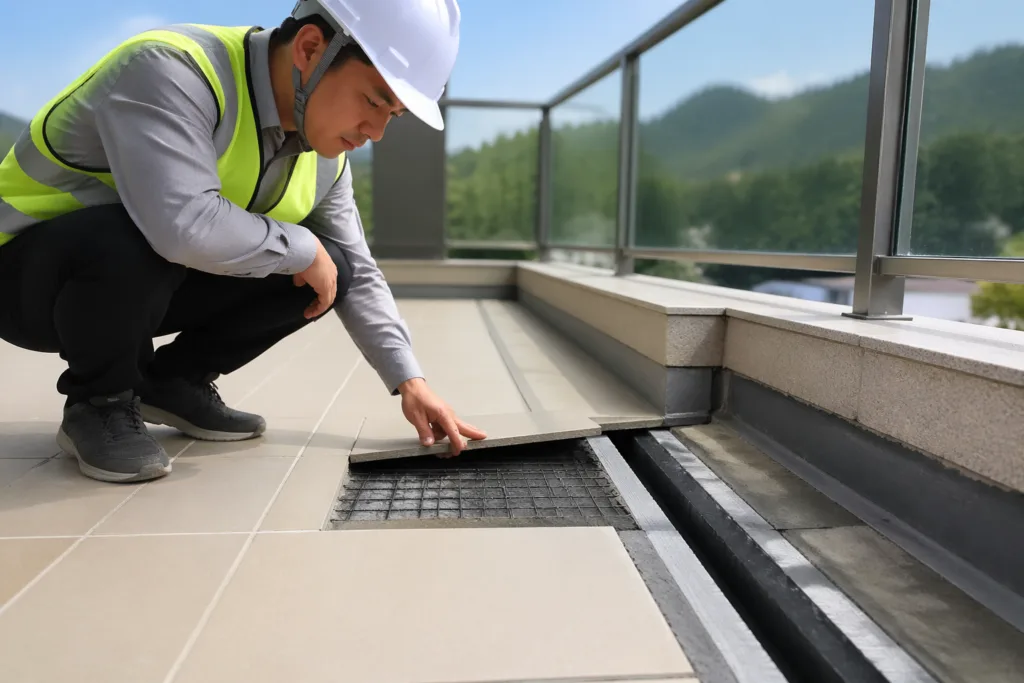
When working on exterior balconies, terraces, or exposed wet areas, refer to our solutions on terrace balcony outdoor floor for compatible reinforcement products and additional strategies.
Step Four: Continuous Top Seal
Finally, apply your waterproofing membrane or coating—epoxy, polyurethane, polyaspartic, or hybrid—in a seamless manner to overlap the reinforced zones by at least 70mm. At drains, slope coatings carefully and ensure membrane is fully wrapped and continuous under grates or hardware. Edges must be sealed and integrated with the main field layer to eliminate termination points.
Critical Locations: What to Watch For
Wall-Floor Joints
These corners experience the brunt of slab movement and frequent wetting. Always create a ‘cove fillet’ shaped with epoxy or compatible mortar. Properly embedded tape in the corner prevents fissure propagation.
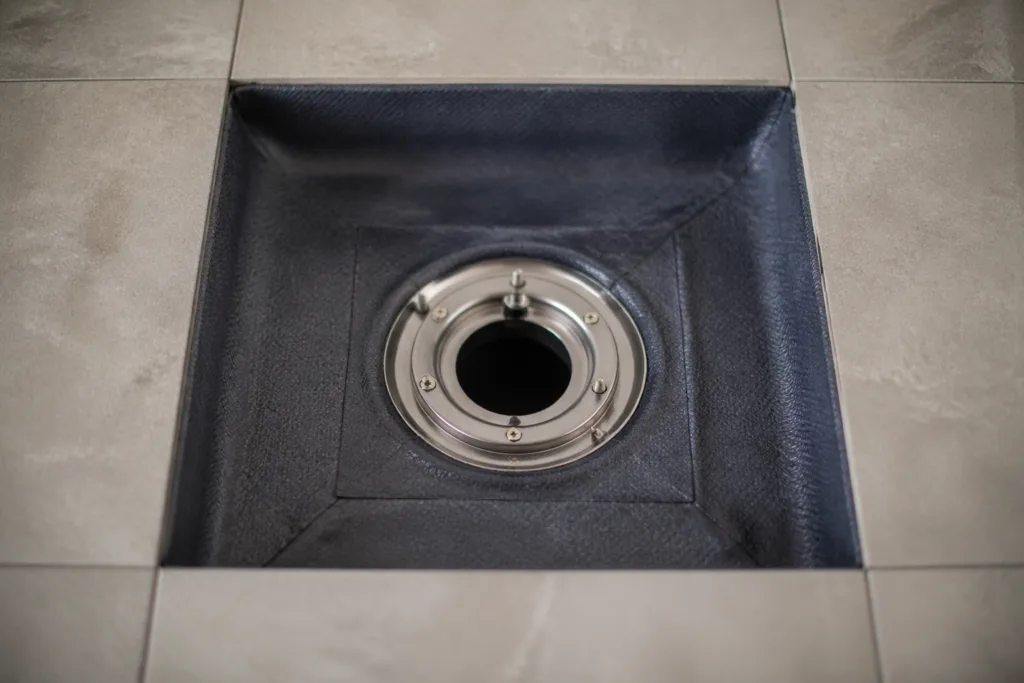
Drains and Pipe Penetrations
Waterproofing detail around drains is never just cosmetic. Roughen plastic or metal, fill gaps with a high-bond paste, and use an elastic reinforcement collar. Consult kitchen bathroom tile waterproofing for solutions dealing with complex or multi-drain scenarios in wet rooms and kitchens.
Expansion and Control Joints
These need to accommodate both movement and waterproofing. Always apply a compressible backer rod, bond-breaker tape, and an elastic sealant (not just a rigid membrane). Details are especially important in high-traffic areas like pool decks—see insights at swimming pool waterproofing for enhanced solutions.
Thresholds at Entrances and Doorways
Install angled transition strips, reinforce edges, and always slope away from interior spaces so that even wind-driven rain cannot bypass the membrane.
The “Photo Point Checklist”: Capturing Critical Details
Every inspection should include a “photo checklist” documenting these hidden detail points before and after waterproofing:
- All wall-floor and wall-wall intersections (corners)
- Each drain: flag each type (linear, point, balcony, shower)
- Every expansion joint, control joint, and crack repair zone
- All penetrations for pipes, wiring, HVAC, or balustrades
- Thresholds, steps, and door transitions
- Return walls at parapet or curtain wall connections
Common Mistakes in Waterproofing Details (And How to Avoid Them)
- Skimping on cleaning: residue or dust under membrane always causes weak bonding.
- Ignoring repair: applying coatings without solid, crack-free substrate guarantees early failure.
- No reinforcement: trying to “paint over” sharp inside corners leads to splits or pinholes.
- Poor termination: membranes cut off at drain edges or under hardware quickly delaminate.
- Low overlap: not bridging details by 75-100mm leaves an unprotected thin edge zone.
Material Choices: System Compatibility Is Critical
Not all waterproofing products work with every joint or corner situation. For example, stiff epoxies need more flexible tapes at movement zones; fast-cure polyaspartics should never be installed over uncured (green) concrete; urethane sealants demand a clean, dry bond line. When in doubt, always confirm compatibility, or reach out to technical teams for a site-specific solution.
How ZDSpoxy Engineers Manage Details On Site
From a technical manufacturing perspective, ZDSpoxy often advises that batch mixing, pot life control, and detailed substrate moisture testing are essential during corners and joint work. We know from trials that mixing margin for error is smallest in detail areas, as off-ratio mixes or undercured membrane will almost always first show up as a crack in the wall/floor joint or leak at a drain edge. Our field teams also regularly test onsite bond strengths via pull-off adhesion testers at these exact points—not just in the field slab—before membrane is covered by tile or overlay. Prevention beats patching every time.
How to Inspect and Test for Detail Failure
Adhesion Testing
Use a simple “tape test” or full mechanical pull-off to ensure membranes are fully adhered (target >1.5MPa) at corners and around drains. If membrane tears or pulls free, address with more rigorous prep and compatible products.
Moisture and Drainage Checks
Test slope to drain, pond water for 24-48 hours to confirm there are zero low points and that water drains effectively from all corners.
When to Use Primers, Bandages, or Backer Rods
Primers are essential over all concrete and around metals. Bandage tapes should go under membranes at changes in direction. Backer rods are non-absorbent foam rods inserted into movement joints—never leave these joints fully filled with rigid mortar, as subsequent cracking or water tracking is certain.
Drain Waterproofing Detail: Process in Practice
The best method around drains and wall-floor junctions is:
- Clean and roughen all drain surfaces and adjacent substrate.
- Seal or patch gaps with an elastic epoxy or polyurethane paste.
- Install a flexible tape bandage that loops both under and around all visible drain edges.
- Apply continuous membrane flush up to and slightly over the drain mouth; pre-sloped for flow.
- Double-check bond before grates/covers are reinstalled.
Ideal Environmental Conditions for Detailing
Work only at substrate temperatures above 8°C and below 30°C, and do not proceed if humidity or dew point will cause condensation during curing.
Detailing in Outdoor, Wet, or Exposed Locations
For details exposed to UV, rain, or freeze/thaw, use high-flex, UV-stable membranes and reinforcement. Refer to hybrid or polyaspartic innovations for fast return to service in terraces and pool zones.
Repair Techniques for Existing Leaks at Details
- Identify source with dye tests or flooding
- Open up failed detail back to sound substrate
- Follow clean/repair/reinforce/seal steps exactly
- Record before/after photos for documentation and warranty review
Specifying Products for Each Detail
Consider system requirements: traffic load, chemical exposure, mechanical cleaning, expected movement, and waterproofing layer thickness (see our Waterproof Coating Thickness Guide). Always match primer, bandage, membrane, and topcoat as a tested system.
Documentation: Why Project Records Matter
Set up photo logs and material batch traceability for every major phase: substrate prep, crack/joint repair, reinforcement install, topcoat/finish. This provides defense for warranty claims and return visits.
Summary: Risk Reduction in Waterproofing Corners and Joints, Drain Waterproofing Detail
Details make or break any waterproofing installation. Rigorous cleaning, surface repair, reinforcement, and careful top sealing eliminate nearly all failure points. Documenting, testing, and following step-by-step protocols gives you years—sometimes decades—of worry-free performance.
Frequently Asked Questions
Why are corners and joints more prone to leaks than flat surfaces?
Corners and joints bring together different materials and movement areas—cracking, stress, and improper sealing make these the most common leak initiation points.
Can I just use a flexible sealant in corners instead of full detail reinforcement?
No. While flexible sealants help close gaps, proper reinforcement tape and a seamless waterproof topcoat are vital for bridging movement and preventing future cracks.
How often should photo inspections be carried out for detail zones?
At a minimum: before prep, after repairs, post-reinforcement, and finished topcoat. This creates an auditable record in case of warranty claims or disputes.
What’s the biggest mistake made in drain waterproofing details?
Stopping membrane at the drain edge instead of wrapping and overlapping fully—this nearly guarantees edge leaks or eventual membrane detachment.
Can I install waterproofing details on slightly damp concrete?
It depends; most epoxy and polyurethane systems demand thoroughly dry substrate. Some newer technologies tolerate limited dampness, but verify manufacturer recommendations first.
Do all systems require both tape and liquid waterproofing at details?
Best practice combines them in critical areas for redundancy—tape bridges cracks and transitions, liquid ensures a seamless seal and chemical resistance.
Related Reading
- How to Prevent Cracking in Epoxy Floors with Proper Joint Management
- Choosing Ideal Waterproof Membrane Thickness: Application Guide
- Repair Solutions for Hairline and Moving Cracks in Wet Areas
- Achieve Safe, Non-Slip Waterproofing for Pools, Bathrooms, and Balconies
- Complete Guide to Resin-Based Wood Floor Upgrades